47(%$5'()70&,10$/,(061'(.$&(44$'74$
(2@A6;4A52<=2?.A6<;<3A529<08
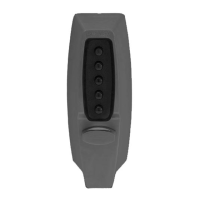
1. Enter the factory-set combination:
Depress buttons 2 and 4 at the same
time (release), then depress button 3
(release). You should feel a slight click
as each button is depressed (see figure
7-1).
2. Turn the outside knob clockwise to the
stop position and hold. Make sure the
latch is fully retracted and flush with the
latch face plate.
3. Release the knob. The latch should
return to the fully extended position.
4. Turn the inside drive sleeve (A) to the
left to stop position and hold (see figure
7-2). The latch will retract until it is flush
with the latch face plate. Release the
sleeve — the latch should return to the
fully extended position. Repeat by turn-
ing sleeve to the right.
1. Ponga la combinación que viene de
fábrica: oprima los botones 2 y 4 al
mismo tiempo (suelte); luego oprima el
botón 3 (suelte). Con cada uno de los
botones que apriete, deberá oir un
chasquido (véase la ilustración 7-1).
2. Haga girar la perilla hacia la derecha
hasta que se detenga y manténgalo en
esa posición. Asegúrese de que el
pestillo queda totalmente replegado y al
ras con la placa de recubrimiento.
3. Suelte la perilla. El pestillo debería
volver a salir completamente.
4. Haga girar el eje interior del (A) impulsor
hasta donde se pare y manténgalo en
esa posición (véase la ilustración 7-2).
El pestillo se replegará hasta quedar al
ras con la placa de recubrimiento.
Suelte el eje y el pestillo debería volver
a salir completamente. Repita, girando
la perilla a la derecha.
056$.$&,@0'(.$2.$&$'(4()7(4;1
;@A.996;4A52?26;3<?06;4=9.A2
1. Place the reinforcing plate (A) over the
inside drive sleeve (B) as shown in fig-
ure 8-1.
2. Insert the two 2
1
⁄2" (64 mm) screws (C)
(item “m” on the checklist) through the
reinforcing plate into the
1
⁄4" (6 mm) holes
drilled in the door.
3. Tighten the screws to secure the lock
housing to the door. The reinforcing
plate (A) should be parallel with the
edge of the door and centered around
the inside drive sleeve (B).
#<A2 Using the thread ring to center the
reinforcing plate (A) will also aid when
installing the inside trim plate in step 10,
page 18.
1. Coloque la placa de refuerzo (A) sobre
el eje interior del impulsor (B), como lo
muestra la ilustración 8-1.
2. Inserte los dos tornillos de 2
1
⁄2 pulg.
(64 mm) (C) (artículo “m” en la lista de
verificación) a través de la placa de
refuerzo, en los agujeros de
1
⁄4 pulg.
(6 mm) que se hicieron en la puerta.
3. Apriete los tornillos para fijar la caja de
la cerradura a la puerta. La placa de
refuerzo (A) debería quedar paralela al
borde de la puerta y centrada alrededor
de eje interior del impulsor.
16$ un aro roscado para centrar la placa
de refuerzo (A) también ayudará a
instalar la placa interior, descrita en el paso
10.