7
The content that is controlled will depend on the fil-
ter type specified by the program.
By adjusting the filter resonance level, you can
increase or decrease the resonance level to add a
unique character to the sound.
Adjusting the cutoff frequency of the high-pass filter
will modify the fullness of the sound from which the
low frequency range has been filtered out.
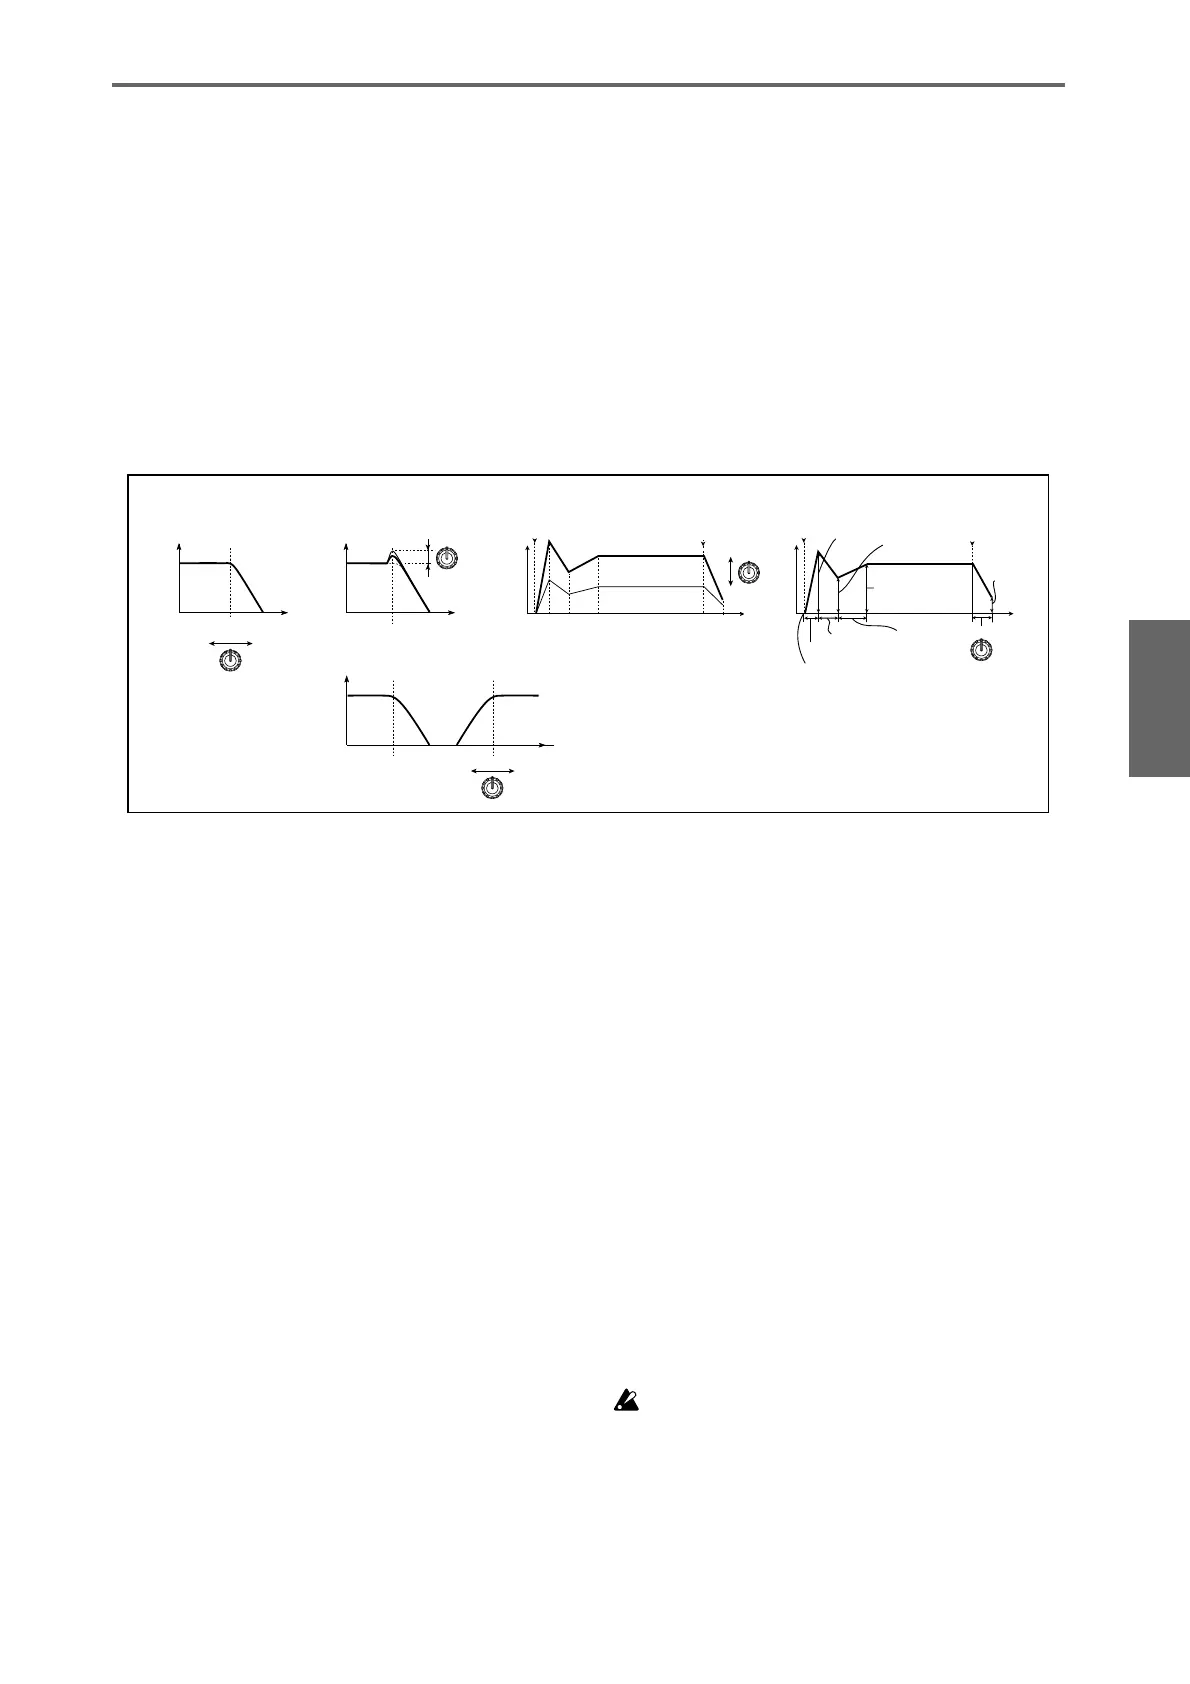
Knob [3]: EG-INTENSITY
Adjusts the filter EG intensity (the depth at which
the filter EG is applied).
Rotating the knob will affect the depth of the filter
EG. Normally, rotating the knob toward the left will
apply the filter EG less deeply, and rotating it
toward the right will apply the filter EG more
deeply. Since the filter EG will operate based on the
cutoff frequency of the filter, knobs [1] and [3] will
work together to control the tonal changes produced
by the filter.
Knob [4]: EG-RELEASE
Adjusts the release times of the filter EG and the
amp EG. This will determine the amount of time
from note-off until the sound disappears.
When you adjust the knob, the release times of the
filter EG and the amp EG will change. Normally,
rotating the knob toward the left will shorten the
release time, and rotating it toward the right will
lengthen the release time.
B-mode controls
6
Press the [REALTIME CONTROLS] key to make
the “B” LED light.
7
Use the REALTIME CONTROLS [1]–[4] knobs to
adjust the sound.
The LCD shows the functions assigned to the knobs
in B-mode. Using these knobs, you can control
parameters such as volume, portamento time, pan,
filter and amp EG, pitch LFO, and master effect send
levels etc.
In each of the preloaded programs and combina-
tions, functions have been assigned to the B-mode
knobs. The B-mode functions can be set for each
individual program, combination, or song.
In Sampling mode and Song Play mode, the B-mode
functions are set for the entire mode (☞OG p.129).
Controlling the Valve Force circuit
8
Press the VALVE FORCE [ON/OFF] key (it will
light).
9
Press the [REALTIME CONTROLS] key to make
the VALVE FORCE LED light.
10
Use the REALTIME CONTROLS [1]–[4] knobs to
adjust the sound.
Knob [1]: INPUT TRIM
Adjusts the level of the signal being sent to the Valve
Force input. This setting will change the way in
which “Ultra Boost” affects the low range, and will
also affect the effect of the vacuum tube. You can
adjust this if raising the “Ultra Boost” setting pro-
duces an unwanted type of distortion.
Knob [2]: ULTRA BOOST
Adjusts the mix level being sent to the ultra boost
(ultra low frequency boost) circuit located in the ini-
tial stage of Valve Force. If you turn this knob all the
way toward the left, the ultra boost circuit will be
bypassed. Turning the knob toward the right will
boost the low range, and simultaneously emphasize
the edge. This is especially effective with kick and
bass drum.
Knob [3]: TUBE GAIN
Adjusts the level of the signal being sent to the vac-
uum tube. Rotating this knob to the right will
increase the amount of the warm tonal character and
distortion that is typical of a vacuum tube.
Knob [4]: OUTPUT LEVEL
Adjusts the Valve Force output level. This lets you
adjust the signal level while maintaining the tonal
characteristics of the Valve Force circuit. If an
unwanted type of distortion occurs in the output, or
if “ADC OVERLOAD !!” appears in the display, use
this knob to lower the level until this indication does
not appear.
Saving the data you edit
Any edits you have made will disappear when you
select a different program or turn off the power. If
you’ve come up with a sound you want to keep, you’ll
need to Write or Save it. For details on writing and sav-
ing, refer to OG p.114 and p.117.
If you’ve selected REALTIME CONTROLS A-mode, or
if you’ve selected B-mode with CC#70–79 assigned to
the knobs, you can write the sounds you’ve edited
using knobs [1]–[4].
Frequency
HighLow
Cutoff
frequency
Level
Cutoff frequency
LPF
Frequency
HighLow
Level
LPF
Level
LPF HPF
Level
Time
Attack Time
Decay Time
Slope Time
Release Time
Attack Level
Start Level
Sustain Level
Break Level
note-on
note-off
Release
Level
Level
Time
note-on
note-off
A-mode
[1] LPF CUTOFF [2] RESONANCE
[2] HPF
[3] EG-INTENSITY [4] EG-RELEASE
SetupDemo songs
Combination/Program
Program editingCombination editingArpeggiator editing
Effects and Valve Force
SaplingProducing a song