11
MENUEXIT ENTER0 /10's HOLD
213
REC/WRITELOCATE START/STOP
REW
SEQUENCER ARPEGGIATOR
PROG BANK
ABCDEFG
HIJKLMN
SMPL MOSS GM
COMBI BANK
PROG/COMBI BANK
PAUSE FF
TEMPO
120
40 240
REC START/STOP
SAMPLING
ON/OFF
VELOCITYGATE
546
879
6
2
2
3
36
1
8
1
9
1
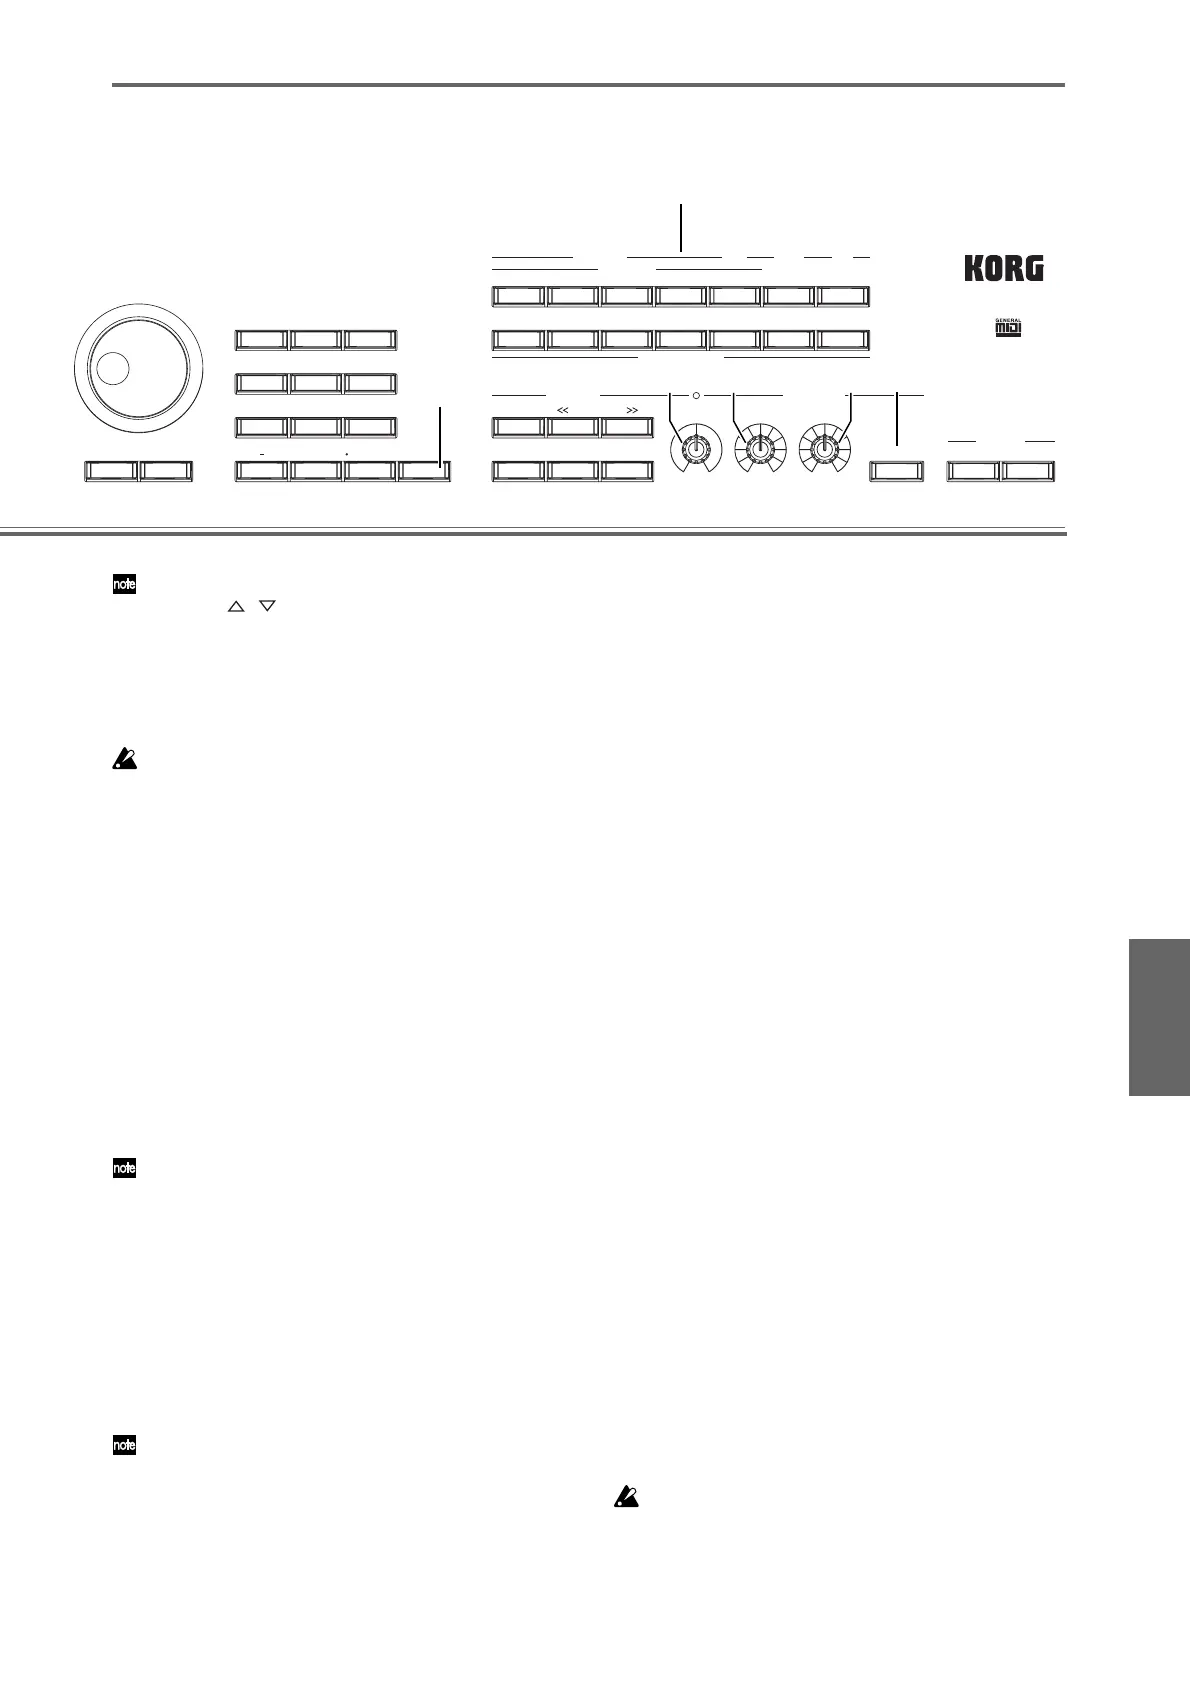
Another way to set the tempo is by selecting “ =” and
using the [ ][ ] keys or the [VALUE] slider.
You can also synchronize the tempo to an external
MIDI device. In this case you won’t be able to control
the tempo from the TRITON Extreme.
The apparent tempo is also affected by the “Resolu-
tion” setting in the P7: Edit-Arpeggiator, Arpeg. Setup
page.
If the display indicates “ =” EXT, the TRITON Extreme
is operating according to an external MIDI clock signal;
i.e., “MIDI Clock” (Global P1: MIDI) is set to External
MIDI or External USB.
7
Set “Reso (Resolution)” to specify the spacing of
the arpeggiated notes over a range of – .
Changing the way that the arpeggio is
played
8
Turn the ARPEGGIATOR [GATE] knob to adjust
the duration of the arpeggiated notes.
Turning the knob toward the left will shorten the
notes, and turning it toward the right will lengthen
them. When the knob is at the center (12 o’clock)
position, the notes will be played as specified by the
program parameter “Gate”. (☞Program P7: Edit-
Arpeggiator, Arpeg. Setup page)
This function can work more effectively in conjunction
with the REALTIME CONTROLS A-mode knob [4] (EG
RELEASE).
9
Rotate the ARPEGGIATOR [VELOCITY] knob to
adjust the strength (loudness) of the arpeggio
notes.
Rotating the knob toward the left will make the
notes softer, and rotating the knob toward the right
will make the notes stronger. At the center position
(12 o’clock), the velocity will be played as specified
by the program parameter “Velocity” (☞Program
P7: Edit-Arpeggiator, Arpeg. Setup page).
This function can work more effectively in conjunction
with the REALTIME CONTROLS A-mode knobs [1]
(LPF CUTOFF), [2] (RESONANCE/HPF), and [3] (EG-
INTENSITY).
10
Select 1, 2, 3, or 4 next to “Octave” to specify the
range of octaves over which the arpeggiated pat-
tern will be played.
11
Use “Sort” to specify whether the notes you play
will be sounded in the order of their pitch.
Checked: the arpeggio will sound each note in the
order of its pitch, regardless of the order in which
you actually played the notes.
Unchecked: the arpeggio will sound each note in the
order in which you actually played the notes.
12
Use “Latch” to specify whether the arpeggio will
continue even after you take your hand off the
keyboard.
Checked: The arpeggio will continue playing even
after you remove your hand from the keyboard.
Unchecked: The arpeggio will stop playing when
you remove your hand from the keyboard.
13
Use “Key Sync.” to specify whether the arpeggio
pattern will start when you play the keyboard, or
will always follow the tempo in synchronization
with the MIDI Clock.
Checked: When you take your hand completely off
of the keyboard and then play the first note-on, the
arpeggio pattern will start from the beginning. This
setting is suitable when you want the arpeggio to
start from the beginning of the measure as you are
playing in realtime.
Unchecked: The arpeggio will always be synchro-
nized to the sequncer or external MIDI clock tempo.
This is useful when playing arpeggios in sync with
recorded tracks or other instruments.
14
Use “Keyboard” to specify whether the notes you
play on the keyboard will be heard in addition to
the arpeggiated notes.
Checked: The notes you play on the keyboard and
the notes played by the arpeggiator will both sound.
Unchecked: Only the arpeggiated notes will sound.
Saving your edited data
Your edits will disappear if you select a different pro-
gram or turn off the power. If you want to keep the
changes you made, you’ll need to Write or Save the
data. For details on writing and saving, refer to OG
p.114 and p.117.
SetupDemo songs
Combination/Program
Program editingCombination editingArpeggiator editing
Effects and Valve Force
SaplingProducing a song