Operation
138
Pos: 48.74.1 /Üb erschriften/Üb erschriften 2/P- T/P/Prallblech ei nstellen @ 471\mod_147 1598177525_78.d ocx @ 317951 7 @ 2 @ 1
11.11 Setting the baffle sheet
Pos: 48.74.2 /B A/Bedienung /Ru ndballenpress e/Prallblech verstellen/Prallbl ech einstellen_Ei nleitung @ 196\ mod_138375 1549469_78.d ocx @ 165635 5 @ @ 1
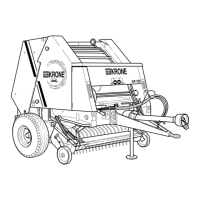
The height of the baffle plate (1) can be adjusted to the swath. Position I is the factory default
setting. If the crop is very moist, moving the baffle plate to position II is recommended.
Pos: 48.74.3 /B A/Bedienung /Ru ndballenpress e/Prallblech verstellen/Prallbl ech verstellen_Bil d Comprima, Ulti ma @ 471\ mod_14715983 15228_78.doc x @ 3179548 @ @ 1
1
2
3
4
12
7
3
3
8
9
2
2
4
11
5
13
5
5
10
4
6
Fig.
Pos: 48.74.4 /B A/Bedienung /Ru ndballenpress e/Prallblech verstellen/Prallbl ech verstellen_T ext1 Comprim a, Ultima @ 473\ mod_14722 08688819_78.d ocx @ 319496 5 @ @ 1
Moving the baffle sheet (1) from position (I) to position (II)
On the left and right side of the machine:
To dismount the bracket (2),
• remove the linch pin (3),
• loosen the round-head screw (4),
• dismount the spring (11) and
• remove the bracket (2).
• Remove the linch pin (5).
• Move the baffle sheet (1) to the upper borehole (12) and secure with the linch pin (5).
To mount the bracket (2),
• insert the coach screw (4) into the front square hole (6) and secure with a spacer
tube (7), disc (8) and locknut (9),
• place the bracket (2) on the bolt (3) and secure with the linch pin (3) and
• mount the spring (11).
Pos: 48.74.5 /L ayout Module /---------------Seitenumbruch---------------- @ 0\mod_11961 75311226_0.d ocx @ 4165 @ @ 1