Chapter 2 - page 5
DISCOVERY manual
2
D-H002.0607EN
2.1.5 Installing the battery charger
• Before you supply power to the barn cleaner or operate, maintain or adjust the machine, first
read the safety instructions carefully and familiarise yourself with all the safety notices. For
more information see chapter 'Safety'.
• Check that the mains voltage from the power source matches the mains voltage required by
the charger.
• Replace damaged wires/cables immediately.
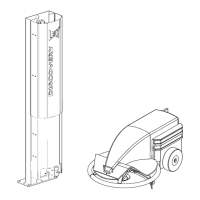
1) The battery charger must be mounted vertically (so that the LEDs are visible through the cut-away) with the
heads of the bolts used to attach it facing upwards.
2) Then attach the other end of the RED power cable to the (+) terminal of the "upper" electrode on the charger
unit. Repeat this with the BLACK power cable, fitting this one to the (-) terminal of the "lower" electrode on the
charger unit.
Once the connections have been made between the barn cleaner's charger
contacts and the charger unit, you can plug the unit into a working, earthed
socket. The charging process then starts.
NOTE
• After being connected to the barn cleaner's battery, the battery charger
will always go through the main charging process for a little while. In
this case, the orange "charge" LED will be illuminated (figure 3 5).
Figure 2 4 barn cleaner at the charger unit
• Only break the connection between the battery charger
and the barn cleaner's battery (by driving it away) when
the 100% LED (green) is illuminated.
• Allow for the fact that there is always a voltage across the
barn cleaner's charging strips (figure 2 4). If you want to
get the barn cleaner away from the battery charger, it is
important that you always ensure that the charging
process has been completed. The "charge" LED is not lit.
Figure 2 5 Location of the charging strips
Charging strips