13
lencomarine.com
Auto Calibration
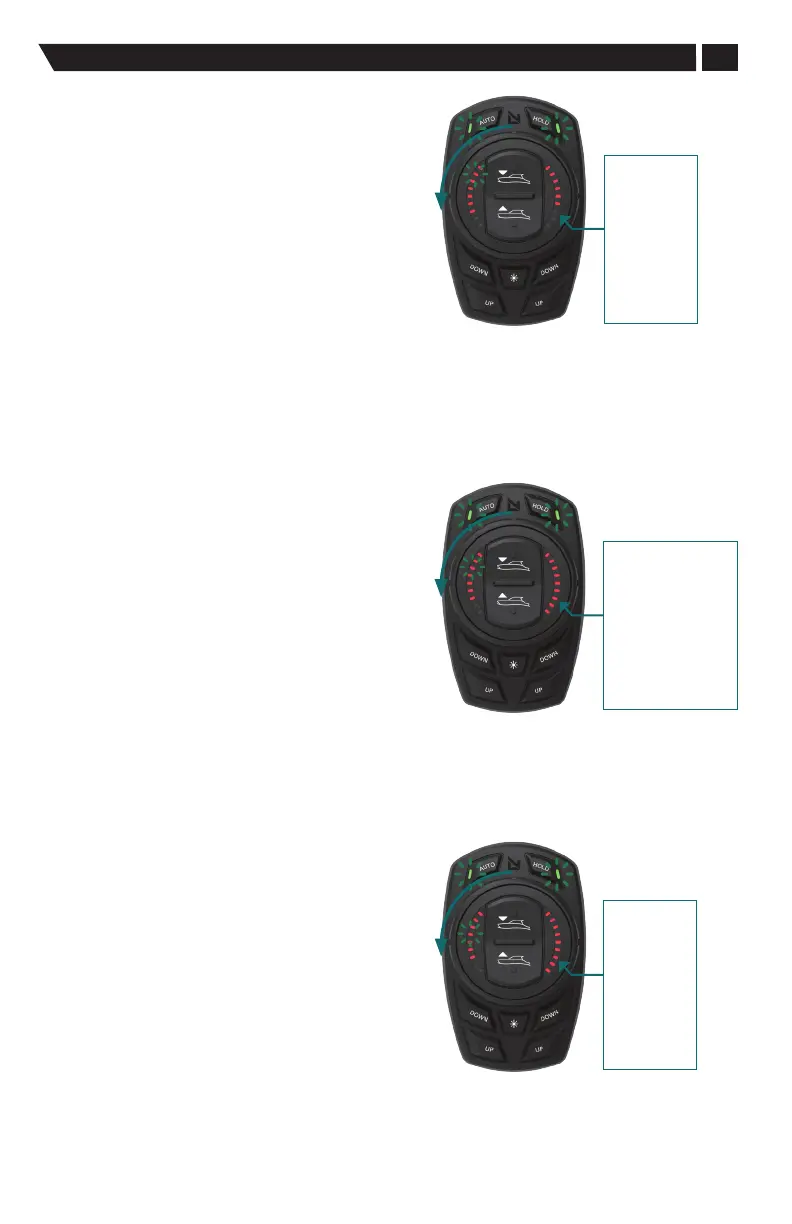
Calibration: 2. Holeshot Activation Speed
This function sets the speed of the vessel at which
the actuators will automatically move to the
Holeshot position.
The system is already in the Calibration mode from
the last calibration step: both AUTO and HOLD
button LEDs slow blink in unison.
IMPORTANT: in order to progress to the next step in
the calibration process rotate the dial counterclockwise
until two left side LEDs are lit. This indicates that you
are setting the Holeshot Activation Speed.
Adjust the value, displayed by the right-hand LEDs,
using the pitch UP/DOWN button on the dial. A guide
to which speed the LEDs correspond to can be found
in the figure on the right. The selected value will auto
save when exiting the menu.
Holeshot
Activation Speed
LED's
1 = 3 mph
2 = 4 mph
3 = 5 mph
4 = 6 mph
5 = 7 mph
6 = 8 mph
7 = 9 mph
8 = 10 mph
9 = 11 mph
Calibration: 3. Holeshot Intensity
This function sets the position of the actuators when
the system automatically enters Holeshot mode.
The system is already in the Calibration mode from
the last calibration step: both AUTO and HOLD button
LEDs slow blink in unison.
IMPORTANT: in order to progress to the next step in
the calibration process rotate the dial counterclockwise
until three left side LEDs are lit. This indicates that
you are setting the Holeshot Intensity.
Adjust the value, displayed by the right-hand LEDs,
using the pitch UP/DOWN button on the dial. The
selected value will auto save when exiting the menu.
Adjusting Holeshot
Intensity
LED's
1 = 0 to 12.5%
2 = 13% to 24. 5%
3 = 25% to 37.5%
4 = 38% to 49.5%
5 = 50% to 62.5%
6 = 63% to 75.5%
7 = 76% to 88.5%
8 = 89% to 98%
9 = 99% to 100%
Calibration: 4. On-Plane Transition Speed
This function sets the vessel speed over ground at
which the Holeshot mode transitions into automatic
pitch and roll control, or "Auto" mode.
The system is already in the Calibration mode from
the last calibration step: both AUTO and HOLD
button LEDs slow blink in unison.
Rotate dial counterclockwise until four left side
LEDs are lit.
Adjust the value, displayed by the right-hand LEDs,
using the pitch UP/DOWN button on the dial. The
selected value will auto save when exiting the menu.
Adjusting Vessel
Speed for On-Plane
Trim Tab Position
LED's
1 = 8 mph
2 = 10 mph
3 = 12 mph
4 = 14 mph
5 = 16 mph
6 = 18 mph
7 = 20 mph
8 = 22 mph
9 = 24 mph