EasyManua.ls Logo

Lennox CHA16 User Manual

Lennox CHA16
86 pages
To Next Page IconTo Next Page
Page #1 background imageLoading...
Page #1 background image
SERVICE
CHA16
UNIT
INFORMATION
6-25 TON UNITS
Page 1
1994 Lennox Industries Inc.
Corp. 9321-L3 Litho U.S.A.
CHA16 SERIES
CHA16 series units are packaged commercial air condition
ers. All units provide twostage dx cooling. 15 ton units are
equipped with three compressors. All other units are
equipped with two compressors. Optional electric heat sec
tions install inside the cabinet and are available in 10kW
through 90kW input sizes. Electric heat operates in single or
multiple stages depending on kW input size. Units are de
signed for rooftop or side of building installation with either
bottom or horizontal discharge and return air.
For commercial applications, the CHA16 is designed to ac
cept any of several different thermostat control systems with
minimum field wiring. Control options such as economizer,
warm up kit, Honeywell W973 control, Honeywell W7400
control or other field specified controls connect to the unit
with jack-plugs. When plugged in" the controls become an
integral part of the unit wiring. Units are also equipped with a
low voltage terminal strip to facilitate thermostat field wiring.
All specifications in this manual are subject to change.
TABLE OF CONTENTS
Introduction Page 1. . . . . . . . . . . . . . . . . . . . . . . . . . . . . . . . . . . . . . .
Specifications Pages 2-6. . . . . . . . . . . . . . . . . . . . . . . . . . . . . . . . . .
Electrical Data Page 7. . . . . . . . . . . . . . . . . . . . . . . . . . . . . . . . . . . . .
Blower Performance Data Pages 8-10. . . . . . . . . . . . . . . . . . . . . . .
Accessory Air Resistance Data Pages 11-12. . . . . . . . . . . . . . . . .
Parts Arrangement Pages 12-16. . . . . . . . . . . . . . . . . . . . . . . . . . . .
I- APPLICATION Page 16. . . . . . . . . . . . . . . . . . . . . . . . . . . . . . . . . .
II- UNIT COMPONENTS Pages 16-27. . . . . . . . . . . . . . . . . . . . . . . . .
Control Box Components Pages 16-19. . . . . . . . . . . . . . . . . . . . . .
Cooling Components Pages 19-25. . . . . . . . . . . . . . . . . . . . . . . . . .
Blower Compartment / Power MakeUp Pages 25-26. . . . . . . . . .
III- ELECTRICAL CONNECTIONS Page 27. . . . . . . . . . . . . . . . . . . .
IV- PLACEMENT AND INSTALLATION Page 27. . . . . . . . . . . . . . .
V- START UP - OPERATION Page 27. . . . . . . . . . . . . . . . . . . . . . . .
Preliminary Checks Page 27. . . . . . . . . . . . . . . . . . . . . . . . . . . . . .
Cooling / Heating Start Up Page 27. . . . . . . . . . . . . . . . . . . . . . . . .
Safety or Emergency Shut Down Page 27. . . . . . . . . . . . . . . . .
VI- COOLING SYSTEM CHECKS Pages 27-28. . . . . . . . . . . . . . . . . .
Gauge Manifold Attachment Page 27. . . . . . . . . . . . . . . . . . . . . . .
Charging Pages 27-28. . . . . . . . . . . . . . . . . . . . . . . . . . . . . . . . . . . . .
VII-INDOOR BLOWER OPERATION / ADJUSTMENT
Pages 28-29. . . . . . . . . . . . . . . . . . . . . . . . . . . . . . . . . . . . . . . . . . . . .
Blower Operation Page 28. . . . . . . . . . . . . . . . . . . . . . . . . . . . . . . .
Determining Unit CFM Pages 28-29. . . . . . . . . . . . . . . . . . . . . . . . .
Blower Belt Adjustment Page 29. . . . . . . . . . . . . . . . . . . . . . . . . . .
VIII- MAINTENANCE Page 29. . . . . . . . . . . . . . . . . . . . . . . . . . . . . . . . .
Filters Page 29. . . . . . . . . . . . . . . . . . . . . . . . . . . . . . . . . . . . . . . . . .
Lubrication Page 29. . . . . . . . . . . . . . . . . . . . . . . . . . . . . . . . . . . . .
Supply Air Blower Wheel Page 29. . . . . . . . . . . . . . . . . . . . . . . . . .
Evaporator and Condenser Coil Page 29. . . . . . . . . . . . . . . . . . . .
Electrical Page 29. . . . . . . . . . . . . . . . . . . . . . . . . . . . . . . . . . . . . . .
IX- ELECTRIC HEAT COMPONENTS Pages 30-39. . . . . . . . . . . . .
Matchups and Ratings Pages 30-34. . . . . . . . . . . . . . . . . . . . . . . .
Electric Heat Components Pages 34-39. . . . . . . . . . . . . . . . . . . . .
X- ACCESSORIES Pages 40-54. . . . . . . . . . . . . . . . . . . . . . . . . . . . .
RMF16 Roof Mounting Frame Page 40. . . . . . . . . . . . . . . . . . . . .
OAD16 Outdoor Air Damper Page 40. . . . . . . . . . . . . . . . . . . . . . .
Economizers Pages 40-46. . . . . . . . . . . . . . . . . . . . . . . . . . . . . . . .
Transitions and Supply / Return Diffusers Page 46. . . . . . . . . . . .
Firestats Page 46. . . . . . . . . . . . . . . . . . . . . . . . . . . . . . . . . . . . . . . .
Cycle Control Kit Pages 46-47. . . . . . . . . . . . . . . . . . . . . . . . . . . .
Low Ambient Kit Page 48. . . . . . . . . . . . . . . . . . . . . . . . . . . . . . . . .
Status Panels Pages 48-49. . . . . . . . . . . . . . . . . . . . . . . . . . . . . . .
Commercial Controls Hardware Pages 49-51. . . . . . . . . . . . . . . .
Optional Commercial Controls Systems Pages 51-54. . . . . . . . .
Clocks / Timers Page 54. . . . . . . . . . . . . . . . . . . . . . . . . . . . . . . . . .
XI- WIRING DIAGRAMS / OPERATION SEQUENCE
Pages 5687. . . . . . . . . . . . . . . . . . . . . . . . . . . . . . . . . . . . . . . . . . . .
Basic Unit Operation Sequence Pages 5657. . . . . . . . . . . . . . . .
REMD16M Economizer Operation Sequence Pages 58-59. . . .
Warm Up Kit Operation Sequence Pages 60-61. . . . . . . . . . . . . .
Unit Operation Sequences Pages 62-68. . . . . . . . . . . . . . . . . . . .
Electric Heat Operation Sequence Pages 69-87. . . . . . . . . . . . . .

Table of Contents

Question and Answer IconNeed help?

Do you have a question about the Lennox CHA16 and is the answer not in the manual?

Lennox CHA16 Specifications

General IconGeneral
BrandLennox
ModelCHA16
CategoryAir Conditioner
LanguageEnglish

Summary

SPECIFICATIONS - CHA16-823 & CHA16-953

OPTIONAL ACCESSORIES CHA16-823 & CHA16-953 (Ordered Extra)

SPECIFICATIONS - CHA16-1353 & CHA16-1603

OPTIONAL ACCESSORIES CHA16-1353 & CHA16-1603 (Ordered Extra)

SPECIFICATIONS - CHA16-1853

OPTIONAL ACCESSORIES CHA16-1853 (Ordered Extra)

SPECIFICATIONS - CHA16-2553 & CHA16-2753

SPECIFICATIONS - CHA16-3003

ELECTRICAL DATA — CHA16-823, -953, -1353 & -1603

ELECTRICAL DATA — CHA16-1853, -2553, -2753 & -3003

CHA16-823 BLOWER PERFORMANCE

CHA16-953 BLOWER PERFORMANCE

CHA16-1353 BLOWER PERFORMANCE

CHA16-1603 BLOWER PERFORMANCE

CHA16-1853 BLOWER PERFORMANCE

CHA16-2553, CHA16-2753 & CHA16-3003 BLOWER PERFORMANCE

ACCESSORY AIR RESISTANCE

PED16-185 & PED16-300 POWER EXHAUST FANS PERFORMANCE

CEILING DIFFUSER AIR THROW DATA

823/953 PARTS ARRANGEMENT (Figure 1)

1353/1603 PARTS ARRANGEMENT (Figure 2)

1353/1603 PARTS ARRANGEMENT (Figure 3)

2553/2753/3003 PARTS ARRANGEMENT (SLAB COIL SHOWN) (Figure 4)

CHA16-823, -953 CONTROL BOX COMPONENTS (Figure 5)

CHA16-1353, -1603 CONTROL BOX COMPONENTS (Figure 6)

CHA16-1853 UNIT CONTROL BOX (Figure 7)

CHA16-2553, -2753, -3003 UNIT CONTROL BOX (Figure 8)

II-UNIT COMPONENTS

A-Lifting Brackets

Factory-installed brackets for lifting and servicing the unit.

B-Control Box Components

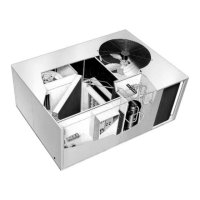
Details on control box components and their functions.

Power Distribution Terminal Block TB13

Provides line voltage electrical connection to control box components.

Terminal Block TB17

Low voltage terminal block for diagnostic troubleshooting and testing.

Transformer T1 (all units)

Supplies power to unit control circuits, except heating section.

Transformer T18 (-2553, -2753, -3003 only)

Transformer T3 (all 460V and 575V units)

Transformer Fuse F1 (all units)

Condenser Fan Motor Fuse F10 (-2553, -2753, -3003 only)

Unit Line Voltage Fuses F16 (-1853, -2553, -2753, -3003)

Circuit Breaker CB4, CB5 (-1603 Y voltage only)

Compressor Contactor K1 (all units)

Compressor Contactor K2 (all units)

Compressor Contactor K14 (-1853 only)

Condenser Fan Contactor K10 (all units except -1353)

Condenser Outdoor Fan Contactor K68 (-2553, -2753, -3003 only)

Blower Motor Overload Relay S42 (5 & 10 HP Motors only)

Compressor Delay DL15 (-1603 Y voltage, all -1853 voltages only)

Pilot Relay Board A11 (-1853, -2553, -2753, -3003 only)

Indoor Blower Contactor K3 (all units)

Low Ambient Lockout Switch (Compressor Monitor) S3 (all units)

Low Ambient Lockout Switch (Compressor Monitor) S30 (-1353, -1603 only)

Compressor Motor Protector A9, A10 (-2553, -2753, -3003 only)

C-Cooling Components

Summary of Features

Details the independent cooling circuits, evaporators, condenser fan, and blower.

CHA16-823, -953 PLUMBING COMPONENTS (Figure 14)

CHA16-1353,-1603 PLUMBING COMPONENTS (END VIEW COMPRESSOR COMPARTMENT) (Figure 15)

CHA16-1853 PLUMBING COMPONENTS CONDENSING SECTION - VAPOR LINES (Figure 16)

CHA16-1853 PLUMBING COMPONENTS CONDENSING SECTION - LIQUID LINES (Figure 17)

CHA16-2553, -2753, -3003 PLUMBING COMPONENTS (SLAB COIL SHOWN) CONDENSING SECTION - LIQUID AND SUCTION LINES (Figure 18)

CHA16-823, -953, -1353, -1603 EVAPORATOR PLUMBING (Figure 19)

CHA16-1853 PLUMBING COMPONENTS EVAPORATOR SECTION (Figure 20)

CHA16-2553, -2753, -3003 PLUMBING COMPONENTS EVAPORATOR SECTION (Figure 21)

1-Compressors B1, B2 and B13

2-Crankcase Heaters HR1, HR2 and HR5

3-High Pressure Limit S4, S7 and S28

4-Loss of Charge Switch S24, S25 and S34

5-Thermometer Well (Figure 22)

6-Freezestats S49, S50 and S53

7-Condenser Fans B4 and B5

D-Blower Compartment / Power Make-Up Components

1-Indoor Blower Motor B3

Details blower motor ratings, operation, and specifications.

TYPICAL BLOWER COMPARTMENT AND POWER ENTRY (CHA16-1853 SHOWN FOR CLARITY) (Figure 24)

CHA16 LOW VOLTAGE/LINE VOLTAGE TERMINAL STRIP - ALL UNITS (Figure 25)

2-Low Voltage Terminal Strip TB1

Used for low voltage (thermostat) connections in the make-up compartment.

3-Line Voltage Make-Up Strip TB2

Used for line voltage wiring connections in the make-up compartment.

III-ELECTRICAL CONNECTIONS

A-Power Supply

Instructions for connecting power supply and checking voltage.

IV-PLACEMENT AND INSTALLATION

Guidelines for unit installation according to codes and instructions.

Guidelines for unit installation according to codes and instructions.

V-STARTUP - OPERATION

A-Preliminary and Seasonal Checks

Steps to ensure proper installation and electrical connections before startup.

B-Cooling Startup

General procedure for starting the unit in cooling mode.

C-Heating Startup

Procedure for starting the unit in heating mode.

D-Safety or Emergency Shutdown

Instructions for safely shutting down the unit.

VI-COOLING SYSTEM SERVICE CHECKS

A-Gauge Manifold Attachment

How to attach service gauge ports for checking refrigerant charge.

B-Charging

Procedures for checking and adding refrigerant charge.

VII-INDOOR BLOWER OPERATION / ADJUSTMENT

A-Blower Operation

General procedure for blower operation and thermostat control.

B-Determining Unit CFM

Methods for measuring and determining the unit's airflow (CFM).

VIII-MAINTENANCE

A-Filters (Figure 29)

Information on filter types, maintenance, and replacement.

B-Lubrication

Note on motors being prelubricated; no further lubrication needed.

C-Supply Air Blower Wheel

Instructions for inspecting and cleaning the blower wheel.

D-Evaporator Indoor Coil

Guidelines for inspecting and cleaning the evaporator coil.

E-Condenser Coil

Instructions for cleaning and inspecting the condenser coil.

F-Electrical

Checks for wiring, voltage, and amp-draw.

IX-OPTIONAL ECH16 ELECTRIC HEAT

CHA16-823 MODELS (TABLE 4)

Specifications for electric heat models for CHA16-823.

CHA16-953 MODELS (TABLE 5)

Specifications for electric heat models for CHA16-953.

CHA16-1353 MODELS (TABLE 6)

CHA16-1603 MODELS (TABLE 7)

CHA16-1853 MODELS (TABLE 8)

CHA16-2553 MODELS (TABLE 9)

CHA16-2753 MODELS (TABLE 10)

CHA16-3003 MODELS (TABLE 11)

A-Matchups and Ratings

B-Electric Heat Components

1-Contactor K15

Contactor for energizing first stage heating elements.

2-Contactor K16

Contactor for energizing second stage heating elements.

3-Contactor K17

Contactor for energizing third stage heating elements.

4-Contactor K18

Contactor for energizing fourth/fifth stage heating elements.

5-Contactor K75

Contactor for second stage heating elements in specific units.

6-Relay K9

Pilot relay that switches blower and enables electric heat stages.

7-Relay K19

Pilot relay that isolates CHA16 circuits from ECH16 circuits.

8-Time Delay DL2

Provides timed interval for staging heating elements.

9-Time Delay DL4

Provides timed interval between second and third heating elements.

10-Time Delay DL5

Provides timed interval between third and fourth heating elements.

Provides timed interval between third and fourth heating elements.

11-Time Delay DL18

Provides timed interval between fourth and fifth heating elements.

Provides timed interval between fourth and fifth heating elements.

12-High Temperature Limit S15 (Primary)

Primary limit located downstream from heating elements.

Primary limit located downstream from heating elements.

13-High Temperature Limit S63 (Redundant)

Redundant temperature limit for 460 & 575V units.

Redundant temperature limit for 460 & 575V units.

14-High Temperature Limit S20 (Secondary)

Secondary limit for each heating element assembly.

Secondary limit for each heating element assembly.

15-Fuse F3

Current limiting fuse for electric heat stages.

Current limiting fuse for electric heat stages.

16-Terminal Strip TB3

Connections for electric heat line voltage and CHA16 unit wiring.

Connections for electric heat line voltage and CHA16 unit wiring.

17-Transformer T2

Line voltage to 24V transformer for electric heat controls.

Line voltage to 24V transformer for electric heat controls.

18-Heating Elements

Describes heating elements, their arrangement, and safety limits.

Describes heating elements, their arrangement, and safety limits.

PARTS ARRANGEMENT ELECTRIC HEAT SECTION CHA16 SERIES UNITS 7.5 THRU 12.5 TONS 10, 15, 20, 30, 40 AND 50 KW

PARTS ARRANGEMENT ELECTRIC HEAT SECTION CHA16 SERIES UNITS 15 TONS AND LARGER 15, 30, 45, 60 AND 460/575V 75kW

PARTS ARRANGEMENT ELECTRIC HEAT SECTION 208/230V 75kW AND 460/575V 90kW

X-ACCESSORIES

A-RMF16 Mounting Frame

Frame for mounting CHA16 units on combustible surfaces.

B-OAD16 Outdoor Air Damper

Manual outdoor air damper section for fixed outside air intake.

C-Economizer

Optional dampers, enthalpy sensor, and control for economizer function.

Optional differential enthalpy control

1-REMD16M Downflow Economizer (all units)

Designed for downflow use, adaptable to horizontal discharge.

Economizer designed for downflow use, adaptable to horizontal discharge.

2-EMDH16M Horizontal Economizer (-823, -953, -1353, -1603 only)

Horizontal economizer for units requiring horizontal air discharge.

Horizontal economizer for units requiring horizontal air discharge.

b-PED16 Power Exhaust Damper (-1853, -2553, -2753, -3003 only)

Optional power exhaust fans for economizers.

Optional power exhaust fans for economizers.

3-Economizer Accessories

a-GED16 Gravity Exhaust Dampers (economizers not equipped with PED16)

Optional gravity exhaust dampers for pressure relief.

PED16 CONTROL KIT

PED16 AND ENTHALPY CONTROL INSTALLATION

c-Warm Up Kit

Holds outdoor dampers closed during night setback and morning warm-up.

Holds outdoor dampers closed during night setback and morning warm-up.

d-Differential Enthalpy (all economizers)

Selects lowest enthalpy condition for cooling demand.

Selects lowest enthalpy condition for cooling demand.

4-Economizer Operation and Controls (all economizers)

a-Enthalpy Control: Setpoint Control

Senses outdoor heat content to control dampers for cooling.

ENTHALPY CHART

b-Minimum Positioner

Adjusts the minimum position of the outdoor damper blades.

Adjusts the minimum position of the outdoor damper blades.

c-Enthalpy Sensor

Monitors outdoor air heat content to determine cooling suitability.

Monitors outdoor air heat content to determine cooling suitability.

d-Mixed Air Sensor

Measures mixed air temperature to help determine damper position.

Measures mixed air temperature to help determine damper position.

REMD16 MIXED AIR SENSOR LOCATION

REMD16M ENTHALPY CONTROL/RELAY KIT

e-Wiring, Installation, Maintenance

f-Modulating Damper Motor Check

REMD16M DAMPER ASSEMBLY INSTALLATION

D-Transitions

Optional supply/return transition SRT16 for use with CHA16 units.

Optional supply/return transition SRT16 for use with CHA16 units.

E-Supply and Return Diffusers

Optional flush mount and extended mount diffusers/returns FD11 and RTD11.

Optional flush mount and extended mount diffusers/returns FD11 and RTD11.

F-Firestats

Local codes may require firestats for automatic unit shutdown or tasks.

Local codes may require firestats for automatic unit shutdown or tasks.

G-Cycle Control Kit (Figure 52)

Prevents frequent cycling caused by thermostat diddling or bulb vibration.

Prevents frequent cycling caused by thermostat diddling or bulb vibration.

C2-1 diagram with D5 diagram

electromechanical thermostat with modulating economizer and warm-up

Wiring diagram for thermostat, economizer, and warm-up kit.

H-Low Ambient Kit (all units)

Allows mechanical cooling operation at low outdoor temperatures.

Allows mechanical cooling operation at low outdoor temperatures.

I-Status Panels SP11 and SSP11

Optional panels for remote monitoring of system operation.

Optional panels for remote monitoring of system operation.

1-SP11 Application

Application of SP11 readout relay kit for electric heat interface.

Application of SP11 readout relay kit for electric heat interface.

2-SSP11 Application

Application of SSP11 readout relay kit for electromechanical thermostat.

Application of SSP11 readout relay kit for electromechanical thermostat.

3-Indications and Functions

J-Commercial Controls Hardware

Hardware for Lennox' Commercial Controls like W973, W7400.

Hardware for Lennox' Commercial Controls like W973, W7400.

1- Jack J2/(opt. Plug P2)

Heating section connection for wiring harness, GCS16 and CHA16 units.

Heating section connection for wiring harness, GCS16 and CHA16 units.

2 - Jack J3 / Plug P3

Filter section connection for economizer or relay kits.

Filter section connection for economizer or relay kits.

3- Jack J16 / Plug P16

Unit control box connection for optional control systems.

Unit control box connection for optional control systems.

4- Jack J18 / Plug P18 (used in 15 ton and larger units only)

Extension harness for power exhaust damper fans to PED16 relay kit.

Extension harness for power exhaust damper fans to PED16 relay kit.

5- Jack J24 / (opt. Plug P24) (used in 15 ton and larger units only)

Filter section connection for optional power exhaust damper PED16 control kit.

Filter section connection for optional power exhaust damper PED16 control kit.

6- Jack J25 / (opt. Plug P25) (used in 15 ton and larger units only)

Unit control box connection for optional SP11 or SSP11 status panel.

Unit control box connection for optional SP11 or SSP11 status panel.

7- Jack J33/ (opt. Plug P34) (used in 15 ton and larger units only)

Heating section connection for optional third stage (W3) heating relay.

Heating section connection for optional third stage (W3) heating relay.

8- Jack J35 / Plug P35 (used in 12.5 ton and smaller units only)

Unit control box connection for assembly line tests only.

Unit control box connection for assembly line tests only.

9- Jack J36 / Plug P36 (used in 15 ton and larger units only)

Unit control box connection for assembly line tests only.

Unit control box connection for assembly line tests only.

10- Jack J57/ (opt. Plug P57) (used in 15 ton and larger units only)

Unit control box connection for optional "dirty filter" indicator switch.

Unit control box connection for optional "dirty filter" indicator switch.

K-Optional Commercial Controls Systems

1- D5 Wiring Diagram - Modulating Economizer Model Number REMD16M-185

Details the downflow modulating economizer and its connections.

2 - Warm-Up Kit

Accessory to economizer that holds dampers closed during morning warm-up.

WARM UP KIT RELAY KIT INSTALLATION 12.5 ΤΟN AND SMALLER UNITS (Figure 58)

WARM UP KIT RELAY KIT INSTALLATION 15 ΤΟΝ AND LARGER UNITS (FIGURE 59)

CAUTION

Warning about connecting relay kits to incorrect systems.

Warning about connecting relay kits to incorrect systems.

3- C1 Wiring Diagram

Standard 2heat/2cool thermostat wiring for units without economizer/warm-up.

Standard 2heat/2cool thermostat wiring for units without economizer/warm-up.

4- C2-1 Wiring Diagram

Wiring for units with economizer and warm-up, requiring CMC3-1 clock.

Wiring for units with economizer and warm-up, requiring CMC3-1 clock.

5-C11-1 Wiring Diagram

Wiring for thermostat with C11 night kit for setback function.

Wiring for thermostat with C11 night kit for setback function.

WARNING

Warning about connecting relay kits designed for other control systems.

Warning about connecting relay kits designed for other control systems.

CAUTION

Warning about connecting warm-up kit to W7400 relay kit.

Warning about connecting warm-up kit to W7400 relay kit.

11- C8-1 Wiring Diagram

W973 control system for units without economizer or warm-up.

W973 control system for units without economizer or warm-up.

12 - C14-1 Wiring Diagram

W973 control system for units with economizer and warm-up.

W973 control system for units with economizer and warm-up.

13- C12 Wiring Diagram

T7300 electronic thermostat for units without economizer.

T7300 electronic thermostat for units without economizer.

14- C12-2 Wiring Diagram

T7300 electronic thermostat for units with economizer.

T7300 electronic thermostat for units with economizer.

L-Clocks / Timers (CMC3-1)

Optional clocks for electromechanical or W973 thermostats for setback.

Optional clocks for electromechanical or W973 thermostats for setback.

C1 diagram with B9 and A16 DIAGRAMS

basic thermostat with CHA16-1853, with typical electric heat and without economizer

Wiring diagram and operation sequence for basic thermostat.

A-CHA16-1853 C1 DIAGRAM WITH B9 AND A16 DIAGRAMS

Operation Sequence: C1 Section B9 and A8 Sections

(Electromechanical Thermostat wired to CHA16-1853)

Details thermostat actions and unit component interactions.

C2-1 diagram with D5 diagram

electromechanical thermostat with modulating economizer and warm-up

Wiring diagram for thermostat, economizer, and warm-up kit.

B-REMD16M C1 DIAGRAM WITH D5 DIAGRAM

Electromechanical Thermostat with Economizer

Sequence for REMD16M economizer with electromechanical thermostat.

Operation Sequence: C1 Diagram with D5 Diagram (economizer connected to CHA16-1853 with electromechanical thermostat)

Enthalpy Low, 1st Stage Cool

Cooling sequence when outdoor air is suitable for cooling.

Enthalpy Low, 2nd Stage Cool

Cooling sequence for second stage with economizer operating.

Enthalpy High, 1st Stage Cool

Cooling sequence when outdoor air is too warm or humid.

Enthalpy High, 2nd Stage Cool

Cooling sequence for second stage with high enthalpy conditions.

Night Setback (optional field installed)

First Heat Demand After Night Setback (Begin Warm-Up)

Steps describing the warm-up process after night setback.

C2-1 diagram with D5 diagram

electromechanical thermostat with modulating economizer and warm-up

Wiring diagram for thermostat, economizer, and warm-up kit.

C-WARM-UP KIT

Optional feature for REMD16M economizer to control dampers.

Optional feature for REMD16M economizer to control dampers.

C2-1 DIAGRAM WITH D5 DIAGRAM

Electromechanical Thermostat with Economizer and Warm-Up

Sequence for warm-up kit operation with thermostat and economizer.

WARNING

Warning about connecting relay kits to incorrect systems.

Warning about connecting relay kits to incorrect systems.

WARNING

Warning about proper jack and plug connections for control failure prevention.

Warning about proper jack and plug connections for control failure prevention.

Operation Sequence:

Night Setback:

Describes how night setback operates with time clock and thermostat.

First Heat Demand After Night Setback (Begin Warm-Up)

Steps describing the warm-up process after night setback.

B41 diagram with C1 diagram CHA16-2553, 2753, 3003 Operating Sequence

CHA16-2553, -2753, -3003 Operation Sequence: B41 Section and C1 Sections

(Basic Unit with Basic Electromechanical Thermostat)

Sequence steps for basic unit with electromechanical thermostat.

B9 diagram with C1 diagram CHA16-1853 Operating Sequence

CHA16-1853 Operation Sequence: B9 Section and C1 Sections

(Basic Unit with Basic Electromechanical Thermostat)

Sequence steps for basic unit with electromechanical thermostat.

B2 diagram with C1 diagram CHA16-1603 Operating Sequence

CHA16-1603 Operation Sequence: B2 Section and C1 Sections

(Basic Unit with Basic Electromechanical Thermostat)

Sequence steps for basic unit with electromechanical thermostat.

B2 diagram with C1 diagram CHA16-1353 Operating Sequence

CHA16-1353 Operation Sequence: B2 Section and C1 Sections

(Basic Unit with Basic Electromechanical Thermostat)

Sequence steps for basic unit with electromechanical thermostat.

B1 diagram with C1 diagram CHA16-823 / 953 Operating Sequence

CHA16-823, -953 Operation Sequence: B1 Section and C1 Sections

(Basic Unit with Basic Electromechanical Thermostat)

Sequence steps for basic unit with electromechanical thermostat.

A1 diagram with B2 diagram ECH16-82/95/135/160 10kW & 15kW 208/230V Sequence

Operation Sequence: A1 Section and B2 Sections (10kW 208/230V electric heat wired to CHA16-1603)

1- Control voltage in this heater is supplied by a separate transformer T2...

Control voltage supply from transformer T2 for electric heat.

2- 1st stage heating demand closes W1...

Sequence for 1st stage heating demand and element activation.

3- When K9-1 switches, indoor blower contactor K3 is energized...

Blower activation and economizer operation based on K9-1 signal.

A2 diagram with B2 diagram ECH16-82/95/135/160 20kW & 30kW 208/230V Sequence

Operation Sequence: A2 Section and B2 Sections (20/30kW 208/230V electric heat wired to CHA16-1603)

1- 1st stage heating demand closes W1...

Sequence for 1st stage heating demand and element activation.

2- When K15-1 closes, heating elements HE1 are energized...

Energizing heating elements HE1 in a Delta configuration.

3- When K9-1 switches, indoor blower contactor K3 is energized...

Blower activation and economizer operation based on K9-1 signal.

A3 diagram with B2 diagram ECH16-82/95/135/160 40kW 208/230V Sequence

Operation Sequence: A3 Section and B2 Sections (40kW 208/230V electric heat wired to CHA16-1603)

1- Control voltage in this heater is supplied by a separate transformer T2...

Control voltage supply from transformer T2 for electric heat.

2- 1st stage heating demand closes W1...

Sequence for 1st stage heating demand and element activation.

3- When K9-1 switches, indoor blower contactor K3 is energized...

Blower activation and economizer operation based on K9-1 signal.

A4 diagram with B2 diagram ECH16-82/95/135/160 50kW 208/230V Operating Sequence

Operation Sequence: A4 Section and B2 Sections (50kW 208/230V electric heat wired to CHA16-1603)

1- Control voltage in this heater is supplied by a separate transformer T2...

Control voltage supply from transformer T2 for electric heat.

2- 1st stage heating demand closes W1...

Sequence for 1st stage heating demand and element activation.

3- When K9-1 switches, indoor blower contactor K3 is energized...

Blower activation and economizer operation based on K9-1 signal.

A5 diagram with B2 diagram ECH16-82/95/135/160 10kW & 15kW 460V & 575V Sequence

Operation Sequence: A5 Section and B2 Sections (10kW 208/230V electric heat wired to CHA16-1603)

1- 1st stage heating demand closes W1...

Sequence for 1st stage heating demand and element activation.

2- When K15-1 closes, heating elements HE1 are energized...

Energizing heating elements HE1 in a Wye configuration.

3- When K9-1 switches, indoor blower contactor K3 is energized...

Blower activation and economizer operation based on K9-1 signal.

A6 diagram with B2 diagram ECH16-185/255/275/300 20kW & 30kW 460V & 575V Sequence

Operation Sequence: A6 Section and B2 Sections (20kW 460V or 575V electric heat wired to CHA16-1853)

1- 1st stage heating demand closes W1...

Sequence for 1st stage heating demand and element activation.

2- When K15-1 closes, heating elements HE1 and HE2 are both energized...

Energizing heating elements HE1 and HE2 in a Wye configuration.

3- When K9-1 switches, indoor blower contactor K3 is energized...

Blower activation and economizer operation based on K9-1 signal.

A7 diagram with B2 diagram ECH16-185/255/275/300 45kW 460V & 575V Sequence

Operation Sequence: A7 Section and B2 Sections (45kW 460V or 575V electric heat wired to CHA16-1853)

1- 1st stage heating demand closes W1...

Sequence for 1st stage heating demand and element activation.

2- When K15-1 closes, heating elements HE1 and HE2 are both energized...

Energizing heating elements HE1 and HE2 in a Wye configuration.

3- When K9-1 switches, indoor blower contactor K3 is energized...

Blower activation and economizer operation based on K9-1 signal.

A8 diagram with B2 diagram ECH16-185/255/275/300 60kW 460V & 575V Sequence

Operation Sequence: A8 Section and B2 Sections (60kW 460V or 575V electric heat wired to CHA16-1853)

1- 1st stage heating demand closes W1...

Sequence for 1st stage heating demand and element activation.

2- When K15-1 closes, heating elements HE1 and HE2 are both energized...

Energizing heating elements HE1 and HE2 in a Wye configuration.

3- When K9-1 switches, indoor blower contactor K3 is energized...

Blower activation and economizer operation based on K9-1 signal.

A15 diagram with B9 diagram ECH16-185 15kW 208/230V Operating Sequence

Operation Sequence: A15 Section and B9 Sections (15kW 208/230V electric heat wired to CHA16-1853)

1- 1st stage heating demand closes W1...

Sequence for 1st stage heating demand and element activation.

2- When K77-1 closes, heating pilot relay K77...

Sequence for pilot relay K77 activation and heating control.

3- When K9-1 switches, indoor blower contactor K3 is energized...

Blower activation and optional power exhaust fan relay.

A16 diagram with B9 diagram ECH16-185/255/275/300 30kW 208/230V Operating Sequence

Operation Sequence: A16 Section and B9 Sections (30kW 208/230V electric heat wired to CHA16-1853)

1- 1st stage heating demand closes W1...

Sequence for 1st stage heating demand and element activation.

2- When K77-1 closes, heating pilot relay K77...

Sequence for pilot relay K77 activation and heating control.

3- When K9-1 switches, indoor blower contactor K3 is energized...

Blower activation and optional power exhaust fan relay.

A17 diagram with B9 diagram ECH16-185/255/275/300 45kW 208/230V Operating Sequence

Operation Sequence: A17 Section and B9 Sections (45kW 208/230V electric heat wired to CHA16-1853)

1- 1st stage heating demand closes W1...

Sequence for 1st stage heating demand and element activation.

2- When K77-1 closes, heating pilot relay K77...

Sequence for pilot relay K77 activation and heating control.

3- When K9-1 switches, indoor blower contactor K3 is energized...

Blower activation and optional power exhaust fan relay.

A18 diagram with B9 diagram ECH16-185/255/275/300 60kW 208/230V Operating Sequence

Operation Sequence: A18 Section and B9 Sections (60kW 208/230V electric heat wired to CHA16-1853)

1- 1st stage heating demand closes W1...

Sequence for 1st stage heating demand and element activation.

2- When K77-1 closes, heating pilot relay K77...

Sequence for pilot relay K77 activation and heating control.

3- When K9-1 switches, indoor blower contactor K3 is energized...

Blower activation and optional power exhaust fan relay.

A19 diagram with B9 diagram ECH16-185/255/275/300 75kW 208/230V Operating Sequence

Operation Sequence: A19 Section and B9 Sections (75kW 208/230V electric heat wired to CHA16-1853)

1- 1st stage heating demand closes W1...

Sequence for 1st stage heating demand and element activation.

2- When K77-1 closes, heating pilot relay K77...

Sequence for pilot relay K77 activation and heating control.

3- When K9-1 switches, indoor blower contactor K3 is energized...

Blower activation and optional power exhaust fan relay.

Related product manuals