EasyManua.ls Logo

LightSpeed Technologies Redcat User Manual

LightSpeed Technologies Redcat
42 pages
To Next Page IconTo Next Page
Page #1 background imageLoading...
Page #1 background image
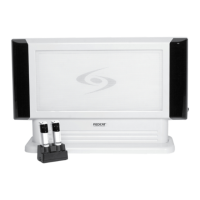
Classroom Audio System
Turn on the REDCAT.
Lightspeed Technologies, Inc.
11509 SW Herman Rd
Tualatin, OR 97062
800.732.8999
www.lightspeed-tek.com
MN0095US01-1
User Manual
MN0095US01-1
DAILY REDMIKE USE
TURN ON THE REDMIKE
CHARGE BATTERIES
Speak in a natural voice. A normal conversational speech
level will provide an adequate signal. It is not necessary to
increase the intensity of your voice—the audio system provides
adequate amplication (approximately 5 – 10 dB) above
ambient room noises.
Avoid wearing jewelry that may rub or bump against
the microphone.
Turn the REDMIKE off during private conversations with a
student, parent, or other classroom visitor. You can also cover
the LED lens of the REDMIKE to block the signal.
Recharge batteries each night. When recharged nightly,
operating time (actual usage) for the microphones will last
through a typical school day.
START OF THE DAY
Turn the
microphone
ON using the
ON/OFF switch
on the side of
the REDMIKE
and speak
normally. Set
the channel
switch to A.
Return the
REDMIKE to
the cradle
charger and
recharge the
REDMIKE at
the end of
the day.
1
2
3
4
Remove the
REDMIKE from
the charger and
place it around
your neck. Adjust
the neck strap
so the top of the
microphone rests
just below your
collarbone.

Other manuals for LightSpeed Technologies Redcat

Questions and Answers:

LightSpeed Technologies Redcat Specifications

General IconGeneral
BrandLightSpeed Technologies
ModelRedcat
CategoryStereo System
LanguageEnglish

Summary

Safety Instructions and Certifications

General Safety Instructions

11 essential safety and operation instructions for the Lightspeed product, including warnings and precautions.

Product Certifications

Details on compliance with EEC directives and specific EN standards for electrical safety and EMC.

System Overview

System Components

Overview of the REDCAT system's main parts, including the receiver/amplifier and microphones.

Side Panel Controls and Connections

Detailed description of controls and connectors located on the side panel of the REDCAT unit.

Rear Panel Controls and Connections

Explanation of controls and inputs found on the rear panel of the REDCAT, including equalizer and audio inputs.

REDMIKE Controls and Connections

Details on the REDMIKE microphone's buttons, indicators, battery compartment, and input/output options.

Attaching the Lanyard to REDMIKE

Step-by-step guide on how to attach the lanyard to the REDMIKE microphone for proper positioning.

Cradle Charger Controls and Connections

Explanation of the REDMIKE cradle charger's indicators, DC power port, and optional charging port.

Optional LT-71 LightMic Controls and Connections

Description of the LT-71 LightMic controls, indicators, and connection options for audio input and charging.

Optional HM-70 Handheld Controls and Connections

Details on the HM-70 handheld microphone's features, controls, indicators, and charging input.

Set-up

Unpacking Your System

Instructions for ensuring all system components are received and accounted for.

Setting Up the REDCAT

Guidance on choosing a setup method (tabletop vs. wall-mount) and selecting an optimal location.

Wall-Mount Setup and Bracket Removal

Steps for wall-mounting the REDCAT, including selecting a location and removing the base/wall bracket.

Mount Base/Wall Bracket

Instructions for attaching the base/wall bracket securely to the wall and mounting the REDCAT unit.

Audio Integration

Diagram and explanation of how the REDCAT integrates with various audio sources like projectors and DVD players.

Connecting External Audio Devices

Steps to connect external audio sources like TV, VCR, DVD, or computer directly into the REDCAT.

Connecting Power Supply and Final Checks

Procedure for connecting the power supply and performing final setup checks for safe operation.

System Operation and Optional Features

Initial Set-up: REDMIKE

Step-by-step guide for the initial setup and volume adjustment of the REDMIKE microphone.

Initial Set-up: Optional LT-71

Instructions for setting up and adjusting the optional LT-71 LightMic for classroom audio.

Initial Set-up: Optional HM-70

Procedure for setting up and adjusting the optional HM-70 handheld microphone for classroom use.

Charging the REDMIKE

Steps for charging the REDMIKE microphone using the cradle charger and ensuring proper battery care.

Charging the Optional LT-71

Instructions for charging the optional LT-71 LightMic via the cradle charger for optimal performance.

Charging the Optional HM-70

Procedure for charging the optional HM-70 handheld microphone and its battery.

Output to Assistive Listening Device (ALD)

Guide on connecting the REDCAT system to an ALD receiver for enhanced audio delivery.

Amplify External Audio Equipment with REDMIKE

How to use the REDMIKE's input jack to amplify external audio sources like laptops or MP3 players.

Troubleshooting, Daily Use, and Warranty

Troubleshooting Guide

Common problems and solutions for the REDCAT system, focusing on battery issues, static, and sound.

Daily Use Instructions

Steps for turning on the system, positioning the microphone, and charging batteries for daily operation.

Classroom Audio Tips and Warranty Information

Advice for optimal audio performance and details of the five-year limited warranty for the system.

System Specifications

Overall Specifications

General performance data for the REDCAT system, including power output and dimensions.

Receiver Specifications

Technical details for the REDCAT infrared receiver, including carrier frequencies and operating range.

Transmitter Specifications

Technical details for REDMIKE, LT-71, and HM-70 transmitters, covering audio distortion and battery.

Individual Components & Optional Accessories

User Notes