Page 16 / 29
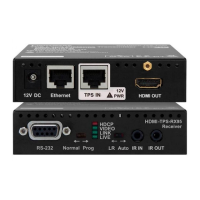
2.9.4. Rear view of DVI-TP-RX100
CATx input DVI output +5V DC
CATx input Connect one CAT5, CAT5e, CAT6a or CAT7 (recommended)
cables between DVI-TP-RX100 and the transmitter (DVI-TP-
TX200/TX300 or Lightware Hybrid Matrix equipped with twisted
pair output cards).
The DVI-TP-RX100 does not have networking capabilities. Do
not connect the RJ45 input of the DVI-TP-RX100 to a Local
Area Network device or a PC. Doing so may damage the unit!
DVI output Connect one DVI-D or DVI-I cable (only digital pins are
connected internally) between DVI-TP-RX100 and the display
device.
The output connector is able to supply 500 mA current on pin
14 to power fiber optical DVI extenders like DVI-OPT-TX100.
+5V DC connector Connect the output of the supplied +5V power adaptor.
CAUTION! Warranty void if damage occurs due to use of a
different power source.