22
SETUP MENU (CONTINUED)
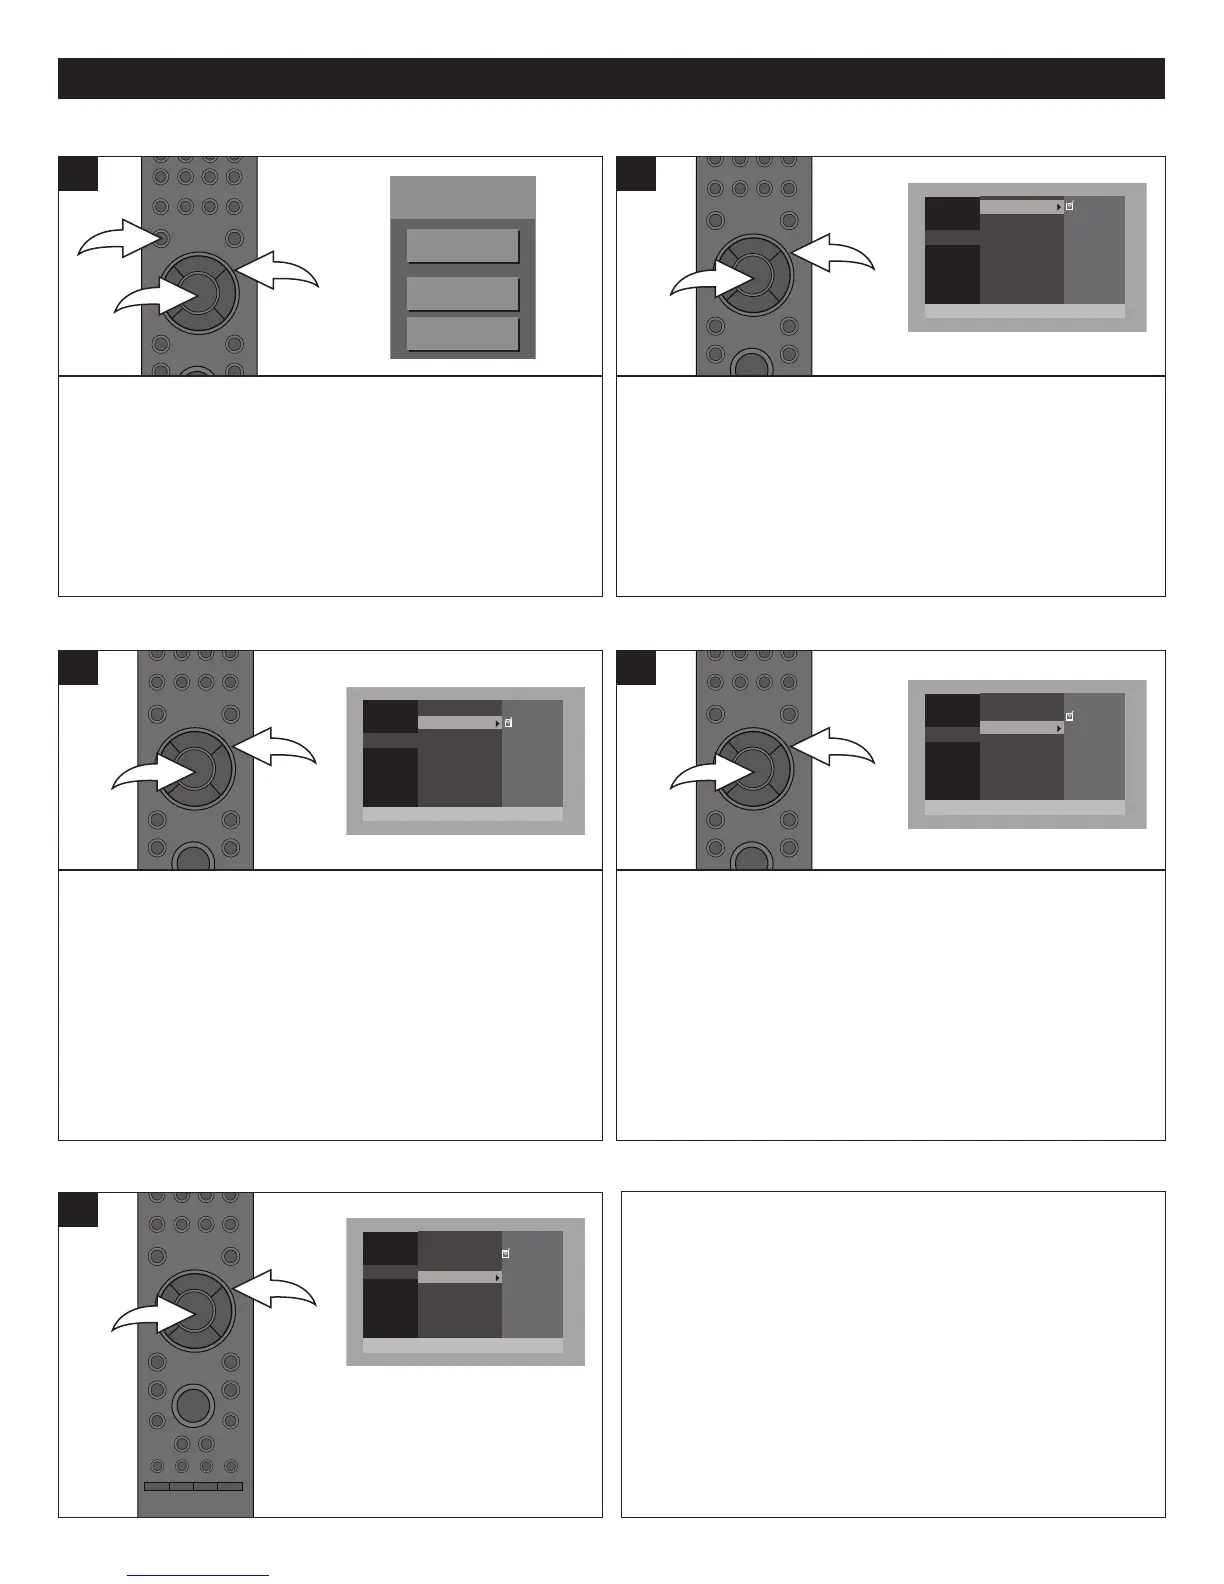
Press the SETUP button 1 and the BD-Video Menu will
appear. Select SETTING using the Navigation (π,†)
buttons 2, then press the ENTER button 3 to enter the Main
menu.
Select AUDIO using the Navigation (π,†) buttons 2, then
press the ENTER button 3 to enter the Audio menu.
1
Use this option when Dolby Digital audio is being played to
enhance the audio when movies are being played through
small speakers or at a low volume. It will normalize low level
or high level content.
Select the Audio menu as shown to the left. Select DYNAMIC
RANGE using the Navigation (π,†) buttons 1, then press
the ENTER button 2. Select ON to activate or OFF to
deactivate this feature, and press the ENTER button 2 again.
1
AUDIO SETUP MENU
DYNAMIC RANGE
BD-Video
TOP MENU
SETTING
BD-VIDEO DATA ERASE
GENERAL
VIDEO
AUDIO
LANGUAGE
P
ARENTAL
NETWORK
ON
OFF
DYNAMIC RANGE
PCM DOWN CONVERSION
DIGITAL AUDIO OUTPUT
SPEAKER SETTING
G
ENERAL
VIDEO
AUDIO
LANGUAGE
PARENTAL
NETWORK
O
N
OFF
D
YNAMIC RANGE
PCM DOWN CONVERSION
DIGITAL AUDIO OUTPUT
S
PEAKER SETTING
GENERAL
VIDEO
AUDIO
LANGUAGE
PARENTAL
NETWORK
PCM
B
ITSTREAM
DYNAMIC RANGE
PCM DOWN CONVERSION
D
IGITAL AUDIO OUTPUT
S
PEAKER SETTING
GENERAL
VIDEO
AUDIO
LANGUAGE
PARENTAL
NETWORK
2
CHANNEL
MULTICHANNEL
ATTENUATOR [OFF]
D
YNAMIC RANGE
PCM DOWN CONVERSION
D
IGITAL AUDIO OUTPUT
SPEAKER SETTING
Use this option to turn the PCM down sampling On or Off.
Some amplifiers cannot support the high sampling rate of the
PCM signal. In this case, turn this option ON and the player
will output at 48kHz. Select the Audio menu as shown above.
Select PCM DOWN SAMPLING using the Navigation (π,†)
buttons 1, then press the ENTER button 2. Select ON for
96KHz, which will output the audio as normal. Select OFF to
deactivate using the Navigation (π,†) buttons 1 and press
the ENTER button 2 again.
1
Use this option to select PCM or BITSTREAM.
Select the Audio menu as shown above. Select DIGITAL
AUDIO OUTPUT using the Navigation (π,†) buttons 1,
then press the ENTER button 2. Select PCM when
connected to equipment that does not decode Dolby Digital
or DTS. Select BITSTREAM when using an Amp/Receiver to
decode the audio source using the Navigation (π,†) buttons
1 and press the ENTER button 2 again.
1
PCM DOWN CONVERSION
DIGITAL AUDIO OUTPUT
GENERAL
V
IDEO
AUDIO
LANGUAGE
PARENTAL
N
ETWORK
ON
OFF
DYNAMIC RANGE
PCM DOWN CONVERSION
DIGITAL AUDIO OUTPUT
S
PEAKER SETTING
GENERAL
VIDEO
AUDIO
LANGUAGE
PARENTAL
N
ETWORK
O
N
O
FF
D
YNAMIC RANGE
PCM DOWN CONVERSION
D
IGITAL AUDIO OUTPUT
S
PEAKER SETTING
GENERAL
VIDEO
A
UDIO
LANGUAGE
PARENTAL
NETWORK
PCM
B
ITSTREAM
DYNAMIC RANGE
PCM DOWN CONVERSION
DIGITAL AUDIO OUTPUT
SPEAKER SETTING
GENERAL
VIDEO
AUDIO
LANGUAGE
PARENTAL
NETWORK
2 CHANNEL
M
ULTICHANNEL
ATTENUATOR [OFF]
DYNAMIC RANGE
PCM DOWN CONVERSION
DIGITAL AUDIO OUTPUT
SPEAKER SETTING
Use this option to set the desired Speaker Setting as follows:
Select the Audio menu as shown above. Select SPEAKER
SETTING using the Navigation (π,†) buttons 1, then press
the ENTER button 2; the options will appear. Select one of
the options (described below) using the Navigation (π,†)
buttons 1, then press the ENTER button 2.
2 CHANNEL: Select when output to a 2 channel audio
system.
MULTICHANNEL: Select when output to a system that has
multiple channels, such as a surround sound system.
ATTENUATOR: Turn ON to lessen the audio output when
the sound is too loud or OFF to deactivate.
1
SPEAKER SETTING
GENERAL
VIDEO
AUDIO
LANGUAGE
PARENTAL
NETWORK
ON
O
FF
DYNAMIC RANGE
P
CM DOWN CONVERSION
D
IGITAL AUDIO OUTPUT
SPEAKER SETTING
GENERAL
VIDEO
AUDIO
LANGUAGE
PARENTAL
NETWORK
O
N
OFF
D
YNAMIC RANGE
PCM DOWN CONVERSION
D
IGITAL AUDIO OUTPUT
S
PEAKER SETTING
GENERAL
VIDEO
AUDIO
LANGUAGE
PARENTAL
NETWORK
PCM
B
ITSTREAM
DYNAMIC RANGE
PCM DOWN CONVERSION
D
IGITAL AUDIO OUTPUT
SPEAKER SETTING
GENERAL
VIDEO
AUDIO
LANGUAGE
PARENTAL
NETWORK
2 CHANNEL
MULTICHANNEL
ATTENUATOR [OFF]
DYNAMIC RANGE
PCM DOWN CONVERSION
DIGITAL AUDIO OUTPUT
SPEAKER SETTING
GENERAL
VIDEO
AUDIO
LANGUAGE
PARENTAL
NETWORK
ON
O
FF
DYNAMIC RANGE
P
CM DOWN CONVERSION
DIGITAL AUDIO OUTPUT
S
PEAKER SETTING
GENERAL
VIDEO
AUDIO
LANGUAGE
PARENTAL
NETWORK
ON
O
FF
DYNAMIC RANGE
PCM DOWN CONVERSION
D
IGITAL AUDIO OUTPUT
SPEAKER SETTING
GENERAL
VIDEO
AUDIO
LANGUAGE
PARENTAL
NETWORK
P
CM
BITSTREAM
D
YNAMIC RANGE
PCM DOWN CONVERSION
D
IGITAL AUDIO OUTPUT
SPEAKER SETTING
G
ENERAL
VIDEO
AUDIO
LANGUAGE
P
ARENTAL
NETWORK
2 CHANNEL
MULTICHANNEL
A
TTENUATOR [OFF]
DYNAMIC RANGE
PCM DOWN CONVERSION
D
IGITAL AUDIO OUTPUT
SPEAKER SETTING