-34-
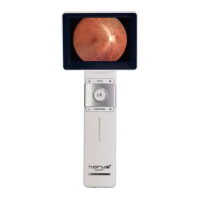
C. DGC 200
Press the power button to turn on the control unit. Approximately one to two
seconds later, the boot screen will appear on the LCD panel. After about 15 seconds,
the information icons will appear on the top of the LCD panel.
Step 2: Make sure SD card is inserted
Once the SD card has been inserted, the user can start to take photographs in any
shooting mode, either photo or video mode.
Step 3: Choose a shooting mode
Tap the photo or the video mode icon to enter a shooting mode.
Step 4: Mark left/right eye
By doing so, the user can tell whether a photo/video is left eye or right eye of examinee
record from its Įle name.
Step 5: Aim and preview
User can select white light or blue light to take image by tapping the white light/blue
light switch icon on screen. The default setting is white light.
Position the camera correctly and adjust to appropriate settings to get a clear preview.
The image brightness can only be changed in photo mode. The user can rely on the
auto focus of DSC 200 to improve clarity or adjust focus manually.
Step 6: Press the OK button to shoot