. A complete Parts List is available at www.MillerWelds.com
OM-281426 Page 32
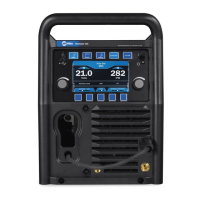
6-3. Controls, TIG Steel/Stainless Manual Mode
1 Auto-Set Button
Press button to turn Auto-Set fea-
ture On or Off. Auto-Set is On when
illuminated.
2 Tungsten Size Buttons
Press the Plus (+) or Minus (-) but-
ton to adjust up or down.
3 Pulse Adjustment Knob
The range is OFF - 150 PPS (Puls-
es per Second). Pro-Set value is
100 PPS (See tips below).
4 Amperage Adjustment Knob
5 TIG Arc Start Select Buttons
Press the up and down buttons to
select desired TIG arc start.
TIPS: Low-Speed Pulse: 1 to 10
pulses per second (PPS) will pro-
duce a distinct ripple pattern in the
weld bead. It can be used to time
filler addition, reduce distortion and
improve control.
High Speed Pulse: 100 pulses per
second (PPS) and higher helps to
focus the arc for increased stability,
penetration
and travel speed. In-
creased puddle agitation improves
weld microstructure.
Ref. 281252A
1
2
3
4 5
6-4. Controls, Stick Manual Mode
1 Auto-Set Button
Press button to turn Auto-Set fea-
ture On or Off. Auto-Set is On when
illuminated.
2 DIG Adjustment Knob
The range is Off - 99%. Pro-Set val-
ue is 30% for 7018 electrodes. (See
tip below).
3 Amperage Adjustment Knob
TIP: DIG (Arc Force Control) con-
trols the amount of additional am-
perage at low voltage (short arc
length) conditions. Adjust the DIG
percentage for different joint config-
urations and electrodes.
Ref. 281252A
1
2
3

 Loading...