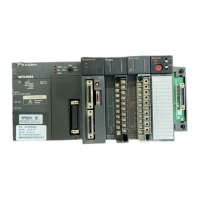
4. AnSHCPU MODULE
4 - 19
MELSEC-
No. Name Function
(4) RS-422 connector
•
Used to connect a peripheral device to write/read, monitor, or test a program using a peripheral
device.
•
Close with the cover when not connected to a peripheral device.
(5) Cover
•
Protects AnSHCPU printed circuit board, memory cassette, RS-422 connector, battery, etc.
•
Execute the following operations with the cover open.
•
Memory cassette connection/disconnection
•
Setting a dip switch
•
Connection to battery connector
•
For mounting the module to the base unit battery replacement
(6) Module fixing screws
•
For mounting the module to the base unit
(7) Battery
•
For retaining data such as programs, device latch ranges, file registers, etc.
(See Section 7.2 for battery replacement.)
(8) DIP switch
•
Used for switching the I/O control method and for setting the memory protect function.
(See Sections 4.4.2 and 4.4.3)
(9) Battery connector
•
For connection to the battery
(10)
Memory cassette
installing connector
•
For installing the memory cassette
(11) "POWER" LED
•
5 V DC power display LED
(12) Base installation hole
•
Hole to install the base unit to a panel such as a control board. (M5 screw)
(13)
Power supply input
terminals
•
Connect the 100 V AC or 200 V AC power for the power input terminal.
(14) LG terminals
•
Power filter grounding terminal. Has half the voltage level of the input voltage.
(15) FG terminals
•
Grounding terminal connected to the shielding pattern on the print board.
(16) DIN rail
•
DIN rail installation hook (2)
(17)
RS-422 connector
cover
•
RS-422 connector cover
(18) Module connector
•
Connector to install the I/O module or special module.
For the connector not for module installation, install supplied connector cover, or blank cover
(A1SG60) to prevent dust entry.
Number of I/O slots
A1SJHCPU : 5
A1SJHCPU-S8 : 8
(19)
Extension cable
connector
•
Connect the extension cable with the signal send/receive connector with the extension base unit.
(20) Base cover
•
Extension connector protective cover.
To extend, the area surrounded by the groove below the OUT sign on the base cover must be
removed using tools such as a nipper.
(21) Module fixing screws
•
Screws to fix the module to the base. (M4
×
12 screws)
 Loading...