Do you have a question about the NCR RealPOS 5976-1 Series and is the answer not in the manual?
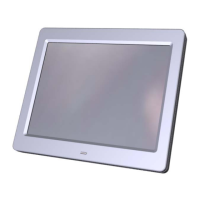
| Display Size | 15 inches |
|---|---|
| Resolution | 1024 x 768 |
| Aspect Ratio | 4:3 |
| Brightness | 250 cd/m² |
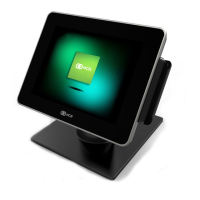
| Touchscreen | Yes |
| Interface | USB |
| Storage Temperature | -20°C to 60°C |
| Touch Technology | Projected Capacitive |
| Connectivity | USB |
| Video Input | VGA |
| Mounting | VESA |
| Operating Temperature | 0°C to 40°C |
| Humidity | 20% to 80% non-condensing |
Details various NCR RealPOS 5976 models and their configurations.
Identifies target users based on product configuration needs.
Models for users needing advanced line display features.
Models for users replacing older 5975 displays.
Statement regarding compliance with RoHS regulations.
Detailed specifications of the display's hardware components.
Information on interface support and connectivity.
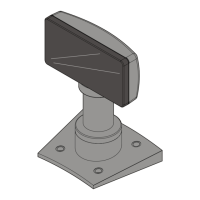
Various mounting solutions available for the display.
Software needed for updates and configurations on the 5976 device.
Information on supported character sets and memory.
Working, storage, and transit environmental conditions.
Physical measurements of the display unit.
Details of the mounting hole pattern on the base plate.
AC and DC power requirements for the device.
System configuration and interface details.
Dimensions for routing cables from the display to the host.
Overview of the installation process and target audience.
Types of cables supported for connection.
Options for powering the display device.
Step-by-step guide for installing the hardware.
Test for character set loading and checksum validation.
Test to check all pixels for functionality.
Crucial safety instructions for servicing the display.
General servicing guidelines and warnings.
How the unit behaves during power-up.
Common issues and their solutions.
Guidance on replacing the unit if faulty.
Instructions on how to clean the display unit.
How the display receives data and commands.
Recommended rate for scrolling text on the display.
Executes power-down/power-up diagnostic sequence and clears display.
Clears all displayed characters by writing spaces.
Handles commands that are not recognized by the firmware.
Displays firmware part number and character sets.
Sets the display to normal run-time conditions.
Reduces power consumption and extends display life.
Activates a flashing cursor at the current position.
Turns off the cursor.
Preserves display life by blanking the screen after inactivity.
Creates a visual effect by walking characters across the display.
Activates screen save functions immediately.
Prevents screen save activity from host software.
Makes characters blink at the cursor position.
Counteracts character blinking, defaulting to off.
Moves the cursor one position to the left.
Moves the cursor one position to the right.
Moves the cursor up one line.
Moves the cursor down one line.
Moves the cursor to a specified position.
Requests all available character set codenames.
Adjusts the overall brightness level of the display.
Returns an identifier for the display model.
Returns detailed product information as an ASCII string.
Requests the ESC character to be displayed.
Chooses one of the supported or external character sets.
Details on default and downloadable character sets.
Overview of Retail Platform Software (RPS) for Windows and Linux.
Information on installing and using RPS for Windows.
Information on installing and using RPS for Linux.
Steps for downloading and installing the Retail Platform Software.
Steps to remove the Retail Platform Software from Windows and Linux.
Overview of the RomFlasher and Code Page Update utility.
Steps for downloading and installing the software utility.
Steps to remove the software utility from Windows and Linux.
Information on product IDs and firmware versions.
Utility for updating device firmware.
Step-by-step guide to update the device firmware.
How to change the firmware mode to compatibility.
How to change the firmware mode back to native.
Utility for managing character code pages.
Steps to download files for code page generation.
Process to create a code page file.
How to flash code pages into devices.
Steps to replace built-in code pages.
Overview of the Service Support Utility's configuration capabilities.
How RomFlasher saves settings for Service Support Utility.
Steps for downloading and installing the Service Support Utility.
Steps to remove the Service Support Utility from Windows and Linux.
Managing the service's background activation.
Steps to stop the service from running automatically.
Instructions to start the service manually.
How to set the service to start automatically.
How to configure the device using default settings.
Feature enabling backward compatibility with previous models.
Steps to set the device for backward compatibility.
How to change the display brightness level.