ENGLISH USER MANUAL
28 SR 1601 D3 / LPG3 / P3 - 33019216
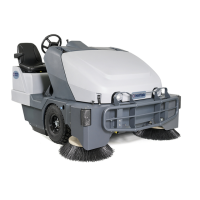
DUST FILTER MAINTENANCE (PANEL FILTER)
The hopper dust lter must be cleaned regularly to maintain the efciency of the vacuum system. Follow the recommended lter
service intervals for the longest lter life.
WARNING!
– Wear safety glasses when cleaning the lter.
– Do not puncture the lter.
– Clean the lter in a well-ventilated area.
– Wear appropriate dust mask to avoid breathing in dust.
1. Drive the machine on a level oor, engage the parking brake and turn the ignition key (66) to “0”.
2. Open the latches (6), lift the hopper hood (16) and ensure that the support rod (17) is in place.
3. Inspect the dust lter upper part (12) for damage. A large amount of dust on top of the lter is usually caused by a hole in the
lter or a damaged lter gasket.
4. Unscrew the lter shaker assembly mounting knobs (13). Lift the lter shaker assembly (11) to access the lter panel.
5. Lift the dust lter (12) and remove it from the machine.
6. Clean the lter using one of the methods below:
Method “A”
Vacuum loose dust from the lter. Then gently tap the lter against a at surface (with the dirty side down) to remove loose dust and
dirt.
NOTE
Take care not to damage the metal lip which extends past the gasket.
Method “B”
Vacuum loose dust from the lter. Then blow compressed air (maximum pressure 6 Bar) into the clean side of the lter (in the
opposite direction of the airow).
Method “C”
Vacuum loose dust from the lter. Then soak the lter in warm water for 15 minutes, then rinse it under a gentle stream of water
(maximum pressure 2.5 Bar). Let the lter dry completely before installing it back into the machine.
NOTE
For proper drying, lay the lter horizontally on two spacers to allow the air to ow under the lter.
NOTE
For a better cleaning, it is allowed to wash the lter with water and non-lathering detergents.
This provides better quality cleaning but reduces the life of the lter, which will have to be replaced more frequently. The
use of inadequate detergents can damage the lter.
7. Install the lter in the reverse order of removal and note the following:
• Install the lter with the wire gauze up.
• If the lter gasket is damaged or missing, it must be replaced.
NOTE
Before replacing lter clear debris from dust plate located under lter.
Check that the debris skirt at the rear of the dust plate swings freely.
33019216(4)2012-03 A.indb 28 10/04/2012 15:52:54
 Loading...