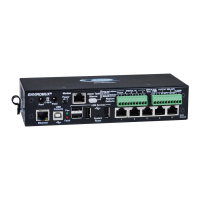
NTI ENTERPRISE ENVIRONMENT MONITORING SYSTEM
12
Installing an Unsigned Driver in Windows 8 and 10 (x64)
When trying to load the USB driver into a Windows 8 or 10 PC in order to use the USB Console port on an NTI product,
you may encounter a window that prevents it because it is an “unsigned driver”, in spite of the fact it is actually a
Microsoft driver from an earlier operating system.
The steps to enable the installation of the USB driver on Windows 8 are as follows:
1. From Windows 8 Control Panel choose General –> Under “Advanced Startup” –> Restart now.
Now the system will restart and might take some minutes to show up the boot menu. Wait for It patiently.
After some time you will be prompted with a menu with the following options.
1. Continue
2. Troubleshoot
3. Turn off
2. Choose “Troubleshoot”
Then the following menu appears:
Refresh your PC
Reset your PC
Advanced Options
3. Choose “Advanced Options”
Then the following menu appears:
System Restore
System Image Recovery
Automatic Repair
Command Prompt
Windows Startup settings
4. Choose “Windows Startup Settings”, then Click Restart.
Now the computer will restart and the boot menu appears.
5. Choose “Disable Driver Signature Enforcement” from the boot menu.
Now Windows will start and you can follow the instructions on page 7 for the installation of the USB driver.
The steps to enable the installation of the USB driver on Windows 10 are as follows:
1. Click the Start menu and select Settings.
2. Click Update and Security.
3. Click Recovery.
4. Click Restart now under Advanced Startup.
5. Click Troubleshoot.
6. Click Advanced options.
7. Click Startup Settings.
8. Click Restart.
9. On the Startup Settings screen press 7 or F7 to disable driver signature enforcement.
Your computer will restart and you will be able to install non-digitally signed drivers.
Note: If you restart your computer again the driver signature enforcement will be re-enabled.
 Loading...