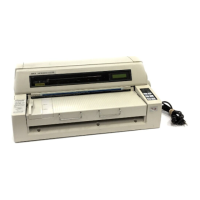
3.2.7
(1)
(2)
(3)
(4)
(5)
6)
Ribbon feed gear assembly
Remove the upper cover (see 3.2.1).
Remove ribbon cartridge
@
by lifting both
sides@
Disengage the two front tabs
@
and two rear tabs@
(total of four tabs). Then lift
upward by inserting small flat screwdriver to slots.
Remove ribbon feed gear assembly
@.
Remove carriage cable
@
,
cable holder
8,
and contact pressure rubber
@
from
ribbon feed gear assembly
@.
For reassembly, reverse the disassembly procedure.
Notes:
D
6
not touch the carriage cable
@
and space motor assembly
@
terminal (contact)
B
directly with hand and make sure that it is clean.
1.
2.
3.
Make sure the carriage cab/e
@
is not folded.
After installing ribbon feed gear assembly
@,
check and adjust the gap between the
platen and print head (see section
5).
3-14