9
I
9~1
Replacement
of
Lamps
Do
not
attach
heat
compound
stuck
on
the
lamp
glass.
AJwaystighten
the: clamp.,
ing
knobs
firmly.
rP
Donottouch
the
lamp
glass
surfacevirith
your
hand
directly.
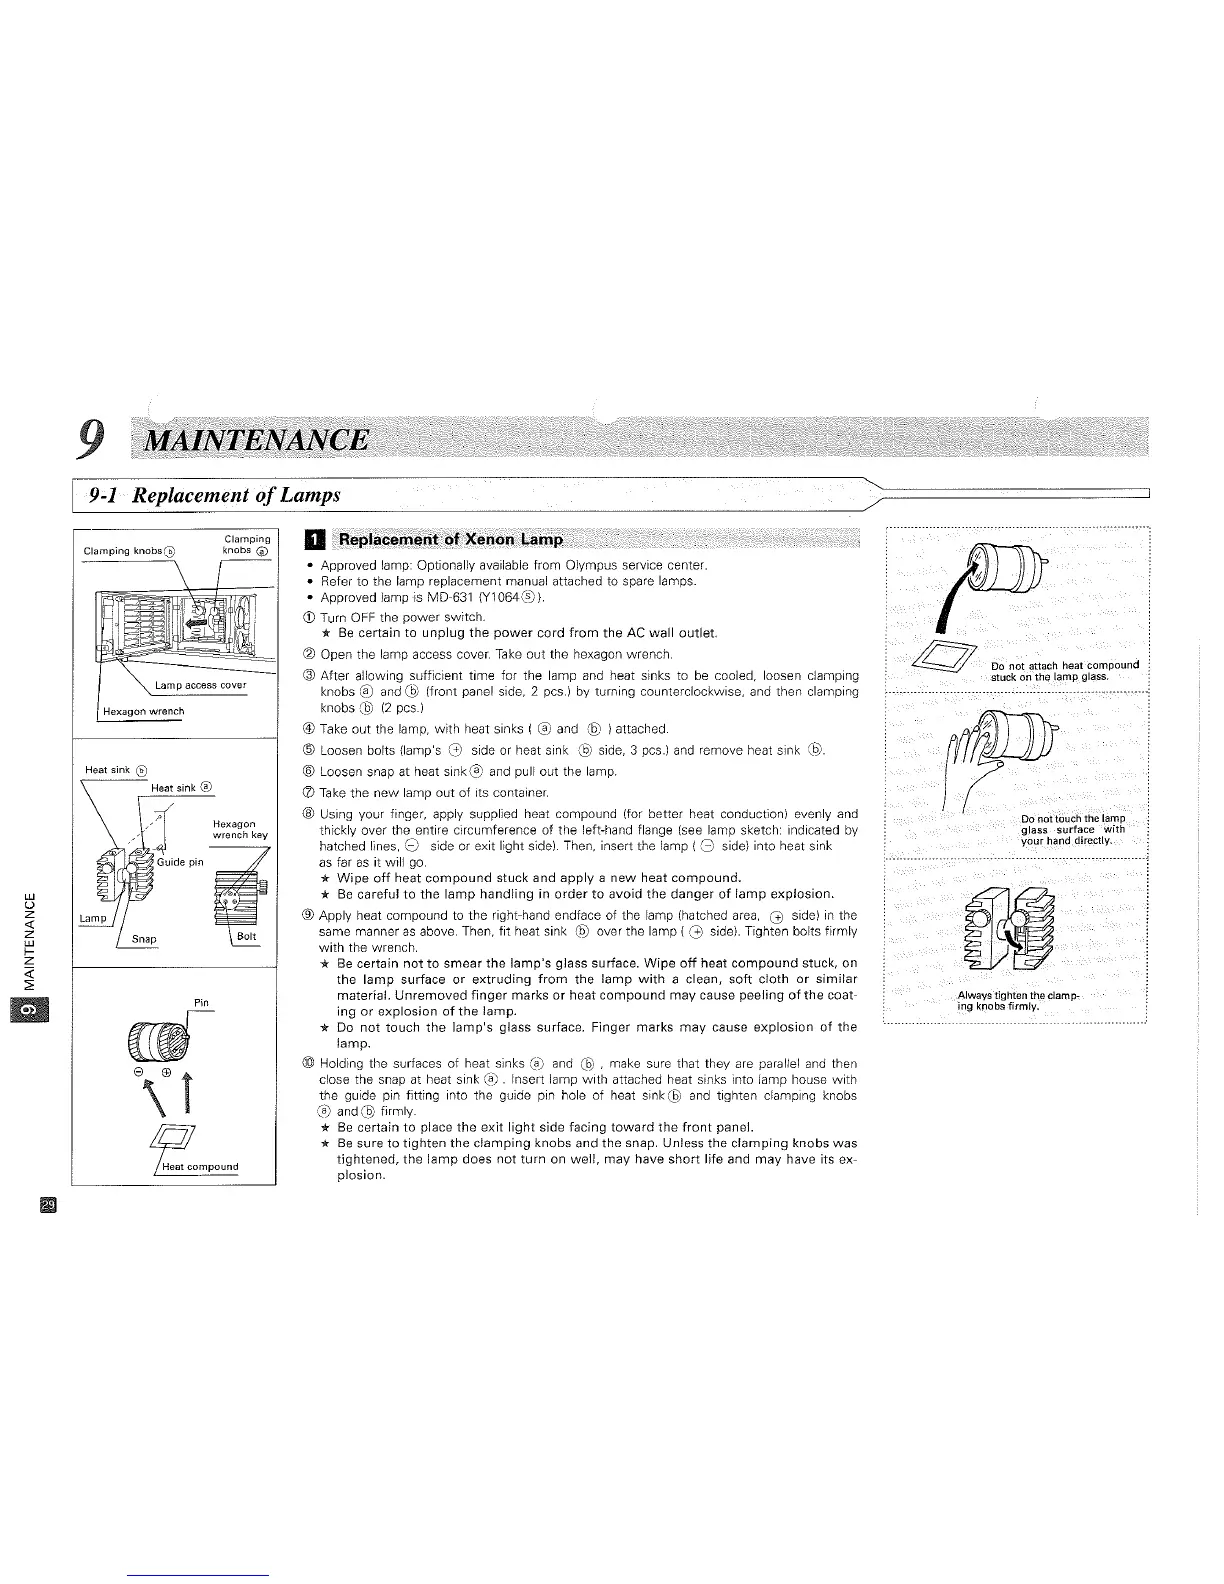
o Replacemlmt of Xenon lan1p
• Approved lamp: Optionally available from Olympus service center.
• Refer
to
the lamp replacement manual attached to spare lamps.
• Approved lamp is MD-631
(Yl064(S)
I.
eD
Turn
OFF
the power switch.
*
Be
certain
to
unplug
the
power
cord
from
the
AC
wall
outlet.
@ Open the lamp access cover.
Take
out the hexagon wrench.
® After allowing sufficient time for the lamp and heat sinks to
be
cooled, loosen clamping
knobs ® and @ (front panel side, 2
pcs.1
by turning counterclockwise, and then clamping
knobs
(9)
(2
pcs.1
® Take out the lamp,
with
heat sinks ( ® and @ I attached.
@ Loosen bolts (lamp's G side or heat sink
.@
side, 3 pes.) and remove heat sink
(tV.
® Loosen snap at heat sink ® and pull out the lamp.
(])
Take
the
new
lamp out of its container.
® Using your finger, apply supplied heat compound (for better heat conductionl evenly and
thickly over the entire circumference of the left-hand flange (see lamp sketch: indicated by
hatched lines,
8 side or exit light side). Then, insert the lamp
{-8
side} into heat sink
as
far
as
it will go.
*
Wipe
off
heat
compound
stuck and
apply
a
new
heat
compound.
*
Be
careful
to
the
lamp
handling
in
order
to
avoid
the
danger
of
lamp
explosion.
® Apply heat compound to the right-hand endface of the lamp (hatched
area,
G sidel
in
the
same manner
as
above. Then, fit heat sink
(6)
over the lamp ( G sidel. Tighten bolts firmly
with
the wrench.
*
Be
certain
not
to
smear
the
lamp's
glass surface.
Wipe
off
heat
compound
stuck,
on
the
lamp
surface
or
extruding
from
the
lamp
with
a clean,
soft
cloth
or
similar
material.
Unremoved
finger
marks
or
heat
compound
may
cause
peeling
of
the
coat-
ing
or
explosion
of
the
lamp.
* Do
not
touch
the
lamp's
glass surface.
Finger
marks
may
cause
explosion
of
the
lamp.
@)
Holding the surfaces of heat sinks
(a)
and
(§)
, make sure that they are parallel and then
close the snap at heat sink
(~)
. Insert lamp
with
attached heat sinks into lamp house
with
the guide pin fitting into the guide pin hole of heat
sink@
and
tighten clamping knobs
(a)
and
(9)
firmly.
*
Be
certain
to
place
the
exit
light
side facing
toward
the
front
panel.
*
Be
sure
to
tighten
the
clamping
knobs and
the
snap. Unless
the
clamping
knobs
was
tightened,
the
lamp
does
not
turn
on
well,
may
have
short
life and
may
have
its ex-
plosion.
Clamping
knobs @
Hexagon
wrench
key
Heat
compound
Pin
Lamp
access
cover
Hexagon
wrench
Guide
pin
~,
rr'-"=oJ<
Heat
sink
®
Heat sink ®
Clamping
knobs®
LlJ
U
Z
«
z
LlJ
f-
Z
<i'
:;;
Ell