125
Analog Output Units Section 5-2
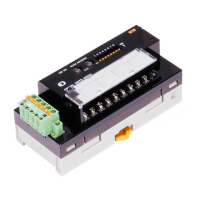
Components
DIP Switch Settings The following diagram shows the functions of the DIP switch.
The following table summarizes the DIP switch settings. (All pins are factory-
set to OFF.)
PWR Indicator
Internal power being supplied: Lit green
No internal power supply: Not lit
U.ERR Indicator
Unit error: Lit red
Unit normal: Not lit
DIN Track Mounting Hook
I/O Unit Interface
Communications Connector 1
(on the Communications Unit side)
TS Indicator
Shows the communications status of the I/O Unit interface.
Normal communications: Lit green
I/O Unit interface error: Lit red
During initialization, or with no power supply: Not lit
I/O Unit Interface
Communications Connector 2
(on the terminator side)
Terminal Block
DIP Switch
On the left side of the Casette.
Pin 1 to 6: Output range
Pin 7: Reserved for system use (OFF)
Pin 8, 9: Output for communications errors
Pin 10: Software setting enable/disable
Cassette
Detach by pressing on the lower
part and pulling outwards.
(Refer to page 200.)
(Refer to page 201.)
(Refer to page 207.)
(Refer to page 125.)
Pin(s) Function Settings Meaning
1 through 6 Output range Output range settings (See below.)
7 Reserved for system use OFF Must be set to OFF.
8, 9 Output for communications
errors
(See below.)
8 9 Output
OFF OFF Clear to minimum
(See below.)
OFF ON Clear to maximum
(See below.)
ON OFF Clear to 0 V
(for –10 to 10 V)
Clear to minimum
(other than the above)
ON ON Hold
10 Software setting enable/
disable
OFF Set the output range and
output for communications
errors with pins 1 to 9. (fac-
tory-set)
ON Output range setting (See
note.) and output setting for
communications errors can
be set using the Configura-
tor.
Operating specifications
•
Output for communications errors
•
Software setting enable/disable
Output
range
ON