24
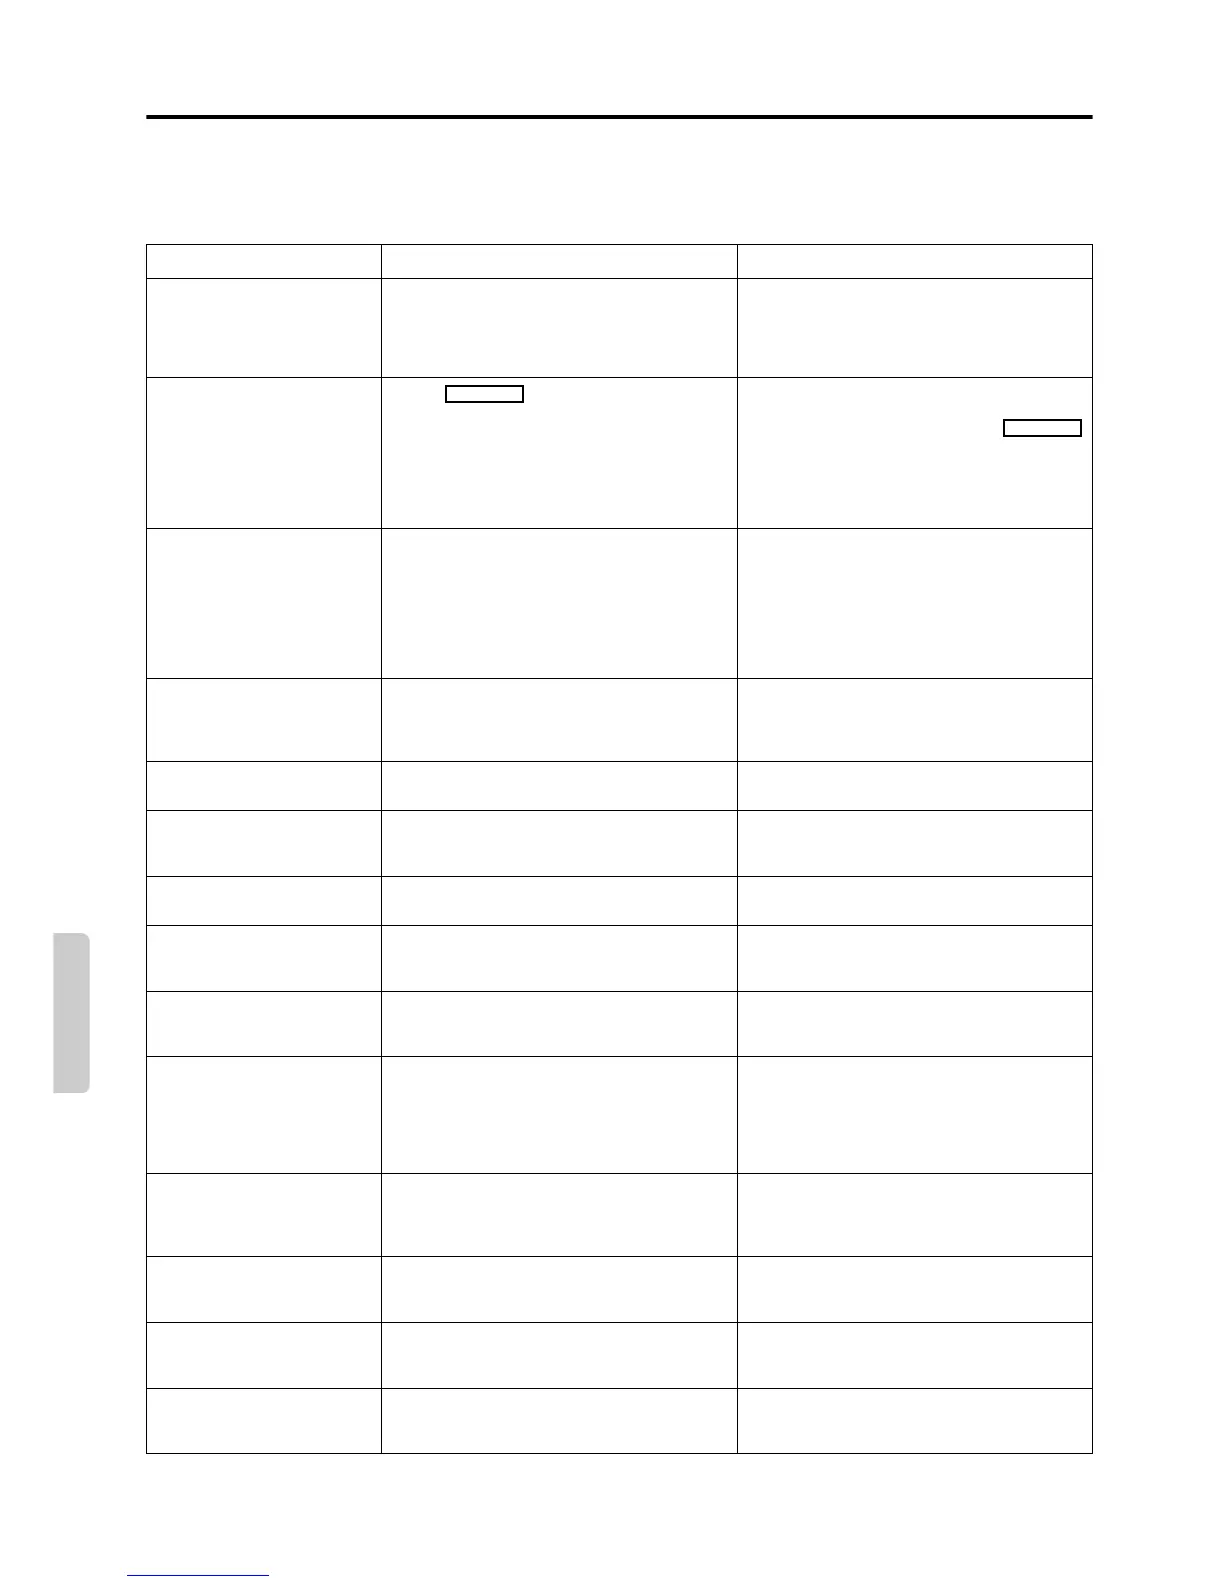
Troubleshooting guide
If a problem occurs while you are using the remote controller, first operate the unit using the front panel controls to confirm that it is not due
to a malfunction (or worn out batteries) of the remote controller.
This stereo system contains a sensitive microcomputer, which under certain circumstances might fail to operate due to excessive noise inter-
ference. In such an event, disconnect the AC power from your electrical outlet and replace it 5 seconds later.
● Also refer to the respective instruction manuals of the video disc player, video cassette recorder, TV monitor, etc., being used.
Trouble Cause Remedy
No power. ● Power cord is disconnected.
● There is external noise in the computer circuits
of this unit.
● AC fuse blown.
● Connect power cord.
● Turn the power button off and then on again or
remove the AC plug from the outlet and then
plug it again.
● Contact your Onkyo Service Center.
Power on but no sound. ● The indicator is lit.
● MUTING button is on.
● Bad connections.
● Amplifier protection circuitry has been acti-
vated.
● While pressing the input selector button for the
source that you wish to listen to, press the
TAPE (MONITOR) button. The
indicator goes off.
● Switch to off by the remote controller.
● Check connections, speaker cables, etc.
● Contact your Onkyo Service Center.
No sound from the center
speaker, or very minimal
sound.
● Speaker cable connections are not corrected.
● SURROUND MODE button is set to BY-PASS.
● CENTER LEVEL is set to minimum.
● CENTER MODE button is set to PHANTOM.
● Check the connection between the amplifier
and the speaker.
● Set the SURROUND MODE button to DOLBY
PRO LOGIC or HALL.
● Set the CENTER LEVEL to the appropriate
volume.
● Set CENTER MODE button to NORMAL or
WIDEBAND.
Hum, low-frequency noise.
● Poor or no input ground.
● Poor or no phono motor ground.
● The placement of the audio connection cables
on the rear panel is incorrect.
● Check outer conductor of input plugs.
● Check for proper ground connection.
● Adjust the placement of the cable to reduce
hum.
Howling when the volume is
turned up.
● Turntable and speakers are too close together. ● Move them farther apart.
Rough or scratchy sound.
High range is not clear.
● Stylus of turntable pick-up is worn.
● Turntable stylus tip is dirty.
● Treble control too high.
● Replace.
● Clean.
● Turn treble control down.
AM stations cannot be
received.
● AM loop antenna is not attached. ● Connect the included AM loop antenna to the
AM antenna terminals.
Buzzing noise on AM (partic-
ularly conspicuous at night
or with weak stations).
● Noise from electrical apparatus such as fluo-
rescent lamp.
● Move the AM loop antenna to different posi-
tion.
● Set up an outdoor AM antenna.
High-pitched noise or buzz-
ing noise on AM.
● Noise from TV set. ● Place the AM loop antenna as far as possible
from the TV.
● Move unit away from TV set.
Crackling noise on AM, FM. ● Noise caused by turning fluorescent lamp on
and off.
● Noise from automobile ignition.
● Move antenna as far as possible from the fluo-
rescent lamp.
● Install an FM outdoor antenna as far as possi-
ble from the road.
● Change the position or direction of the outdoor
antenna.
TUNED and STEREO indica-
tors light but sound is dis-
torted and stereo separation
is bad.
● Station is too strong.
● Multiple reflection of the radio waves because
of tall buildings or mountains.
● Change to T-shaped antenna.
● Use antenna which has better directivity and
select a point where the distortion is least.
TUNED and STEREO indica-
tors flicker and hiss is heard
on FM.
● Station is too weak.
● Stereo FM broadcasts cover only about half
the distance of an ordinary broadcast.
● Install an outdoor FM antenna.
● Change the position or direction of the outdoor
antenna.
No station is recalled when
the PRESET SCAN button is
pressed.
● The power cord has been unplugged for a long
time.
● The memory contents are lost. Store all sta-
tions again.
Front panel controls function
but remote controller does
not.
● No batteries in remote controller.
● Batteries have worn out.
● Insert batteries.
● Replace batteries
TAPE MON.
TAPE MON.

 Loading...