17
1. Before Use
• Function buttons ([Fn6] to [Fn10]) are
touch icons.
Touch the [ ] tab on the recording screen to
display them.
45
46
47
48
50
49
34
51
38 39
58
5455
36
35
44
43
52
53
37 4140
42
57 56
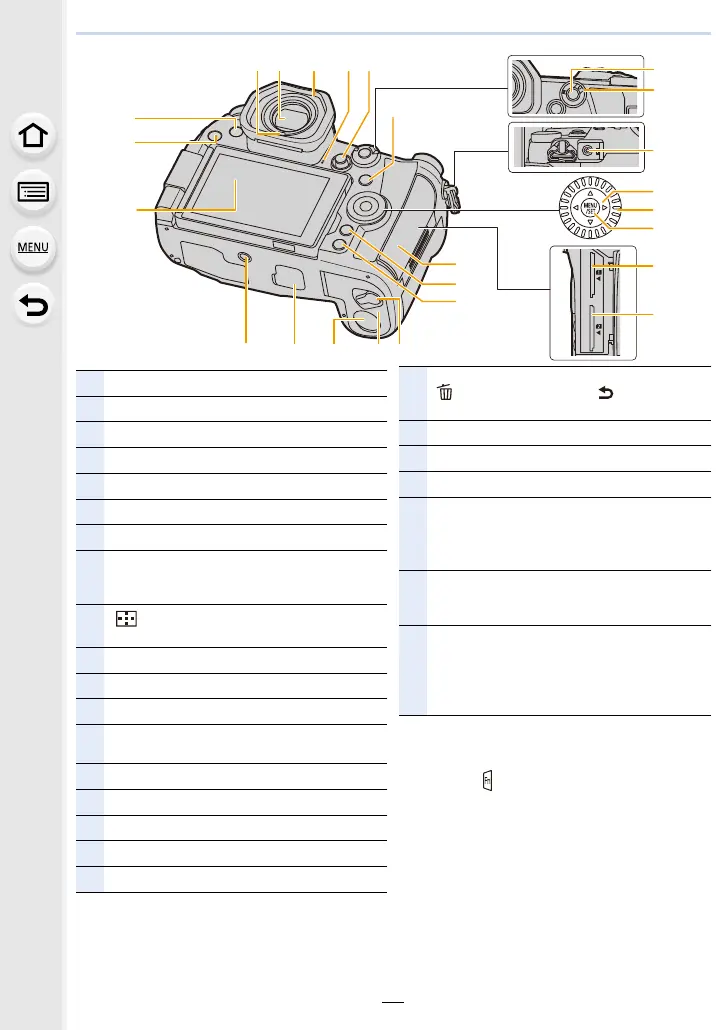
34
Touch screen (P52)/monitor (P313)
35
[(] (Playback) button (P176)
36
[LVF] button (P41)/[Fn3] button (P60)
37
Eye sensor (P41)
38
Viewfinder (P41)
39
Eye cup (P334)
40
Speaker (P222)
41
Joystick (P48)/Function button (P60)
Centre (Fn11)/3 (Fn12)/1 (Fn13)/4 (Fn14)/
2 (Fn15)
42
[ ] (Auto Focus Mode) button (P92)/
[Fn1] button (P60)
43
[AF/AE LOCK] button (P106)
44
Focus mode lever (P87, 103)
45
[REMOTE] socket (P310)
46
Cursor buttons (P47)/Function button (P60)
3 (Fn16)/1 (Fn17)/4 (Fn18)/2 (Fn19)
47
Control dial (P46)
48
[MENU/SET] button (P47, 55)
49
Card slot 1 (P29)
50
Card slot 2 (P29)
51
Card door (P29)
52
[Q.MENU] button (P58)/[Fn2] button (P60)/
[ ] (Delete) button (P183)/[ ] (Cancel)
button (P57)
53
[DISP.] button (P49)
54
Release lever (P23)
55
Battery door (P23)
56
DC coupler cover (P312)
• When using an AC adaptor, ensure that the
Panasonic DC coupler (optional) and AC
adaptor (optional) are used.
57
Cover for the battery grip connector (P309)
• Keep the cover for the battery grip connector
out of reach of children to prevent swallowing.
58
Tripod mount (P338)
• It may not be possible to attach and securely
fasten a tripod with a screw length of 5.5 mm
(0.22 inch) or more to the camera. Doing so
may also damage the camera.

 Loading...