Do you have a question about the Panasonic SA-VK61D and is the answer not in the manual?
Procedures for safe handling before and after repair, including capacitor discharge.
Explains the protection circuitry and troubleshooting steps if it activates.
General safety rules for servicing, lead dress, and protective device installation.
Procedure for checking leakage current with the unit unplugged.
Procedure for checking leakage current with the unit plugged in.
Guidelines and techniques to prevent ESD damage to sensitive components.
Information on lead-free solder, its properties, and safe soldering practices.
Precautions for handling optical pickup, including avoiding impact and short-circuiting.
Steps and checks required before replacing an optical pickup unit.
Methods for grounding to prevent ESD damage to optical pickup.
Specific cautions related to laser diode operation and safety.
Visuals and list of disc types supported by the unit.
Details on how HighMAT improves usability and creates a common interface.
The initial step in the repair process.
The second step, focusing on identifying the problem.
The diagnostic phase to pinpoint the faulty component.
The step where the actual repair is performed.
The final step of the repair process.
Detailed steps for identifying the cause of a malfunction.
Guidance on inspecting mechanical parts and diagnosing faults.
Methods to check for laser diode damage in the optical pickup.
Steps to verify the operational status of the optical pickup.
Describes the unit's self-diagnosis and tilt adjustment functions for effective repair.
Instructions for checking usage time before replacing the optical pickup and spindle motor.
Precautions for handling optical pickup due to static electricity.
Details on automatically displayed error codes like F61 and F76.
Explanation of error code F61, its state, causes, and troubleshooting.
How to activate and display memorized error codes.
Step-by-step guide to initiate the self-diagnosis function.
Description of error codes related to disc tray and servo failures.
Lists error codes that occur when playback is not possible.
How to display and measure jitter values.
How to measure and memorize laser current initialization values.
How to measure DVD laser current electricity.
How to measure CD laser current electricity.
How to set the tray lock function.
Steps to enter the disc lock mode.
Steps to enter the operation lock mode.
Post-repair procedures like closing the tray and unplugging the power.
Procedures for optimizing the drive after replacing Flash ROM or module PCB.
Process for upgrading DVD player firmware for performance improvements.
Combined process for firmware upgrade and recovery.
Procedure for removing screws, breaking joints, and desoldering the power amp IC.
Steps for removing the FFC board and DVD Module (1) PCB.
Procedures for installing the DVD Module (1) PCB after replacement.
Steps for inserting gears, rotating wrenches, and drawing the disc tray.
Steps for installing the disc tray, including sliding racks and aligning gears.
Steps for installing belts, removing screws, unsoldering terminals, and removing the motor assembly.
Steps for installing winding belts, flywheels, capstan belts, and sub chassis.
Steps for forcing levers, lifting, and removing the cassette lid assembly.
Detailed steps for adjusting head azimuth for optimal playback.
Procedure for adjusting tape speed to a target frequency.
Highlights critical components and safety warnings.
Warning about static electricity sensitivity of ICs and LSIs.
Continued schematic of the power supply circuit, showing transistor switches and regulators.
Continued schematic of the power circuit, showing fuses, transformers, and regulators.
Detailed pin functions for the system microprocessor IC600.
Safety warnings related to special components and replacements.
Emphasizes using manufacturer-specified parts for replacements.
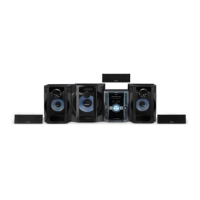
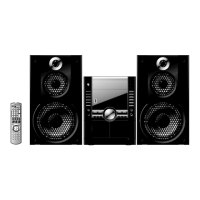
| Brand | Panasonic |
|---|---|
| Model | SA-VK61D |
| Category | Stereo System |
| Language | English |