How do I tune to the correct AM frequency on my Panasonic SA-XR57 Receiver?
- SSamuel GriffinSep 6, 2025
If the correct AM frequency cannot be tuned in on your Panasonic Receiver, change the frequency step to suit your area when AM is selected.
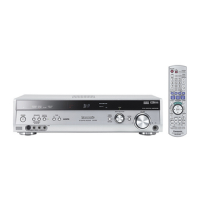
How do I tune to the correct AM frequency on my Panasonic SA-XR57 Receiver?
If the correct AM frequency cannot be tuned in on your Panasonic Receiver, change the frequency step to suit your area when AM is selected.
What to do if my Panasonic SA-XR57 stops and shows “OVERLOAD”?
If your Panasonic Receiver stops, “OVERLOAD” appears on the display, and the unit turns off, it could be due to several reasons: * Shorting of positive and negative speaker wires. * Using speakers with an impedance lower than that rated for this unit. * Straining of the speakers through excessive volume or power. * Using the unit in a hot environment without proper ventilation. Determine and correct the cause, then turn the unit on.
Why is the sound distorted when using the Sound Field Control (SFC) on my Panasonic SA-XR57 Receiver?
If the sound is distorted when using the Sound Field Control (SFC) on your Panasonic Receiver, depending on the input source, sound may be distorted if you increase the SFC effect level. If this happens, decrease the SFC effect level.
Why can't I switch MULTI CH SURROUND on my Panasonic SA-XR57 Receiver?
If you cannot switch MULTI CH SURROUND on your Panasonic Receiver (Dolby Pro Logic, NEO:6, and SFC are unavailable): * Check if the center speaker, surround speakers, and surround back speakers are connected properly. * Switch SPEAKERS A on. * You cannot use the MULTI CH SURROUND effect when the input source contains PCM signals with sampling frequencies of 192 kHz. * Cancel DVD analogue 6-channel playback. * You cannot use the effect when the input source contains dual audio signals in Dolby Digital or DTS formats.
How do I fix the issue where the first few seconds of sound are cut off when using an HDMI connection with my Panasonic SA-XR57?
If the first few seconds of sound are cut off when using an HDMI connection with your Panasonic Receiver: * If playing a chapter on a DVD, change the audio output setting on the DVD player or DVD recorder from “Bitstream” to “PCM”. Note that 6.1-channel sources will be played as 5.1-channel. * Select “PCMFIX ” as instructed in “Setting input signals” when you play 2-channel sources.
Why is there no sound from the surround back speaker on my Panasonic Receiver?
If you are not hearing sound from the surround back speaker on your Panasonic Receiver: * Ensure the speaker settings for your speakers are correct. * Switch MULTI CH SURROUND on.
What does it mean if the analogue input becomes distorted and the message 'OVERFLOW' appears on the display of my Panasonic SA-XR57 Receiver?
If the analogue input becomes distorted and the message “OVERFLOW” appears on the display during playback on your Panasonic Receiver, switch the attenuator on.
How to troubleshoot no sound from center, surround, or subwoofer speakers on my Panasonic SA-XR57?
If you are not hearing sound from the center, surround, or subwoofer speakers on your Panasonic Receiver: * Ensure the speaker settings for your speakers are correct. * Confirm Dolby Pro Logic, NEO:6, or SFC settings, and select an adequate mode. * Switch MULTI CH SURROUND on when you play 2-channel stereo sources.
Why is there noise and interference on my Panasonic Receiver radio?
If your Panasonic Receiver radio cannot be tuned in or has a lot of noise and interference: * Connect the appropriate antenna. You may need an outdoor antenna or one with more elements. * Adjust the position of the FM or AM antenna. * Reduce the treble. * Turn off nearby televisions, video decks, DVD recorder, DVD players, and satellite receivers. * Separate the antenna from other cables, cords, and appliances.
How to fix a Panasonic SA-XR57 that has no power?
If your Panasonic Receiver has no power, ensure the AC mains lead is connected.
| Audio system | 7.1 |
|---|---|
| Channels quantity | 7 channels |
| Dimensions (WxDxH) | 430 x 394 x 107.5 mm |
| Output power description | 80 / 100W |
| Line-in | Yes |
| Impedance | 6 Ω |
| Frequency range | 4 - 88000 Hz |
| Total Harmonic Distortion (THD) | 0.9 % |
| I/O ports | - Component Video 3-in, 1-out - S-Video 3-in, 1-out - Video 5-in, 2-out - Digital In 4 (2-optical, 2-coaxial) - 6-ch Discrete In - Audio 7-in, 2-out - HDAVI - Subwoofer Out |
| Connectivity technology | Wired |
| AM band range | 522 - 1611 kHz |
| FM band range | 87.5 - 108 MHz |
| Weight | 4500 g |
|---|
Covers mains lead safety, placement, voltage, foreign matter, service.
Step-by-step instructions for replacing the fuse in the AC mains plug.
Explains remote control functions, unit indicators, and display elements.
Guides on connecting audio/video equipment like TVs, DVD recorders, and players.
Details on using HDMI for superior digital audio and video transmission.
Instructions on using various cables for optimal picture quality.
Notes regarding input video signals and component video terminals.
Guides on connecting for standard picture quality using various cables.
Specific instructions for connecting using a 21-pin scart cable.
Guides for making analogue audio connections using various cables.
Instructions for high-quality analogue sound via DVD-Audio 6-channel.
How to connect for multi-channel TV audio using digital or analogue outputs.
Specific connection guide for a DVD recorder that includes a VCR.
Guidance on ideal placement and connection of speakers for optimal sound.
Instructions on how to properly connect speaker cables to terminals.
Specifies the required impedance for different speaker types.
Instructions for connecting speakers designed for bi-wiring.
How to connect and use a second pair of front speakers for multi-room audio.
Guides for connecting FM and AM antennas for radio reception.
How to connect cable or satellite receivers for audio output.
Guide for connecting a VCR for audio and video signals.
How to connect a CD player for digital or analogue audio.
Temporary connections for video cameras or game players.
Guides on how the unit automatically detects and sets up speakers.
Explains the display indicators for detected speakers.
Steps to verify speaker output and balance volume levels.
Steps for turning on the unit, selecting speakers, and choosing input sources.
How to play back selected sources and activate surround effects.
Lists digital signal formats supported by the unit.
Explains the display indicators for various audio signal types.
How to use the SPEAKERS B terminals for stereo playback.
Explanation of the advanced dual amp function for enhanced audio.
How to achieve enhanced stereo sounds using bi-amp connections.
Guides for playing DVD-Audio sources via digital or analogue connections.
Explanation of HDAVI Control for linked operation of Panasonic equipment.
Steps to connect equipment and activate HDAVI Control.
How to operate multiple devices with a single button press.
Instructions for operating a Panasonic DVD recorder with the remote.
Instructions for operating a Panasonic TV with the remote control.
Instructions for operating a Panasonic DVD player with the remote control.
Instructions for operating a VCR with the remote control.
Instructions for operating a CD player with the remote control.
How to enter codes to operate other brands' equipment.
Explanation of Dolby Pro Logic IIx modes (Movie, Music, Game).
Explanation of NEO:6 modes (Cinema, Music) for surround effects.
Guides on using SFC modes for music and movie playback.
Fine-tuning Dolby Pro Logic IIx 'MUSIC' mode settings.
Fine-tuning NEO:6 'MUSIC' mode settings for better audio.
How to adjust output levels for different speakers and the subwoofer.
Adjusting subwoofer level and temporarily silencing speakers.
Controls for dimming the display and using headphones.
Steps to enter menus and select items for adjustment.
How to adjust bass, treble, and speaker volume balance.
Switching dual audio signals and setting the sleep timer.
Steps to enter the setup menu and navigate settings.
Manually setting speaker sizes and distances for optimal sound.
Configuring bi-wiring connections and lowpass filter settings.
Adjusting digital input settings for OPT and COAX terminals.
Fixing input signals and configuring bi-amp settings.
Selecting connected equipment for the HDMI input terminal.
Adjusting standby power and listening comfortably at low volume.
Using attenuator, delaying audio, and resetting settings.
How to manually tune stations and adjust AM frequency steps.
Guide for automatic station tuning and finding stations.
Steps for auto-presetting and manually presetting radio stations.
Methods for improving FM stereo and AM reception quality.
How to change the display to show RDS information like station name.
Solutions for common issues like no power, no sound, or distorted audio.
Troubleshooting for radio reception and HDMI connection problems.
Resolving problems with the remote control and display brightness.
Explains common on-screen messages and their countermeasures.
Detailed technical specifications for amplifier, tuner, and video sections.
Cautions on unit placement, ventilation, and avoiding heat sources.
Guidelines on battery disposal and protecting the unit from liquids.
Lists all accessories provided with the unit.
Instructions on how to clean and maintain the unit.




 Loading...