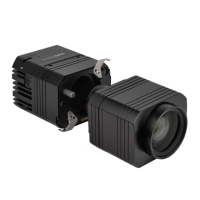
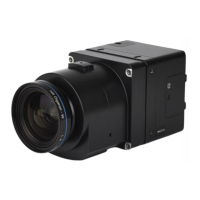
The Phase One iXH Camera System is developed for Phase One Cultural Heritage, Scientific, and Industrial Imaging Solutions. This installation guide provides comprehensive instructions for setting up, operating, and maintaining the iXH-150MP camera system.
Function Description
The iXH camera is an integrated component of a Cultural Heritage digitization system, designed to deliver high-resolution capturing capabilities. It operates in conjunction with Phase One image capture and processing software, Capture One CH. The system supports both flash and continuous light sources, offering flexibility for various imaging scenarios. Remote triggering options, including a remote shutter trigger, foot pedal, and triggering through Capture One, enhance operational convenience. The camera can be connected to a computer via USB-C for tethered sessions and data transfer, or via 1G/10G Ethernet for high-speed networking.
Important Technical Specifications
The standard components included with the iXH-150MP camera system are:
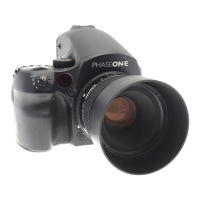
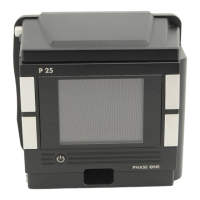
- Phase One iXH 150MP camera
- Phase One RS 72mm MkII / f5.6 Lens
- 24 V DC power supply with international outlet adapters, 5m
- USB 3.0 A-C cable, 4.6m
- Flash sync cable, 5m
- Hand release unit with 30cm cable
- Hand release trigger cable, 5m
- iXH Light Control cable, 5m
- iXG/iXH VHQ L-shaped bracket
- Screwdriver, Allen 4mm
- Microfiber Cloth
- USB drive with documentation
- Installation Guide
- Warranty certificate
- Suitcase for iXG camera
Optional accessories include:
- Schneider Kreuznach RS 120mm / f5.6 APO Macro lens
- Collapsible ø46mm lens shade for 120mm lens
- 21mm Extension Tube
- 42mm Extension Tube
The iXH camera features several ports and threaded holes for mounting and connectivity:
- Lens locking lever
- Top ¼” threaded holes for VHQ L-Bracket
- Bottom ¼” threaded holes for VHQ L-Bracket
- USB-C port
- Data terminal A
- Data terminal B
- Power terminal
- HDMI port cover
- Sync Terminal
- 10G Ethernet port/module
For 1G/10G networking, the iXH camera supports both USB3 and 10G interfaces.
- Up to 5 meters: Use SFP + DAC passive cable. Consumes less power on the camera side.
- Up to 30 meters: Use SFP + copper transceivers (use CAT6e cable or better).
- 30+ meters: Use SFP + optical transceivers.
Recommended adapters for 10G networking:
- Single port: 10Gb/s Ethernet Converged Network Adapter, Compatibility: Intel X520-DA1: X520-10G-1S-X8
- Dual port: 10Gb/s Ethernet Converged Network Adapter, Compatibility: Intel X520-DA2: X520-10G-2S-X8
SFP+ modules:
- Copper: SFP + copper transceiver 10GBase-T, Cat 6a/7, 30m (ASF-10G-T). Compatibility: None, Intel, Cisco. Model: ASF-10G-T
- Fiber: 10Gb/s SFP+ SR Transceiver 10GBase-SR 850nm, 300M, for Intel. Model: AXS85-192-M3
Media types for 10G communication:
- Copper: Cat 6e and better are required for 10G communication. Lengths range from 1 meter up to 10+ meters.
- Fiber optic: LC to LC, Multimode OM3 10Gb 50/125µm, Duplex. Lengths range from 1 meter up to 100+ meters.
Usage Features
- Lens Mounting and Dismounting: Lenses are easily mounted and dismounted. When dismounting, it's crucial to do so in a clean environment and place the lens on a soft cloth to prevent scratching. When mounting, ensure the two large positioning pins align with the camera body, and close the lens locking lever. The lens is asymmetrical and can only be fitted in one position.
- Attaching to a Copy Stand: The iXH camera can be attached to a copy stand using the supplied 4mm Allen screwdriver to secure the VHQ L Bracket. The VHQ L Bracket allows the camera's position to be set in either "portrait" or "landscape" orientation without removing the camera and while keeping the lens centered.
- Remote Triggering: The camera supports remote triggering via a Remote Shutter Trigger (5-meter trigger cable connecting to a data terminal), a Foot Pedal (5-meter trigger cable connecting to a data terminal), or directly through Capture One software.
- Power Supply: Connect the Lemo connector of the iXH power cable to the power terminal of the iXH camera. Always disconnect power when not in use.
- USB-C Connection: Connect the USB-C cable to the camera's USB-C port and to the computer's USB port. An adapter or suitable cable may be needed for computers with only USB-C ports.
- Tethered Session in Capture One: After installing and activating Capture One, users can start a tethered session by selecting "New Session" from the File menu, filling in session details, and clicking OK.
- Setting Date and Time: Date and time can be set in Capture One's Camera Settings Tool. The format YYYY-MM-DD HH:MM must be used.
- Operating with 1G/10G: The camera can be connected to a computer using either USB3 or 10G interfaces. For 10G networking, it's important to configure IP settings (Static Setup, IP Address, Netmask, Gateway, DHCP Enabled/Mode) and ensure the 10G option is enabled in Camera Settings > Power Management.
- Connecting New Camera to Capture One: Connect the camera via USB3, then use the Camera Network Manager in Capture One to add and name the camera.
- Verifying Camera's IP Address: Connect via USB3 and navigate to Camera > Camera_settings > Network-10G in Capture One.
- Configuring Jumbo Packets: For optimal 10G performance, configure Jumbo Packets on the network card. This involves accessing Network Connections, opening Ethernet Properties, selecting "Configure" for the network adapter, going to the "Advanced" tab, selecting "Jumbo Frame," and setting the value (e.g., 9kB MTU). A reboot is required for changes to take effect.
- Next Capture Adjustments: In Capture One, users can configure ICC Profile, Orientation, Metadata, All Other, Styles, and Auto Alignment settings for subsequent captures.
- Camera Controls and Settings: Adjustments for Shutter speed, Aperture, ISO, White Balance, and File Format (IIQ-L 16/14-bit or IIQ-S) can be made in Capture One.
- Working with Live View: Live View allows users to adjust composition, focus (using focus arrows for fine, medium, or large adjustments, or Auto Focus), and set a target resolution, field of view, distance, or magnification. Fine Auto Focus can be activated by holding the Alt key and pressing the AF button for smaller focusing steps.
- Capturing Images: To take a shot, select the camera in Capture One and press the Capture button. The image appears on the monitor. Over-exposure and under-exposure warnings are displayed, and sharpness can be checked using the zoom tool at 100%.
- Setting White Balance: White Balance can be set from a neutral area of an image file using the White Balance picker in the Camera Tool.
- Light Control Setting: The system controls flash and continuous light sources.
- Lighting Mode = Flash: Triggers flash systems. The flash pulse starts at the beginning of the exposure cycle and turns off after 5ms. Connect the flash system via the audio connector of the iXH flash cable to the LEMO 5 socket.
- Lighting Mode = Continuous Light: Controls LED lighting equipment. The iXH controls the light with a Light Strobe signal on LEMO 2 and 3 terminals, turning the light ON or adjusting its level before exposure and turning it OFF or decreasing it after exposure to minimize exposure to artifacts.
- Light Strobe Mode: For continuous light, four modes are available: One Pulse Active Low (recommended for DT Photo Smart Controller), Two Pulses Active Low, One Pulse Active High, and Two Pulses Active High.
- Pre-activation Time: Adjustable from 0ms to 1000ms (1ms steps, tolerance approx. 10ms). This allows lighting equipment to reach full operation level before exposure begins. DT Photo Smart Controller requires 80ms.
Maintenance Features
- Firmware Handling: The Camera Settings tool in Capture One displays technical information about the camera and lens firmware. Users can check for the latest firmware version on industrial.phaseone.com.
- Firmware Updater Application: The Phase One Firmware Updater application (available for Mac and Windows) is used to update the iXH camera firmware. It detects the camera, checks for the latest firmware online, and installs it.
- Installation (Mac): Copy the Firmware Updater application to the Applications folder and run it.
- Installation (Windows): Run FWUpdater.msi and follow the setup wizard.
- Updating Firmware: Ensure the camera is powered ON, USB-C is connected, and the computer has the Firmware Updater installed and an internet connection. Start the application, which automatically checks for updates. Download and install the firmware.
- Restoring Firmware: To restore the camera's firmware to the factory version (without affecting camera settings):
- Remove two plastic covers, screws, and the metal cover.
- Insert a pin into the visible hole and hold it down.
- Connect the camera to power while holding the pin.
- Wait 3-4 seconds.
- Leave the camera for a few minutes until all LEDs resume normal colors; do not power off during this process.