4544
Low-To-High Fire Delay (Menu 5)
This setting is used to set the minimum amount of time that must elapse between the
low fire valve opening and the high fire valve opening. This setting is only available if Low
Fire is enabled in menu 5. The Low-to-High Fire Delay is used to ensure that enough draft
is established before switching to high fire. If this is not done, the volume of gas flowing
through the high fire valve can snuff out the flame due to insufficient oxygen supply.
Generally, the larger the burner, the larger the delay should be. This setting can be set to a
minimum of 30s and a maximum of 300s. Values set above 255s are automatically set to the
value minus 255s.
Pressure/Level Delay (Menu 4)
This setting is used to reject spurious electrical noise that may be present on the Low
Pressure Contact, Level Contact, and the 4-20mA Expansion Card (if installed). This noise
can come from electrical interference, mechanical vibration, or small oscillations in gas
pressure and tank level. The rejection is accomplished by requiring these contacts to remain
open for a continuous period of time (called the “delay”) before shutting down. In the case
of the 4-20mA Expansion Card, the Pressure and Level readings must remain below their
respective low setpoints for the delay time before shutting down. If the Level Event Restart
is enabled in the restart settings, the delays are applied before entering a waiting state as
opposed to shutting down.
This setting can be set to either enabled or disabled. When disabled, there is a small delay.
When enabled, the delay is lengthened. There are separate delays for Pressure and Level, as
well as for contacts and 4-20mA input readings. The following tables list the delays used in all
cases.
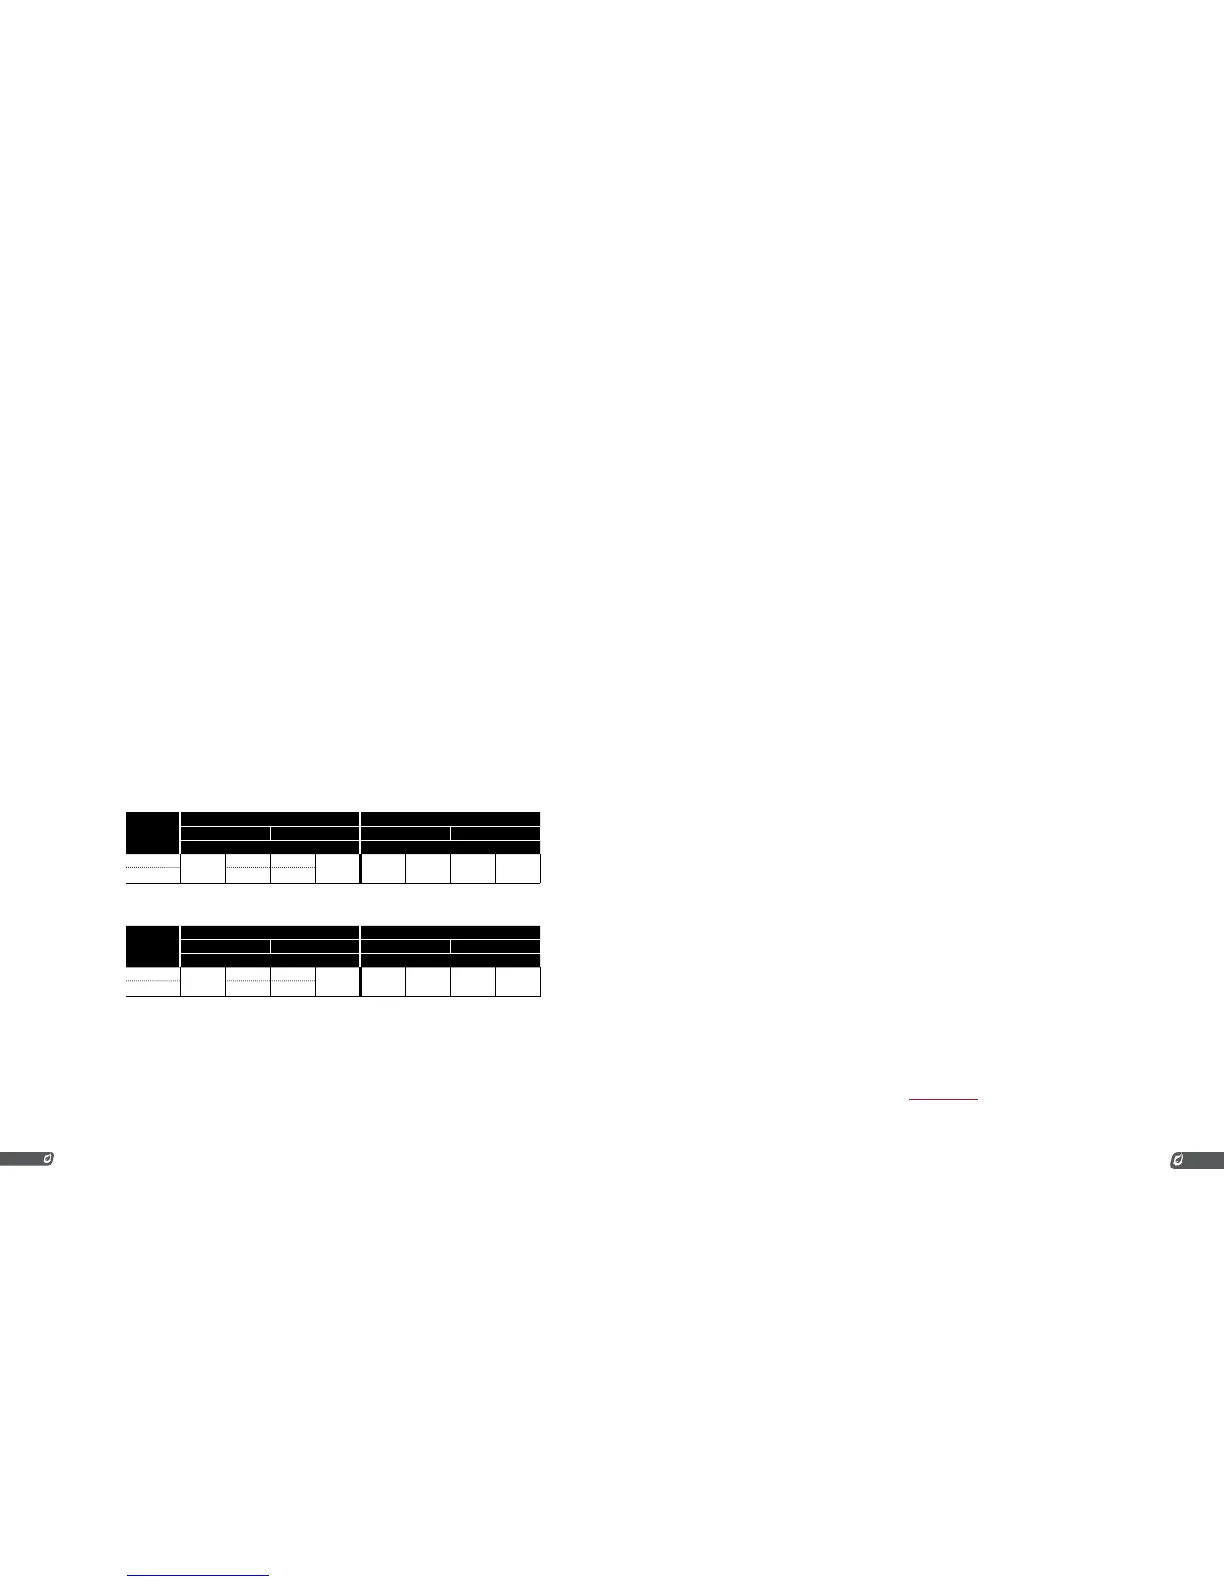
Pressure Delay Table
SETTING
LOW PRESSURE HIGH PRESSURE
4-20mA Contact 4-20mA Contact
Rising Falling Opening Closing Rising Falling Opening Closing
Enabled
2s
6s 6s
0s 2s 2s 0s 0s
Disabled 2s 2s
Level Delay Table
SETTING
LOW LEVEL HIGH LEVEL
4-20mA Contact 4-20mA Contact
Rising Falling Opening Closing Rising Falling Opening Closing
Enabled
2s
20s 20s
0s 0s 0s N/A N/A
Disabled 2s 2s
3.6 | System Operation
This section includes information about how to start and stop the system, how to review key system
settings, how to adjust setpoints while the system is running, and how to check the system firmware
versions.
STARTING THE SYSTEM
There are five different ways to start the system:
Auto Mode Option
The system is set to Manual Mode by default. Setting the system to Auto Mode is the most
common way to start the system.
1. Make sure the system is stopped, all alarms are clear, and the
Home Screen displays “Ready”.
2. Press the Mode Key. A confirmation prompt will show on the
Display.
3. Press the OK Key to confirm that you want to start the
system.
This changes the system to Auto Mode. Based on the defined system settings, the system
will automatically restart from faults. The system will take over turning the valves on and off
according to the system settings and the current Process Temperature.
System Test And Start Option
This method is used during the initial installation when testing the pilot valve, main valve,
ignition circuit, and flame detection circuitry in a slow sequence.
1. Make sure the system is set to Manual Mode and is stopped
with all alarms clear. The Home Screen should display “Ready”.
2. Press and hold the Pilot Key to open the Pilot Valve. Listen for
the Pilot Valve to click open and let the gas through. Continue
to hold the Pilot Key and press and hold the Ignite Key to
begin sparking. Check the Pilot Nozzle for sparks and flame.
If you cannot see the Pilot Nozzle, listen for the sound of
sparking and try to determine if it is coming from the ignition
rod.
3. Release the Ignite Key and check that the display shows a
Flame Quality of 100%.
4. After about 5 seconds, the display will show “Pilot On” if the
Pilot lit successfully.
5. Press the Main Key to open the Main Valve. The system will
count down the Pilot-to-Main Delay and then open the Main
Valve if the Process Temperature is within the expected range.
6. The system will take over turning the valves on and off
according to the system settings and the current Process
Temperature.
7. Press the Mode Key to switch the system into Auto Mode.
This allows the system to automatically restart from faults
specified in the system settings.
If any of these checks fail, consult the troubleshooting section of this guide.