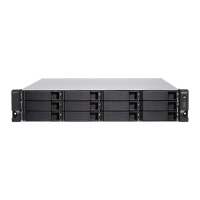
Replacing Memory Modules
The NAS has four memory slots. You can increase the memory capacity of the NAS by upgrading the
memory module.
Use only QNAP modules of the same type and capacity to maintain system performance and stability. You
can purchase QNAP memory modules from authorized resellers.
Important
QNAP recommends installing modules in pairs.
• Ensure that each pair uses identical modules.
• Install the pairs in sequence and follow the assigned slots for each pair.
• Install memory modules in groups of two or four. When installing two memory modules,
install the memory in slots 1 and 3. When installing four modules, install the memory in
slots 1, 3, 2, and 4.
For details on slot numbering, see System Board.
Warning
•
Moving fan blades: Keep your hands and other body parts away from moving fan
blades.
•
Other moving components: Keep your hands and other body parts away from other
moving components.
1. Power off the NAS.
2. Disconnect the power cord from the electrical outlet.
3. Disconnect all cables and external attachments.
4. Remove the case cover.
For details, see Removing the Case Cover.
5. Remove an existing module.
a. Push the retention clips outward simultaneously to release the module.
Warning
Attempting to remove a module that is not completely released may damage the module and
the motherboard.
b. Hold the module by the edges.
TS-h1283XU-RP User Guide
Installation and Configuration 19
 Loading...