Do you have a question about the Raymarine ST600R and is the answer not in the manual?
Provides a general overview of the autopilot's capabilities and features.
Details the technical specifications and operating parameters of the unit.
Explains the primary single and dual button operations for controlling the autopilot.
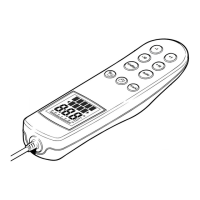
Illustrates and describes the elements shown on the ST600R LCD display.
Instructions for engaging, disengaging, and changing course in Auto mode.
Recalls the last engaged heading after a temporary disengagement.
Details the automatic tack feature for turning the vessel through a set angle.
How the autopilot enters Manual mode via joystick control.
Guides on adjusting the brightness of the display and keypad.
How to navigate and view various data pages transmitted via SeaTalk.
How to use the autopilot to follow a track between waypoints.
Explanation of XTE and the alarm triggered when exceeding limits.
Handling waypoint changes and advancing to the next waypoint.
Maintaining course relative to apparent wind angle.
How to adjust the target wind angle using course change keys.
How to tune autopilot performance for optimal steering.
Adjusting the response level for course keeping accuracy.
Setting the rudder gain for appropriate steering response.
Summary of all available alarms and their meanings.
Alarm for exceeding the maximum allowed cross track error.
Alarm indicating the autopilot cannot move the rudder.
Alarm for waypoint changes and how to accept them.
Alarm when the system's supply voltage drops too low.
Explains Auto and Manual modes for the security feature.
Procedure for activating and configuring the CodeLock security.
How to modify the CodeLock code or change the master unit.
Procedure for manual code entry each time the system powers on.
Troubleshooting steps for incorrect or forgotten CodeLock numbers.
Configuration options for compass, rudder calibration, and display.
Configuration for CodeLock and system status/version.
Advanced autopilot settings and calibration lock controls.
Detailed guide to user-configurable settings.
Corrects compass errors due to magnetic fields.
Aligns the displayed heading with a known reference.
Selects the vessel type for optimal autopilot performance.
Optimizes rudder performance via dockside calibration.
Dealer-specific setup options for Type 100/300 Course Computer.
Setting the rudder gain for optimal steering response.
Sets vessel speed for track mode compensation calculations.
Sets the rate of helm application to correct trim changes.
Compensates for heading errors at higher latitudes.
Area to record final calibration settings for future reference.
Guidance on planning the physical installation of the autopilot unit.
Recommendations for ensuring proper Electromagnetic Compatibility.
Details the required cable connections for different autopilot models.
Instructions for physically mounting the bulkhead socket.
How to attach the stowage bracket for the handheld remote.
Tests to verify functionality when used as a repeater unit.
Procedure for the initial power-on and system checks.
Steps to verify the SeaTalk interface connection.
Confirms correct wiring and initial setup for boat type.
Defines helm direction for course changes and off-course events.
Checks the data interface with external navigation devices.
Verifies the connection and data link with the wind transducer.
Completes setup through sea trial procedures.
Calibrates the compass to compensate for magnetic deviation.
Fine-tuning heading alignment after initial deviation correction.
Familiarization procedure with autopilot functions.
Test to verify correct rudder gain setting.
Basic care, cleaning, and condensation management for the unit.
Guidelines for authorized servicing and safety precautions.
Support contacts and troubleshooting tips before returning the unit.
Troubleshooting steps for when the display shows no information.
Troubleshooting prompt for CodeLock entry.
Resolving discrepancies between displayed and actual compass headings.
Diagnosing and fixing slow course acquisition or turning.
Troubleshooting oversteering during course changes.
Addressing instability or slow performance in Track mode.
Resolving the CAL LOCK message during calibration attempts.
Troubleshooting SeaTalk communication failures.
Diagnosing issues with receiving navigation position data.
Troubleshooting automatic waypoint advancement.
Troubleshooting the 'NO DATA' display message.
Troubleshooting issues with engaging or adjusting locked wind angle.
| Display | LCD |
|---|---|
| Power Supply | 12V DC |
| Communication | NMEA 0183 |
| Waterproof Rating | IPX6 |
| Compatibility | Raymarine Autopilot Systems |
| Keypad | Yes |
| Water Resistance | Yes |
| Weight | 0.3 kg |
| Mounting | Bracket mount |