3030
ITALIANOENGLISH
WASHER-DRIER START-UP AND USE
Starting up the electrical system
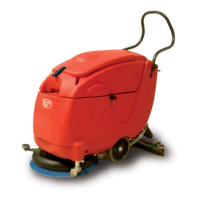
For battery-operated machines, *press the “brush 1 (Fig.1/A)” symbol one time or on the “fan 2 (Fig.1/A)” symbol located on the control panel, or if included, turn the
start-up key 31 (Fig.1/A) on pos.1 to send voltage to the electrical system.
For 230V.AC cable-operated machines, connect the plug 12 (Fig.1/A) to the electrical outlet. A red light 5 (Fig.1/A) on the panel will indicate that the system has now
been powered.
* PRESSING A SECOND TIME WILL ACTIVATE THE SELECTED COMMAND. (SEE “BRUSH ROTATION” AND “SUCTION INSERTION”)
Brush rotation (A)
Press the “brush” symbol located on the control panel to:
- activate the electrovalve to send water onto the brush and start its rotation.
Opening and regulation of cleaning solution on the brush (B)
Regulate the desired quantity of cleaning solution for fl oor cleaning via the lever located on the valve 15 (Fig.1/B).
ATTENTION! DO NOT WET BEYOND THE WIDTH OF THE BRUSH.
Suction insertion (C)
Press the “fan” symbol on the control panel to:
- activate the suction motor
Squeegee lowering/raising (D)
Release the lever 6 (Fig.1/A) and lower it to move the squeegee down; reset the lever to raise it back up.
Forward movement and traction (E)
The operator’s push controls the forward movement while traction is generated by the rotation of the brush on the fl oor. To improve traction, regulate it with the
following procedure:
- loosen the bolt 22 (Fig.1/C)
- turn the nut 23 (Fig.1/C) clockwise or counter-clockwise utilising a closed end spanner, regulating the incline of the brush and therefore also the traction.
Operation
Depending on the conditions of the fl oor to be cleaned, the operator can operate in the following modes, depending on the conditions of the fl oor to be cleaned:
- for “LIGHT DIRT” fl oors, proceed with operations as described in points (A)(B)(C)(D)(E).
- for “HEAVY DIRT” fl oors distribute the cleaning solution following operations as described in points (A)(B)(E), leaving the solution to work for a few
minutes, then proceed with operations as described in points (A)(*B)(C)(D)(E)(F).
(*select the cleaning solution to be utilised by setting lever 15 (Fig.1/B) of the valve regulator on the “AQUA SAVER” symbol)
AQUA SAVER = Economical distribution of water (cleaning solution) on the brush.
ATTENTION!
THIS TYPE OF OPERATION MUST BE PERFORMED IN AREAS WHERE ACCESS TO UNAUTHORISED PERSONNEL IS PROHIBITED; INDICATE THESE ZONES WITH APPROPRIATE SIGNS.
Brush rotation stop/ suction and water closure(F)
(BATTERY-OPERATED MACHINES)
Press the “brush” symbol located on the control panel. The electronic control will generate a delay of 4 seconds to allow the brush to rotate and the washer-drier to
move forward slightly to complete a drying phase with the squeegee. The brush shall then stop automatically. Press the “fan” symbol to stop suction.
(for 230V.AC cable-operated machines)
Press the “brush” button located on the control panel to interrupt rotation; press the “fan” button to stop suction.
Close the water valve by turning the lever 15 (fi g.1/B) to “OFF”
Stopping the washer-drier
(
BATTERY-OPERATED MACHINES)
The washer-drier is equipped with an auto-stop system which intervenes when the machine is not being utilised.
ATTENTION!
T
HE AUTO-STOP SYSTEM IS NOT INCLUDED WITH THE START-UP KEY WASHER-DRIER VERSION. TO STOP THE MACHINE, TURN THE KEY ON POS.0 WHICH
WILL SWITCH OFF THE MACHINE POWER.
(FOR 230V.AC CABLE-OPERATED MACHINES)
Disconnect the 230V.AC cable from the power outlet.
End work
Lift the squeegee. Lift the front part of the machine with a lifting wheel 24 (Fig.1/C), lock the roller with a pin 24b (Fig.1/C) and then empty the dirty water in an
allocated drainage area by releasing the drainage tube 8 (Fig.1/A) and emptying the recovery tank.
ATTENTION!
CARRY OUT ALL DIRTY WATER DRAINING OPERATIONS WITH THE USE OF PROTECTIVE GLOVES AND CLOTHING.