43Bosch Rexroth AG
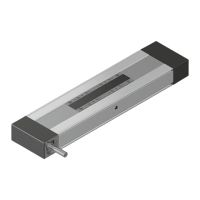
10.5 Sostituire la testata d’estre-
mità, lato di azionamento
F Le testate d’estremità vengono
fornite come gruppo di componenti
completo.
Staccare la corrente!
F Prima di allentare la cinghia
dentata, osservare il capitolo “Tendere
la cinghia dentata” ! 11.
F Prima di procedere allo smon-
taggio della testata, allentare la cinghia
dentata ! 10.4.
• Rimuovere la copertura, se esistente.
• Allentare le quattro viti cilindriche (2).
• Rimuovere l’elemento di serraggio
dalla cinghia dentata (1).
• Sfilare con cautela la testata.
• Infilare la cinghia dentata nella testata
nuova.
• Rifissare l’elemento di serraggio alla
cinghia dentata ed infilare la medesi-
ma nella guida.
• Allineare la testata con le spine
cilindriche (3) e spingerla fino all’ar-
resto sul profilato di base, fissare con
quattro viti cilindriche (2).
• Rifissare la cinghia dentata alla tavola
con l’elemento di serraggio.
• Rimettere in funzione la cinghia denta-
ta come descritto al capitolo “Tendere
la cinghia dentata” ! 11.
• Fissare una nuova copertura nella
testata d‘estremità, se esistente.
10.5 Echange de la tête d’extré-
mité côté entraînement
F Les têtes d’extrémité sont livrées
en tant qu’ensembles complets.
Interrompre l’alimentation
électrique !
F Avant de détendre la courroie,
voir le chapitre « Tension de la courroie
crantée » ! 11.
F Détendre la courroie avant le dé-
montage de la tête d’extrémité ! 10.4.
• Retirer le capot s’il en existe un.
• Dévisser les quatre vis à tête cylindri-
que (2).
• Retirer la pièce de serrage (1) de la
courroie crantée.
• Retirer prudemment la tête d’extré-
mité.
• Introduire la courroie crantée dans la
nouvelle tête d’extrémité.
• Refixer la pièce de serrage sur la
courroie crantée et introduire celle-ci
sur le guidage.
• Aligner la tête d’extrémité avec les
goupilles cylindriques (3) et la pous-
ser en butée sur le corps principal,
la fixer à l’aide de quatre vis à tête
cylindrique (2).
• Refixer la courroie crantée avec sa
pièce de serrage sur le plateau.
• Remettre la courroie crantée en
service de la manière indiquée sous
le chapitre « Tension de la courroie
crantée » ! 11.
• S’il en existe un, fixer le nouveau
capot sur la tête d’extrémité.
10.5 Replacing the drive end block
F End blocks are supplied as
complete assembly kits.
Switch off the power supply!
F Before relieving the tension on the
toothed belt, read the section “Tensioning
the toothed belt” ! 11.
F Before removing the end block,
relieve the tension on the toothed
belt ! 10.4.
• Remove the cover (if present).
• Remove the four socket head cap
screws (2).
• Remove the clamping piece from the
toothed belt (1).
• Carefully pull of the end block.
• Insert the toothed belt in the new end
block.
• Re-attach the clamping piece to the
toothed belt and slide the toothed belt
into the belt guide.
• Using straight pins (3), align the end
block with the frame and push it home.
Screw it down with four socket head
cap screws (2).
• Re-attach the toothed belt to the car-
riage using the clamping piece.
• Start up the toothed belt, following the
instructions given in “Tensioning the
toothed belt” ! 11.
• Fasten the new cover (if present) to
the end block.
Instructions CKRR320103679 (2009.09)
 Loading...