-15-
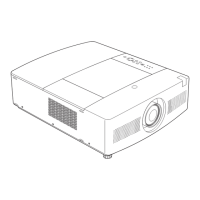
This projector provides a cabinet prism cover on the cabinet top to enhance the service maintenance. This enables
service personnel to align the optical adjustment or replace the optical parts without disassembly the cabinet top.
Maintenance
Quick maintenance
Prism cover
Shutter assy
A
C
Fig. 3
Fig. 5
Panel/Prism assy
Fig. 1
Fig. 2
E
E
E E
E
E
D
D
D
B
Fig. 4
Optical filter assy
2
3
Loosen a screw-A on the lamp cover and slide it
backward, and then loosen a screw-B on the prism
cover and turn it up in the arrow direction (Fig. 1).
Loosen a screw-C and take the shutter assembly
off (Fig. 2).
Loosen 3 screws-D and take the LCD Panel/Prism
ass'y upward off (Fig. 3/Fig. 5).
Remove 2 screws-E on each stopper of the optical
filter ass'y and take the optical filter ass'y upward off
(Fig. 4/Fig. 5).
See chapter "Optical Parts Disassembly" for fur-
ther information of the optical parts disassembly.
1
4
 Loading...