11
Chapter 1: Installation
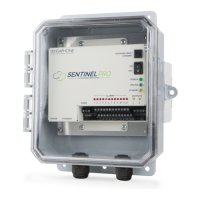
ONLINE LED (GREEN)
This light indicates that the Sentinel Pro unit is communicating with the Sentinel Pro servers.
STANDBY LED (YELLOW)
This light indicates that the Sentinel Pro unit is in standby mode.
ACKNOWLEDGE/ STANDBY BUTTON
When an unacknowledged alarm exists (as indicated by a blinking red alarm LED), briefly press the but-
ton and the alarm LED will stop blinking, indicating that the alarm is acknowledged. To enter Standby
mode, press and hold the button for at least 5 seconds until the Standby LED lights up, then release. To
exit from Standby mode, hold the button down for 5 seconds until the Standby LED turns off.
InsTallaTIon
This section provides information on:
• Operating environment
• Installation
• Connecting sensors
• Network Configuration
PARTS REQUIRED
• Screwdriver and #8 screws
• Network Hub, Switch, or Router that supports 10 or 100 BASE-T with internet access
• Computer w/Internet Connection
OPERATING ENVIRONMENT
Before you install the Sentinel Pro be sure that your operating environment meets the physical require-
ments of the equipment.
Operating Temperature: 32º–122º Fahrenheit (0º–50º C)
Humidity: 5–90 %RH, non-condensing
Power: 115VAC 50/60 Hz outlet within 6’
POWER
Connect the included DC power supply to the power jack on the Sentinel Pro. Plug the power adapter
into a 115V AC power outlet.
NETWORK CONFIGURATION
The Sentinel requires an Internet connection to operate. Using the included network cable, connect the
Sentinel to your 10/100 network hub, switch, or router. Note that your network must support DHCP for
initial configuration. You can change it to a Static IP later if required (see chapter 2). The green ONLINE
LED should light up within a few minutes indicating that the device has connected to the Sensaphone.
net servers.
Technical Info: The Sentinel communicates over port 443 (the standard TCP port that is used
for websites which use SSL encryption), so this must be open for outbound communication. The
device also makes use of port 123 for clock synchronization (NTP), so this must be open for
UDP outbound.
 Loading...