MX-FN27, MX-PN14 DISASSEMBLY AND ASSEMBLY 5 – 4
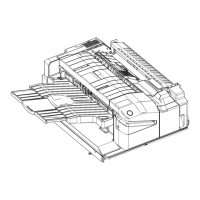
NOTE: How to assemble the Front Tray Lack and Rear Tray Lack
1)Insert the Front Tray Lack [1] and Rear Tray Lack [2] at the
Guide.
2)Release the latch and move the Tray Lack to the bottom.
3)Check the phase position between the Front Tray Lack [1] and
Rear Tray Lack [2] with the lines marked [3] on them. When the
phase position is differ, follow the step 1) again.
2) Remove the Cable Guide [1].
– 1 Screw [2]
– 3 Connectors [3]
– 2 Cables [4]
3) Remove the Tray Shift Motor Unit [1].
– 3 Screws [2]
4) Remove the E-ring [1] and the Gear [2] and the Pin [3].
5) Remove the E-ring [1], and move the Gear [2], after that remove
the pin [3] and the Bushing [4] and the Tray Drive Shaft [5].
6) Remove the E-ring [1] and the Pully [2] and the Pin [3] and the
Bushing [4].
7) Move the Bushing [1], and remove the Paper Fold Unit [2].
8) Remove the 2 Connectors [1] and the 2 Cables [2].