27
5. SEATPOST INSTALLATION
1. INSTALLING AND ADJUSTING THE SHIV SEATPOST
To prevent damage to the frame and/or seatpost, it is important to have a minimum amount of insertion in the seat tube.
Use the sight hole in conjunction with the minimum insertion/maximum extension (min/max) mark on the seatpost.
The seatpost MUST be visible through the sight hole, AND the seatpost must be inserted into the frame deep
enough so the min/max mark on the seatpost is not visible.
If the seatpost is at the min/max mark and the seatpost is not visible through the sight hole, the seatpost is not
inserted deeply enough into the seat tube and should be lowered until it can be seen through the sight hole. This
may result in the saddle being too low. If so, the seatpost must be replaced with a longer seatpost.
WARNING! Your seatpost and frame BOTH require a minimum amount of insertion into the frame
in order to maintain structural integrity. If your seatpost is not inserted deep enough into the seat
tube to meet BOTH requirements, it may result in damage to the frame and/or seatpost, which
could cause you to lose control and fall.
If the seatpost is cut short, the min/max mark on the seatpost may no longer be accurate. Before
cutting the seatpost, note the min/max depth required by the seatpost manufacturer.
WARNING! For general instructions regarding the installation of the seatpost, refer to the appropriate
section in the Owner’s Manual. Riding with an improperly tightened seatpost can allow the saddle to
turn or move and cause you to lose control and fall.
WARNING! Inspect the seatpost and seat tube to ensure that there are no burrs or sharp edges.
Remove any burrs or sharp edges using fine grit sandpaper.
CAUTION: The shape of the seat tube is not continuous. This limits the maximum insertion depth
of the seatpost When the seatpost is fully inserted, back it out 10mm, which is the maximum
insertion depth of the frame. Be careful when lowering it into the seat tube to prevent damage.
If your seatpost is at its maximum insertion depth and the saddle is too high, the post needs to be
replaced with a shorter one or cut to size.
Do not apply grease to the contact surfaces between the seatpost and the seat tube. Grease
reduces the friction, which is critical to proper seatpost grip. Specialized recommends the
application of carbon assembly compound (fiber paste), which can increase friction between
carbon surfaces. Please visit your Specialized Authorized Retailer for additional information.
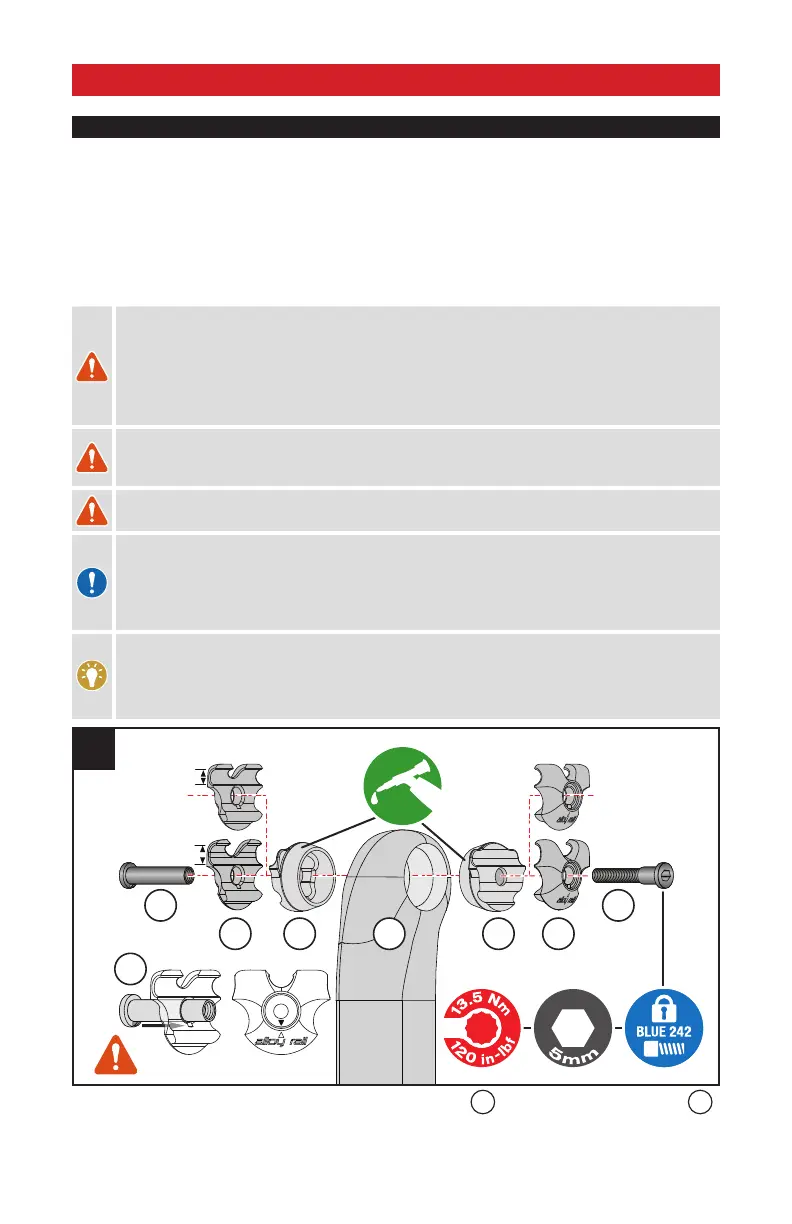
7x9mm
7x7mm
ANGLED SURFACES
D
E
C CA AB
F
Tab into groove Align arrows
1
Fig.1: Apply grease to the conical surfaces of the clamp mechanism
A
and install them into the seatpost
B
.
Fig.1: Engage the saddle rails into the slots of the conical portions of the clamp mechanism, then place the outer