SLAYER STEAM EP USER MANUAL V1.1 | SEPTEMBER 11, 2018 12
STEP 2: UNPACK EQUIPMENT
Your Slayer Steam EP machine will arrive in a lidded wooden crate, bolted
to a pallet at the base. On the outside of the crate, a Steam EP Quick Start
Guide showcases the crate opening procedure with simple illustrations.
Once the crate is opened, resting atop the machine you will find the
accessory box. Unpack with the following steps. At least three (3) able-
bodied people will be needed to lift your machine from the pallet.
DO NOT USE A CROWBAR TO SEPARATE THE CRATE BOX LID FROM
THE BODY. We have made it much easier to open by removing eight wood
screws from the bottom corners. Please reference the Quick Start Guide.
INCLUDED PARTS
• Four (4) rubber feet
REQUIRED TOOLS & SUPPLIES
• #2 Phillips-head screwdriver
• Knife or box cutter
• 9/16-inch socket wrench
• Optional: two (2) or more identical block risers with a maximum
height of 15 centimeters (6 inches), capable of supporting 305 pounds
(140 kilograms)
PROCEDURE
1. Use a Phillips-head screwdriver OR a drill to loosen and remove the
eight (8) screws found along the lower edge of the crate, two (2) at
each corner, then lift the crate from the pallet.
2. Remove the plastic sheet from the machine and identify all crate
contents:
• Slayer Steam espresso machine
• Attached power cords (2), plumbing lines (2), and drain hoses (2)
• External rotary pump
• Accessories box
3. Set aside the accessories box.
4. Locate the two (2) bolts and two (2) nuts that secure the pump to the
pallet, then use a wrench to loosen and remove the nuts; set aside the
pump.
5. Use a knife or box cutter to remove the banding from the machine
body. To protect the machine during installation, keep all other
packing material in place.
6. Locate the four (4) bolts that are threaded into the two (2) wing legs,
then use a 14mm (9/16-inch) socket wrench to loosen and remove all
bolts.
7. Locate the four (4) rubber feet inside of the accessories box and
install them on the wing legs. These feet prevent machine slippage
and countertop scratches Later, adjust the feet individually to level the
machine
PROTIP: Place the rubber feet on the Steam prior to lifting to your
counter top for final placement.
8. Employ the assistance of at least three people to lift the machine up
and away from the crate base, minding the attached cords, lines, and
hose.
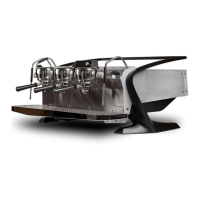
Lift only from the chassis (identified in the image below); do not
handle the drain tray, cup rail, or any part of the wing legs. To
protect yourself during this step, wear thick gloves or drape a
small towel over each wrist and forearm.
9. Suspend the machine with the wing channels located directly above
the prepared counter holes. If using risers, lower the machine onto
the risers. The risers should support the chassis without touching the
drain tray.
10. Remove the packing material from the attached cords, lines, and
hoses, then run them through the wing channels and counter holes.
11. Lower the machine into the prepared position and remove all packing
material.
12. Lift to remove the four (4) cup tray panels; set aside.


 To Next Page