6-42
DCR-HC39E/HC41/HC42/HC42E/HC43/HC43E
6-2. MECHANISM SECTION ADJUSTMENTS
On the mechanism section adjustment
For details of mechanism section adjustments, checks, and replace-
ment of mechanism parts, refer to the separate volume “DV ME-
CHANICAL ADJUSTMENT MANUAL VIII Z (Z200) Mechanism ”.
Note: Before performing the adjustments, check the data of page:
0, address: 10 is “00”. If not, set data: 00 to this address.
2-1. HOW TO ENTER RECORD MODE WITHOUT
CASSETTE
1) Connect the adjustment remote commander to the LANC jack.
2) Turn the HOLD switch of the adjustment remote commander
to the ON position.
3) Close the cassette compartment without the cassette.
4) Select page: 3, address: 01, set data: 0C, and press the PAUSE
button of the adjustment remote commander.
(The mechanism enters the record mode automatically.)
Note: The function buttons become inoperable.
5) To quit the record mode, select page: 3, address: 01, set data:
00, and press the PAUSE button of the adjustment remote com-
mander. (Whenever you want to quit the record mode, be sure
to quit following this procedure.)
2-2. HOW TO ENTER PLAYBACK MODE WITHOUT
CASSETTE
1) Connect the adjustment remote commander to the LANC jack.
2) Turn the HOLD switch of the adjustment remote commander
to the ON position.
3) Close the cassette compartment without the cassette.
4) Select page: 3, address: 01, set data: 0B, and press the PAUSE
button of the adjustment remote commander.
(The mechanism enters the playback mode automatically.)
Note: The function buttons become inoperable.
5) To quit the playback mode, select page: 3, address: 01, set
data: 00, and press the PAUSE button of the adjustment re-
mote commander. (Whenever you want to quit the playback
mode, be sure to quit following this procedure.)
2-3. TAPE PATH ADJUSTMENT
1. Preparation for Adjustment
1) Clean the tape running side (tape guide, drum, capstan shaft,
pinch roller, etc.).
2) Connect the adjustment remote commander to the LANC jack.
3) Turn the HOLD switch of the adjustment remote commander
to the ON position.
4) Connect an oscilloscope to VC-378 board CN1007 via the CPC
Connecting jigs. (J-6082-521-A, J-6082-564-A)
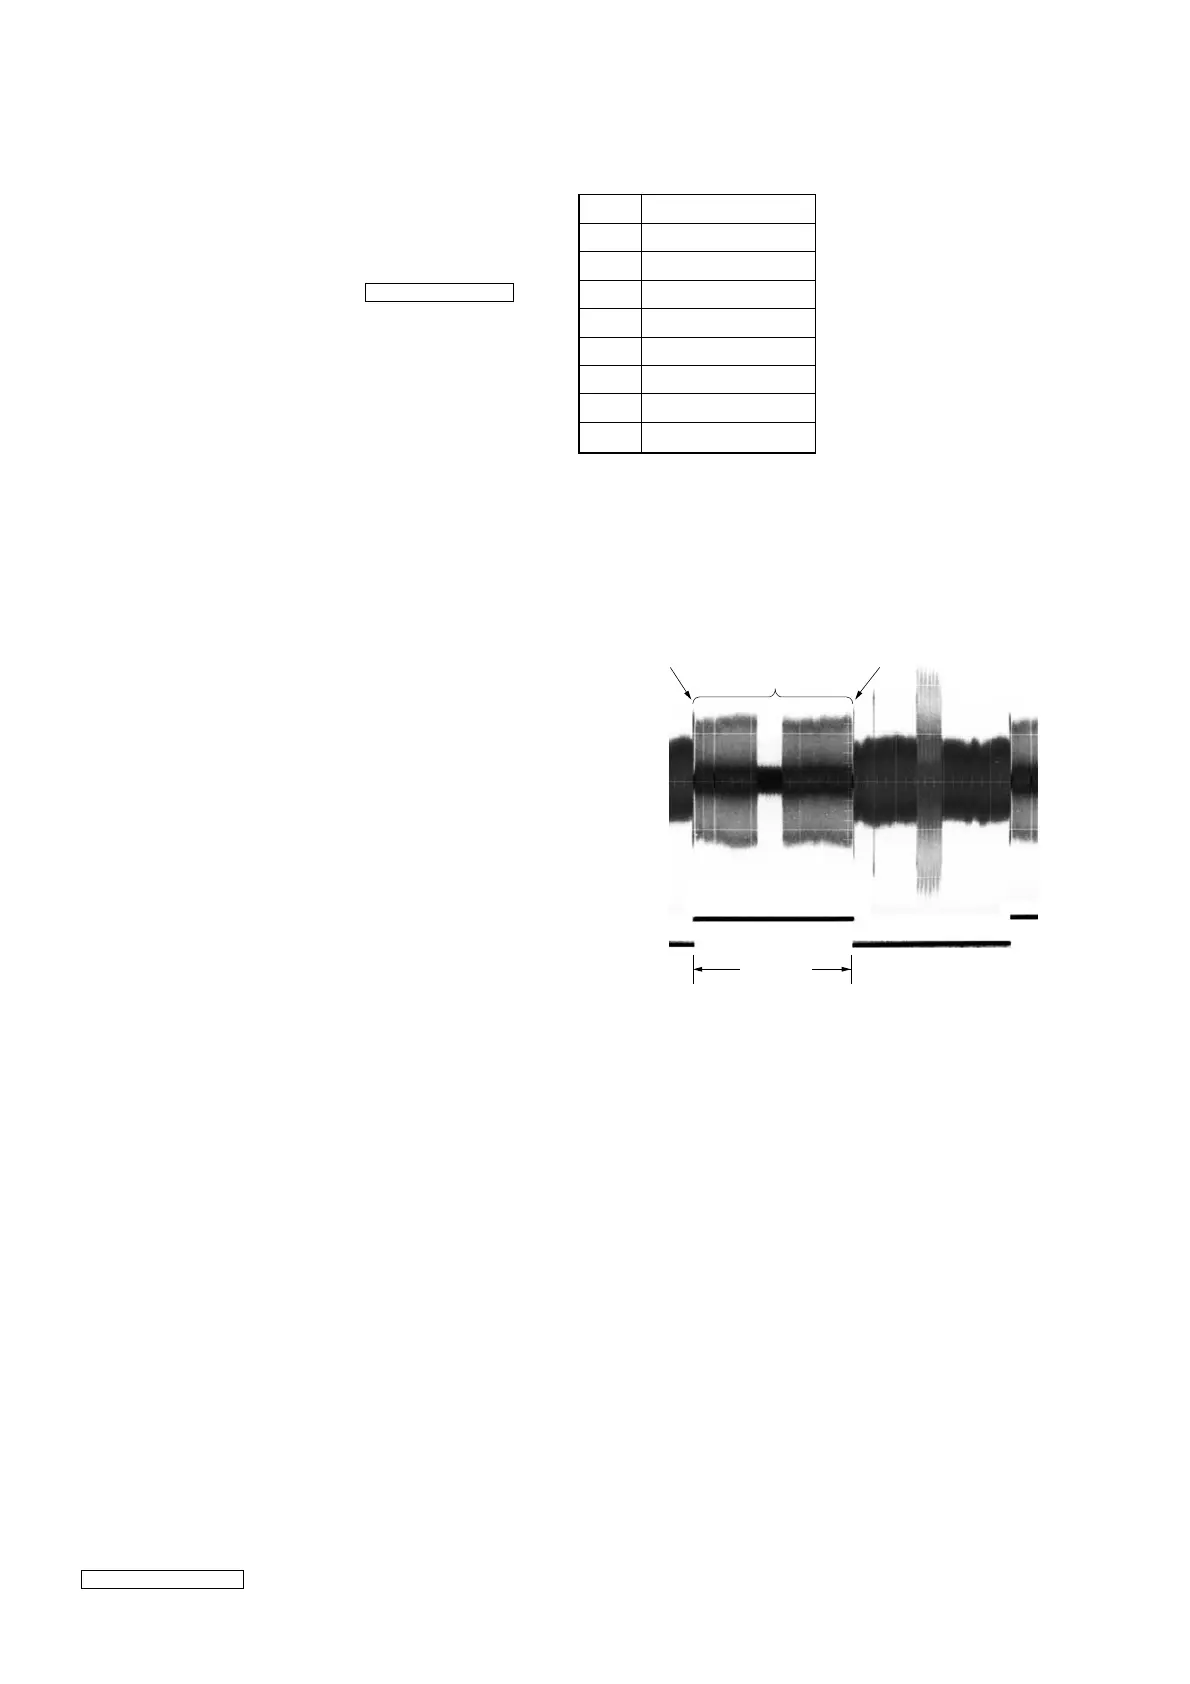
Channel 1: VC-378 board, CN1007 Pin 1 (Note)
External trigger: VC-378 board, CN1007 Pin 2
Note: Connect a 75 Ω resistor between pins 1 of CN1007
and 3 (GND).
75 Ω resistor (Parts code: 1-247-804-11)
5) Playback the alignment tape for tracking. (XH2-1)
6) Select page: 3, address: 33, and set data: 08.
7) Select page: 3, address: 26, set data: 31, and press the PAUSE
button.
8) Check that the oscilloscope RF waveform is normal at the en-
trance and exit.
If not normal, adjust according to the separate volume
“DV MECHANICAL ADJUSTMENT MANUAL VIII
Z (Z200) Mechanism ” .
CN1007 of VC-378 board
2. Procedure after operations
1) Connect the adjustment remote commander to the LANC jack
and set the HOLD switch to the ON position.
2) Select page: 3, address: 26, set data: 00, and press the PAUSE
button.
3) Select page: 3, address: 33, and set data: 00.
Fig. 6-2-1
CH1
Entrance side Exit side
Check this section
(Normal waveform)
CH2
(Trigger)
3.3msec
Pin No.
Signal Name
1 RF MON
2SWP
3 GND
4 XCS EEP
5 EEP SCK
6 EEP SO
7 EEP SI
8 GND






 To Next Page