1-25
102
3
Switch to the JPEG image file list.
For instructions, see “To switch between
the album list and JPEG image file list”
on page 103.
4 Select a JPEG image file using M/m, and
press ENTER.
z Hints
• See “8. Reformatting a Disc” (page 42) to format
DVD-RWs/DVD-Rs in Video mode.
• See the “Photo Album” list to check which
albums have been copied (page 102).
b Notes
• You may not be able to play the slideshow
depending on DVD equipment.
• You cannot copy JPEG image files to a
recordable DVD which has been recorded using
other recorders/devices.
• DATA DVDs finalised on this recorder may not
be able to play on other equipment (page 40).
• No more than 99 slideshows can be recorded to a
disc.
• For DVD-Rs, the available disc space does not
increase even if you erase slideshows.
Using the “Photo Album”
List
You can play JPEG image files on the HDD,
DATA DVDs/DATA CDs, or connected
USB device using the “Photo Album” list.
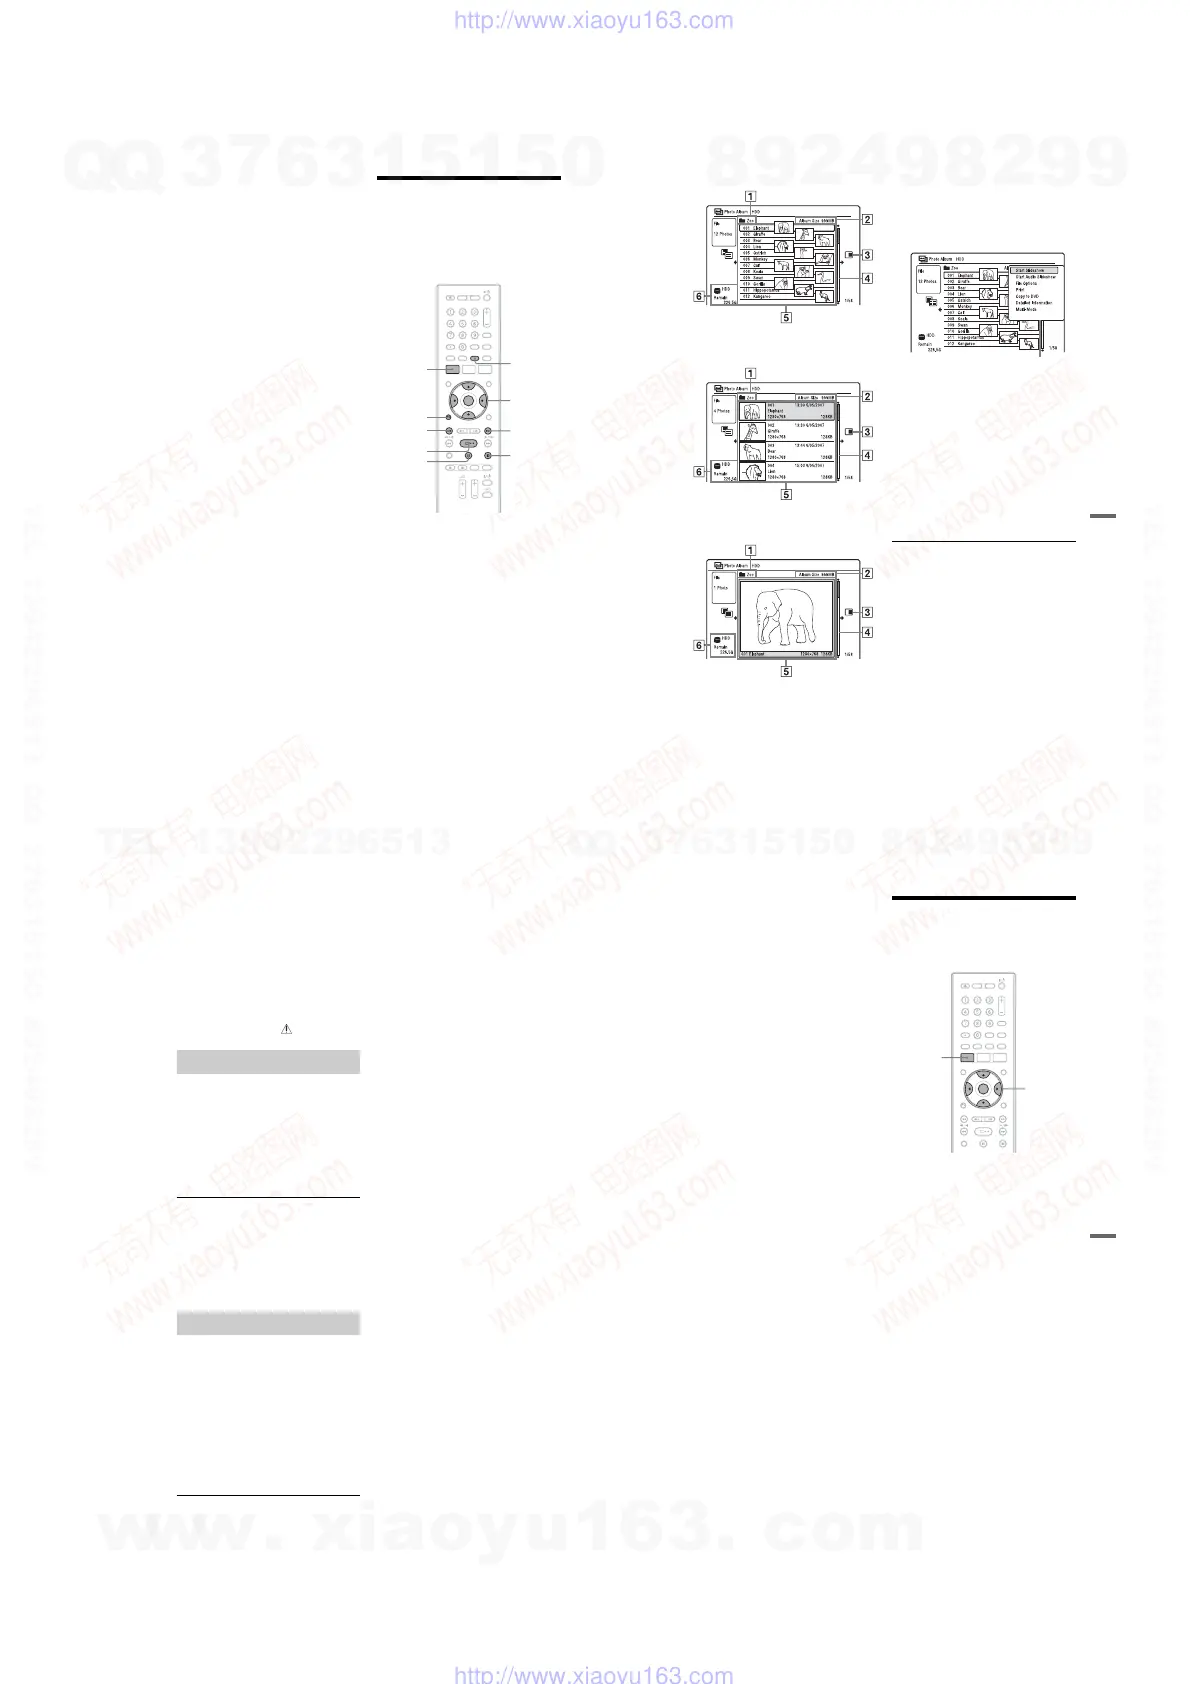
1 Press SYSTEM MENU.
The System Menu appears.
2 Select “Photo Album,” and press
ENTER.
The “Photo Album” menu appears.
3 Select the item, and press ENTER.
To play JPEG image files on the HDD,
select “View/Edit Photos on the HDD.”
To play JPEG image files on DATA
CDs/DATA DVDs, select “View Photos
on a CD/DVD.”
To play JPEG image files from the
connected USB device, select “View
Photos on a USB Device.”
The “Photo Album” list appears.
4 Select an album using M/m, and press
ENTER.
To show the 4-Photo List or 1-Photo List,
press < to select “Title View,” and
press ENTER, then select “4 Photos” or
“1 Photo” using M/m, and press ENTER.
x
SYSTEM
MENU
</M/m/,,
ENTER
H
X
ANGLE
>
.
O
RETURN
103
JPEG Image Files
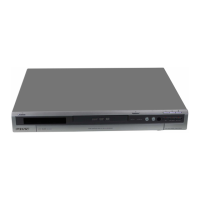
12-Photo List (Example: HDD)
4-Photo List
1-Photo List
A Album name
B Album size
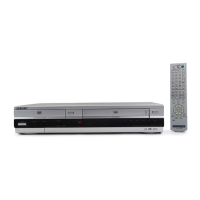
C Sub-menu:
Press , to display the sub-menu.
The sub-menu displays options
applicable only to the selected item. The
displayed options differ depending upon
the model, situation, and disc type.
D Scroll bar:
Appears when all of the JPEG image files
do not fit on the list. To view the hidden
JPEG image files, press M/m.
E Album and JPEG image file
information:
Displays the image, JPEG image file
number, recording date and time, JPEG
image file name, and JPEG image file
size.
F Disc type and remaining space of
current disc
To scroll the list display by page (Page
mode)
Press ./> while the “Photo Album”
list is displayed. Each time you press .
/
>, the entire “Photo Album” list changes
to the next/previous page of albums/JPEG
image files.
To switch between the album list and
JPEG image file list
1 Press < while the “Photo Album” list is
displayed.
2 Select “Display Mode” using M/m, and
press ENTER.
3 Select “File” or “Album” using M/m, and
press ENTER.
To turn off the “Photo Album” list
Press SYSTEM MENU.
m
m
Sub-menu
,continued
104
To reload the files or folders
When a disc or the connected USB device
contains 1,000 or more files and/or 100 or
more folders, select “Read next” in the
“Photo Album” list, and press ENTER to
view unloaded files or folders.
It may take a few minutes to load files or
folders.
b Note
The thumbnail for a file that cannot be playable on
the recorder is displayed as “ .”
1 Follow steps 1 to 4 of “Using the
“Photo Album” List.”
The “Photo Album” list appears.
Switch to the album list, if necessary.
2 Select a JPEG image file using M/m,
and press ENTER.
The selected JPEG image file is
displayed on the entire screen.
To display the detailed information
1 Select a JPEG image file, and press ,.
2 Select “Detailed Information,” and press
ENTER.
The detailed information for the selected
JPEG image file appears.
1 Follow steps 1 to 4 of “Using the
“Photo Album” List.”
The “Photo Album” list appears.
Switch between the album list and JPEG
image file list, if necessary.
2 Select an album or JPEG image file
using M/m, and press H.
The slideshow starts.
If you press H while selecting a JPEG
image file, the slideshow starts from the
selected JPEG image file.
To play a slideshow with the sound (HDD
only)
You can enjoy a slideshow while listening to
the sound stored in the HDD.
1 Select “View/Edit Photos on the HDD”
in step 3 of “Using the “Photo Album”
List” on page 102.
The “Photo Album” list appears.
Switch between the album list and JPEG
image file list, if necessary.
2 Select an album or JPEG image file using
M/m, and press ,.
3 Select “Start Audio Slideshow,” and
press ENTER.
4 Select a genre using </,.
For details about assigning a genre, see
“Managing Audio Tracks on the Music
Jukebox” on page 97.
5 Select “Start,” and press ENTER.
The slideshow and the playback from the
first track of the selected genre start.
b Notes
• Depending on the aspect ratio, some pictures may
be displayed with black bands at top and bottom,
or left and right.
• Large picture files may take a few seconds to
display. This is not a malfunction.
• All albums or tracks in the selected genre will be
played during Slideshow even if some albums or
tracks are set to skip.
To stop a slideshow
Press x (stop) or O RETURN.
To pause a slideshow
Press X (pause).
Note that only slideshow pauses and the
sound continues to play.
To view the next/previous image during a
slideshow
Press ./>.
To zoom an image
Press ENTER repeatedly during a slideshow.
Each time you press ENTER, the
magnification changes as shown below.
2× t 4× t normal magnification
You can move the area you want to zoom
using </M/m/,.
Viewing a JPEG image file
Playing a slideshow
105
JPEG Image Files
To rotate an image
Press ANGLE repeatedly during a slideshow.
Each time you press ANGLE, the image turns
clockwise by 90°.
z Hint
You can start a slideshow by selecting “Start
Slideshow” from the sub-menu.
Managing JPEG Image
Files on the HDD
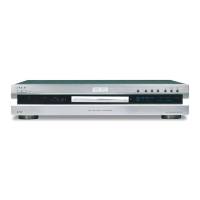
1 Press SYSTEM MENU.
The System Menu appears.
2 Select “Photo Album,” and press
ENTER.
The “Photo Album” menu appears.
3 Select “View/Edit Photos on the
HDD,” and press ENTER.
The “Photo Album” list appears.
4 Select an album or JPEG image file,
and press ,.
The sub-menu appears.
5 Select an option, and press ENTER.
You can make the following edits to the
album/JPEG image file.
“Start Slideshow”: Starts a slideshow
(page 104).
“Start Audio Slideshow” (HDD only):
Starts a slideshow with the sound
(page 104).
“New Album”: Creates a new album.
“Album Options”
•“Erase Album”: Erases the selected
album.
•“Copy Album Contents”: Copies all
JPEG image files in the selected album
to the HDD (page 99).
SYSTEM
MENU
</M/m/,,
ENTER
,continued
w
w
w
.
x
i
a
o
y
u
1
6
3
.
c
o
m
Q
Q
3
7
6
3
1
5
1
5
0
9
9
2
8
9
4
2
9
8
T
E
L
1
3
9
4
2
2
9
6
5
1
3
9
9
2
8
9
4
2
9
8
0
5
1
5
1
3
6
7
3
Q
Q
TEL 13942296513 QQ 376315150 892498299
TEL 13942296513 QQ 376315150 892498299
http://www.xiaoyu163.com
http://www.xiaoyu163.com



 To Next Page