14 MA_441-1-2_A1_180830_en
4
4.1
Assembly of the machine
Once all parts have been in threaded in the correct sequence onto the shaft,
which has been cleaned of grease first, a drop of Loctite can be put each on
the shaft which still protrudes out to the left by about 30 mm, as well as on the
right part of the degreased shaft inside the machine stand, at the ball-bearing
seat. (Loctite, capillary 290)
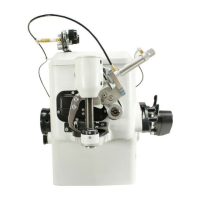
Assembly of the shaft (Fig. 4, Fig. 6 and Fig. 7)
CAUTION! To make a fault-free connection possible, the surfaces to be
joined must be completely grease-free. The shaft is then
pushed all the way into the stand, turned slightly so that the
Loctite is drawn in evenly all-around by the ball-bearing ring, the
stitch variable eccentric (A) (1) is fixated (see point "4.2
Assembly of the stitch variable eccentric"), the shaft is pushed
all the way to left and the adjusting ring (2) on the right shaft
side is sealed close so that the axial gap of the shaft is
removed. (Fig. 4)
After the adhesive has cured for about one hour (Loctite, capillary 290) the
machine can be assembled further and calibrated. During the repair assembly,
the left handwheel does not need to be taken off the shaft; however the control
knob (1) (Fig. 7) and the pins (3) and springs (2) do have to be removed (Fig.
6).
4.2
Mount the left handwheel on the installed shaft so that the tip of the first screw
fits, in the direction of rotation, into the depression of the left radial bore of the
shaft and stands upwards during that.
Assembly of the stitch variable eccentric (Fig. 4, Fig. 5, Fig. 6,
Fig. 7)
Turn the slideway (3) so that the variable eccentric (1) can be pushed down in
the position described above. (Fig. 5)
Turn the first screw (2) so far into variable eccentric so that the adjustment bolt
(4) can be turned through in the shaft. First, loosen the counter nut. Turn the
handwheel with shaft by 180°. Turn the second screw (2) all the way into
variable eccentric; the adjustment bolt (4) should be able to rotate free of
backlash. Screw slideway (3) onto the shaft. (Fig. 5)
Slide the shaft all the way to the left on the ball bearings, push adjusting ring (2)
on the right shaft side all the way on the ball bearings and tighten. The shaft is
fixated now. (Fig. 4)
Allow stitch variable eccentric (1) to level off and tighten. Slide two greased
springs (2) and two greased pins (3) into the bore of the handwheel (Fig. 6).