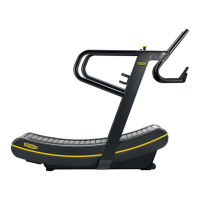
6b.Inserttheclamps(2)and(3)ushagainstthebearing,bothontherightandleftside,on
the rear shaft on the right side of the equipment, as shown below.
Thepartoftheclampwiththebordermustbeushagainstthebearing.
Tighten each of the two clamps as follows: Add a medium threadlocker (e.g. Loctite 243) on the
thread of the screws. Use a 4mm hex wrench and tighten gradually, alternating between the two
right and left screws, until they are fully tightened.
2
3
Figure 52 Fixing the clamps 2 and 3 on the rear shaft, right side of the equipment
7. Retthecomponentsandguardsremovedpreviously.Rettheslat(“7.9.2assemblingthe
slats”).
ATTENTION:xtheslatinplacecorrectly,insertingthetwoplates(2)andtighteningthe4
self-locking nuts (3).
8. Try out the equipment and check that the issue has been resolved.
Skillmill:
Technical Service Guide - Rev. 3.5
Page 87email: support@technogym.com