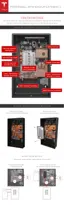
STEP 2 - DETERMINE THE MOUNTING LOCATION FOR POWERWALL
1. Using the wall mount bracket as a guide, measure the proposed location for Powerwall. The
bracket must be bolted into studs or a load-bearing wall, and allow clearance on all sides as
shown in Site Requirements.
2. If mounting into wood, use a stud finder to locate and temporarily mark the center of the
wooden studs. It is important to install each fastener as close to the middle of each stud as
possible.
3. Position the thicker part of the bracket at the top, so that the
flat side is flush with the wall.
Use the bracket as a guide to mark the location of the holes on the wall. Space the holes 200,
300, 400, 500, or 600 mm (8, 12, 16, 20, or 24 in) apart.
Note: Use a level tool to ensure that the bracket is level.
Step-by-Step Installation Instructions
12