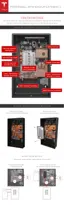
STEP 5 - REMOVE THE PACKAGING
Note: Two people are needed for this procedure.
1. First person: Hold the box in place from the bottom edge, to prevent the box from slipping
and damaging Powerwall's front cover.
2. Second person: Use a T25 Torx to remove the 8 screws holding the box to the wooden blocks.
3. Being careful not to bump the box into the sides or edges of Powerwall's front cover, remove
the box and carefully set it aside.
Note: Leave the protective sticker on the Powerwall front cover until installation is complete.
4. Use a 17 mm socket to remove the 4 bolts that hold the wooden spacer blocks against the
sides of Powerwall. Remove all 4 wooden blocks.
5. Use a T30 Torx driver to remove the screws from the metal L-brackets and discard.
6. Use a 10 mm socket tool and the 2 provided M6 external hex bolts to secure Powerwall to the
lower tabs of the wall mount bracket. Torque to 7 Nm (62 in-lbs).
Step-by-Step Installation Instructions
Step-by-Step Installation Instructions 15