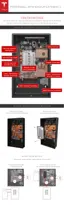
STEP 3 - INSTALL THE WALL MOUNT BRACKET
1. Drill the pilot holes to attach the wall mount bracket to the wall.
2. Install at least four washers and fasteners into the top part of the bracket and two washers
and fasteners into the bottom of the bracket. There must be at least one fastener in each of
the six mounting hole rows. Install the fasteners in the order shown in the numbered image.
3. Verify that the bracket is
firmly attached to the wall.
4. For easier alignment while lifting, use tape or a pencil to mark the wall at the height of the
bracket lip on the outside edges of the intended mount point.
Step-by-Step Installation Instructions
Step-by-Step Installation Instructions 13