6
27. ASPECT Change aspect ratio of the video, default is Auto.
28. V.F. Change the video format of the video.
29. TIMER See an overview and/or edit the timer schedule
2.4 Installing the batteries
Fig. 3
Open the cover on the remote control and insert 2x AAA type batteries into the compartment.
Observe correct polarity of the batteries when inserting. A terminal diagram is shown inside the
compartment.
1. Remove the cover.
2. Insert the batteries.
3. Place the cover.
2.5 Using the remote control and the IR extender.
Connect the external IR extender to the unit at the IR connector and place the sensor end somewhere
convenient, where it can be “seen” by the Remote Control, for example on the TV front panels bezel.
Use the provided double sided sticker.
Fig. 4
To use the remote control, point it towards the external IR extender. The remote control supports a
range of up to 5 meters distance to the receiver at an angle of up to approx. 30 degrees.
NOTE: Managing the receiver will be limited or not possible if there are obstacles
between the remote control sensor and the remote control. Direct sunlight
or very bright light can reduce or disturb the reception of the remote
control signals.
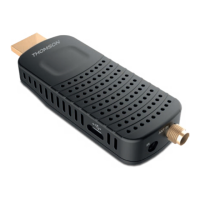
3.0 CONNECTION
3.1 Connecting to a terrestrial antenna
Fig. 5
To receive broadcast signal, your terrestrial indoor or outdoor antenna must be connected to the RF
IN connector of the receiver. Use a properly shielded antenna cable and suitable connectors.
Use the provided SMA to IEC adapter to connect your antenna.
3.2 Connecting to TV with HDMI extender cable or directly to HDMI port.
Fig. 5
The TV set can be connected with the receiver using the provided HDMI extender cable.
If enough spacing left between HDMI inputs and sufcient space is available to accommodate the
various cables, then the receiver can also be inserted directly in to an HDMI port of the TV. Proceed
with care, no physical tension should occur to the TV or receiver once inserted.
3.3 Connecting a USB storage device
Fig. 6
Note: We recommend the use of a hard disk drive USB 2.0 or higher for
recording and play back of TV events.
Use the provided Y-cable (USB-A female at one end, USB-A male and USB-micro to each of the legs).
Connect the USB A plug to the USB port on your TV that is suitable for supplying power to external
devices (5 V and 0.9 A) and connect the USB micro plug to the receiver.
The USB-S female can be used to connect an optional external HDD. The HDD will thus be powered
by the TV, not by the receiver.
For proper functioning of Timeshift and recording functions, a fast USB device (such as a hard
disk drive) is needed. Interrupted playback or a distorted picture during playback or Timeshift are