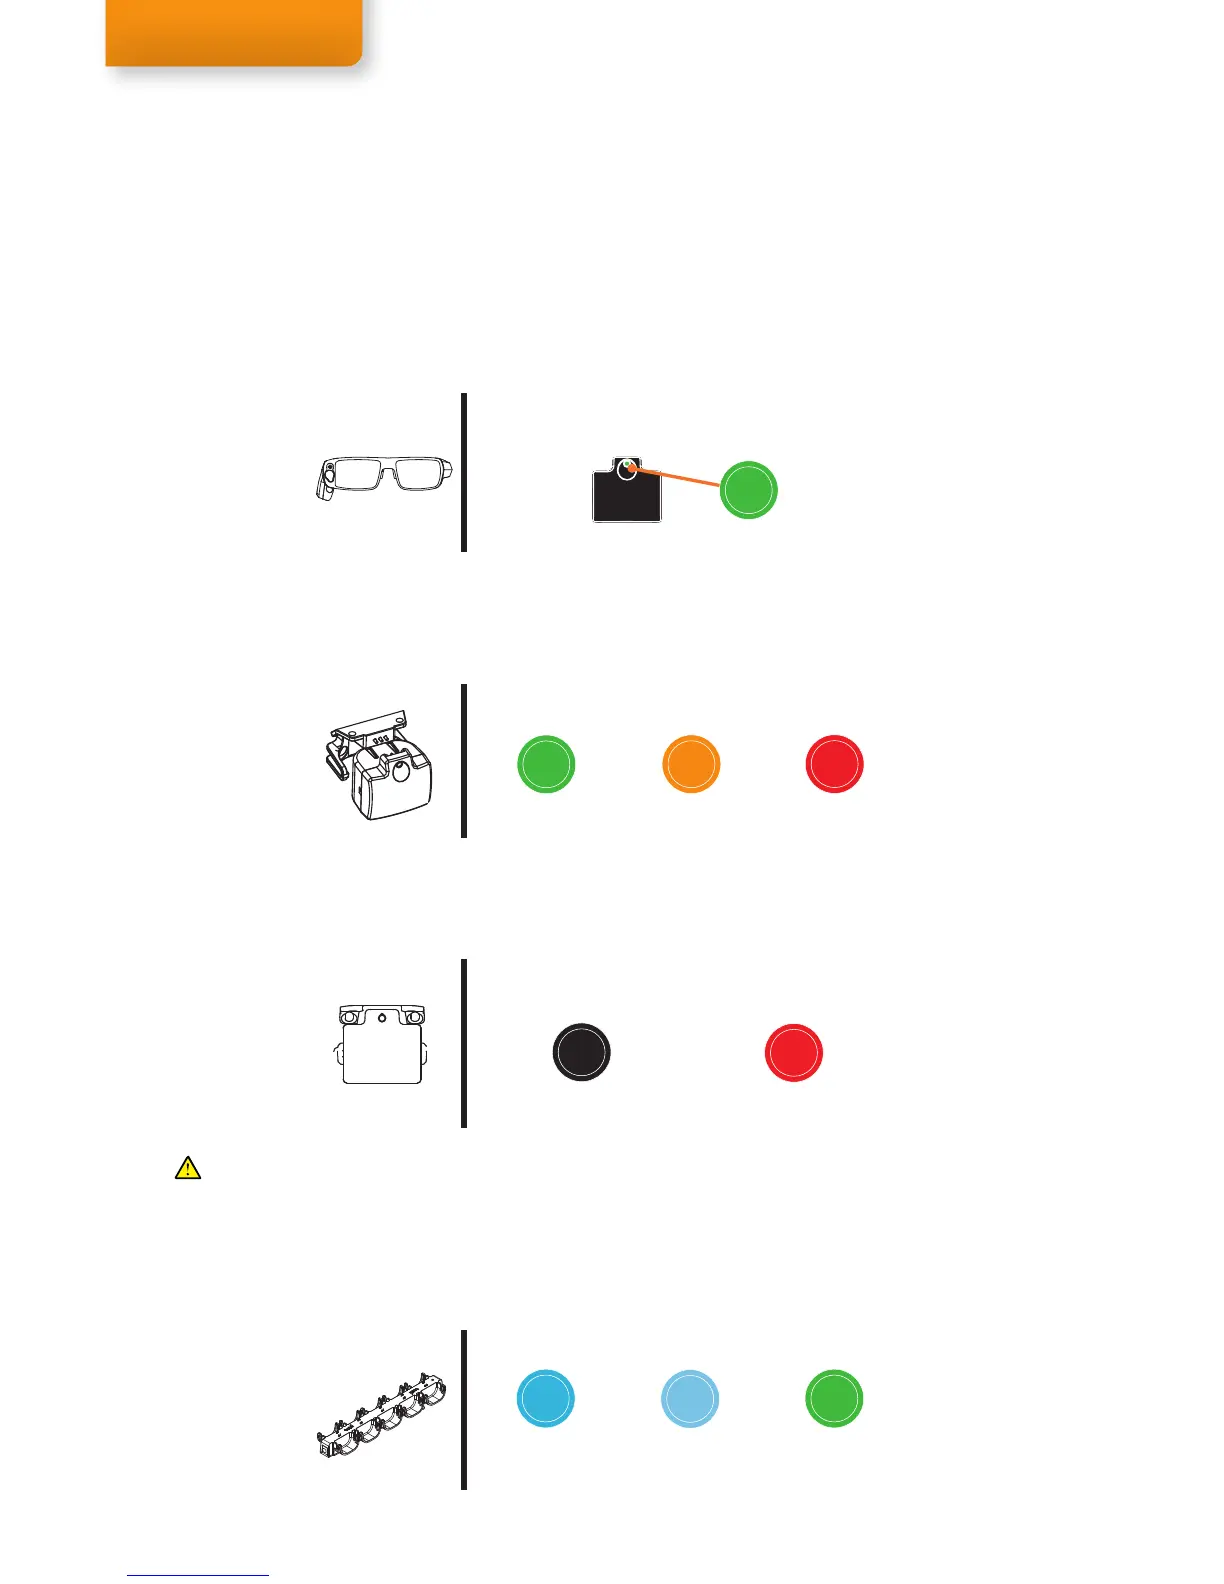
Green blinks 5x-1x
100-50% Charge
Orange blinks 2x
Less then 40% charge
Red blinks 1x
Less then 20% charge
Battery Status
(when placing the IR Marker in a Holder)
Calibration mode
(without a Holder, pair of active glasses detected)
Solid Green
IR Marker
IR Marker Holder mode
(connected to an IR Marker Holder)
No LED indication
IR Marker Holder mode active
Short blink every few seconds
Less than 20% charge
Solid Blue
0-50% charge
Fast charging
Solid Lighter Blue
50%-100% charged
Trickle charging
Solid Green
100% Charged
Trickle cycle completed
Charging status in the IR Marker Charger
If a pair of active glasses is present, the mode will not switch when placing or removing an IR Marker from a
Holder. To make an IR Marker switch to a different mode, cover the IR Marker or the IR Marker Sensor on the
glasses for a few seconds to allow the IR Marker to reconnect. The battery status is then displayed.
LED indicator
The LED indicator on an IR Marker indicates the state of the IR Marker. There are two IR Marker modes: Calibration
mode and IR Marker Holder mode.
Calibration mode
Calibration mode occurs when the IR Marker is not placed in an IR Marker Holder and a pair of active glasses
is within range. This mode is used to conduct a calibration. A solid green light indicates the glasses have been
recognized and a calibration signal is being transmitted by the IR Marker.
Green blinks 5x-1x
100-50% Charge
Orange blinks 2x
Less then 40% charge
Red blinks 1x
Less then 20% charge
Battery Status
(when placing the IR Marker in a Holder)
Calibration mode
(without a Holder, pair of active glasses detected)
Solid Green
IR Marker
IR Marker Holder mode
(connected to an IR Marker Holder)
No LED indication
IR Marker Holder mode active
Short blink every few seconds
Less than 20% charge
Solid Blue
0-50% charge
Fast charging
Solid Lighter Blue
50%-100% charged
Trickle charging
Solid Green
100% Charged
Trickle cycle completed
Charging status in the IR Marker Charger
If a pair of active glasses is present, the mode will not switch when placing or removing an IR Marker from a
Holder. To make an IR Marker switch to a different mode, cover the IR Marker or the IR Marker Sensor on the
glasses for a few seconds to allow the IR Marker to reconnect. The battery status is then displayed.
Battery Status
To check the battery status of an IR Marker, just connect it to a Holder and observe the LED indicator. It will briefly
show the battery status with colored blinks before going into the IR Marker Holder mode. For example, 5 green
blinks indicates the IR Marker is fully charged and 3 blinks shows it has about 75% battery left. When the LED
shows an Orange or Red light you should consider charging it before starting a study.
Charging Status
When the IR Markers have been placed in a charger, the LED will indicate the charging status. Trickle Charging is a
slow battery-preserving charging cycle that will always take about 5-6 hours, even when the IR Marker are already
charged when placing them in the charger. When this cycle is completed the IR Markers will show a full green light.
Green blinks 5x-1x
100-50% Charge
Orange blinks 2x
Less then 40% charge
Red blinks 1x
Less then 20% charge
Battery Status
(when placing the IR Marker in a Holder)
Calibration mode
(without a Holder, pair of active glasses detected)
Solid Green
IR Marker
IR Marker Holder mode
(connected to an IR Marker Holder)
No LED indication
IR Marker Holder mode active
Short blink every few seconds
Less than 20% charge
Solid Blue
0-50% charge
Fast charging
Solid Lighter Blue
50%-100% charged
Trickle charging
Solid Green
100% Charged
Trickle cycle completed
Charging status in the IR Marker Charger
If a pair of active glasses is present, the mode will not switch when placing or removing an IR Marker from a
Holder. To make an IR Marker switch to a different mode, cover the IR Marker or the IR Marker Sensor on the
glasses for a few seconds to allow the IR Marker to reconnect. The battery status is then displayed.
IR Marker Holder mode
IR Marker Holder mode occurs when the IR Marker is connected to an IR Marker Holder. The IR Marker transmits
the unique ID of the IR Marker Holder to the glasses, used to define Areas Of Analysis. The LED indicator is off in
order to remain unobtrusive during a test. The LED will blink red shortly when the battery is low (<20% charge).
If a pair of active glasses is present, the mode will not switch when placing or removing an IR Marker from a
Holder. To make an IR Marker switch to a different mode, cover the IR Marker or the IR Marker Sensor on the
glasses for a few seconds to allow the IR Marker to switch between modes. The battery status will show first.
 Loading...
