What to do if my Toro procore sr54 Lawn and Garden Equipment machine does not turn?
- GgarzaallenSep 4, 2025
If the machine does not turn, ensure that the PTO, driveshaft, and drive chains are working properly.
What to do if my Toro procore sr54 Lawn and Garden Equipment machine does not turn?
If the machine does not turn, ensure that the PTO, driveshaft, and drive chains are working properly.
How to prevent damage to the camber bracket on my Toro procore sr54?
To prevent damage to the camber bracket, do not store the aerator on the ground with tines installed, and do not run the coring head at high speed for an extended time when the tines are out of the ground.
How to deal with soil that's too hard for full penetration with my Toro Lawn and Garden Equipment?
If the soil is too hard for full penetration with your Toro Lawn and Garden Equipment, aerate at a depth that the machine can achieve. Then, water the soil overnight, and increase the depth. Repeat this process if needed until you can aerate the soil at the desired depth.
Why is my Toro Lawn and Garden Equipment noisy or knocking?
If your Toro Lawn and Garden Equipment is noisy or knocking, the crank pin nut may have vibrated loose, the chains may be too loose or the bolts on the bottom of the frame at the rear of the main arm may have vibrated loose. Also, check the oil level in the gearbox.
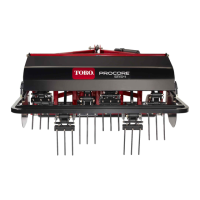
What to do if coring tines are breaking on my Toro Lawn and Garden Equipment?
If the coring tines are breaking on your Toro Lawn and Garden Equipment, it means you are trying to get too much depth for the soil condition. Aerate to a shallower depth.
What to do if tines produce elongated or picking holes with my Toro Lawn and Garden Equipment?
If the tines on your Toro Lawn and Garden Equipment are producing elongated or picking holes, adjust the angle of the tine or change the traction unit ground speed. Also, make sure that you can lower the aerator at least 5 cm (2 inches) below flat ground level to allow for undulation.
Brand | Toro |
---|---|
Model | procore sr54 |
Category | Lawn and Garden Equipment |
Language | English |
Identifies where to find the model and serial numbers on the aerator for service and registration.
Explains the meaning and importance of the safety-alert symbol used throughout the manual.
Essential safety rules for operating the aerator to prevent personal injury.
Information on identifying, understanding, and maintaining safety decals on the machine.
Warning about the danger of the rotating driveline and necessary safety precautions.
Warning indicating the machine must not be operated with any missing safety shields.
Explanation of various safety icons including entanglement, crushing, and falling hazards.
Alerts users to pinch points and the need to keep hands and feet away from moving parts.
Illustrates the decal used for setting the aerator's tine depth.
Warning concerning cancer and reproductive harm as required by California law.
Chart detailing loose parts shipped with the aerator and their purpose during setup.
Step-by-step instructions for safely removing the aerator from its shipping crate.
Procedure for attaching the aerator's lower link arms to the traction unit.
Instructions for connecting the hydraulic top link for specific aerator models.
Steps for connecting hydraulic hoses, couplings, and checking for leaks.
Detailed steps for mounting the depth gauge assembly onto the top link cylinder.
Procedure for connecting the spring-loaded top link to the traction unit.
Steps to check and adjust the hydraulic top link for proper tine head positioning.
Procedure to check the PTO angle and make adjustments if necessary.
Instructions for correctly fitting the PTO shaft to the aerator and traction unit.
Detailed steps for measuring and adjusting PTO shaft length for proper fit.
Final steps for fitting PTO shaft, including cutting and installing the PTO shield.
Procedure for mounting the PTO shield to the aerator gearbox.
Instructions for securely connecting the PTO shaft to the traction unit.
Procedure for adjusting sway links to center the aerator.
Steps to ensure the aerator is level side-to-side using a leveling tool.
Detailed instructions for installing various types of tines onto the aerator.
Procedure for adjusting the aerator's tine depth based on model specifications.
Steps for securely mounting the rear guard onto the aerator.
Instructions for preparing models SR54 and SR70 by removing storage stands.
Procedure for preparing model SR72 by removing its storage stands.
Steps for installing the latch lock mechanism, primarily for CE models.
Instructions for applying CE and production year decals next to the serial plate.
Table detailing key specifications for different ProCore aerator models.
Information on compatible Toro approved attachments and accessories.
Essential safety procedures to follow before starting the aerator.
Explanation of the aerator's mechanical function and how it creates holes.
Guidance on setting the correct PTO speed for optimal aerator performance.
Advice on conducting a training period to familiarize with the aerator's handling.
Steps for inspecting the operation area and preparing for aeration.
Crucial safety precautions to adhere to while operating the aerator.
Critical safety guidelines for operating the aerator on sloped terrain.
Step-by-step instructions for effective aeration and desired turf finish.
Explanation of the subsoil cultivation process achieved by the aerator's action.
Recommendations for aerating when the ground is hard or dry.
Considerations and adjustments for using longer or larger tines on the aerator.
Procedure to adjust the tine angle for specific aerator models based on tine length.
Procedure for setting the tine angle for the SR72 model using predetermined positions.
How to adjust tine depth for SR54-S and SR70-S models via rear roller adjustment.
Procedure to increase or decrease tension on the head return springs.
Guidelines for safely transporting the aerator, including speed limits.
Practical advice for efficient and effective aerator use in various conditions.
Safety measures to take after completing aerator operation.
Steps for thoroughly cleaning and inspecting the aerator after each use.
A schedule outlining required maintenance tasks at different service intervals.
Critical safety precautions to follow before and during machine maintenance.
Guidelines for safely lifting the aerator for maintenance or attachment changes.
Instructions for lubricating PTO shaft joints and roller bearings at specified intervals.
Details on the correct gearbox oil and procedures for checking the oil level.
Step-by-step guide for draining and refilling the aerator gearbox with oil.
Procedures for inspecting the drive chain for wear and adjusting its tension.
Instructions for adjusting the PTO clutch to prevent slipping or ensure proper engagement.
Table listing torque specifications for critical fasteners on the aerator.
Step-by-step guide for safely detaching the aerator from the traction unit.
Procedure to inspect springs for damage that could affect hole pattern.
Explanation of how forward and lateral hole spacing is determined and adjusted.
Lists common issues with the aerator and provides solutions for each.
Safety precautions to follow when storing the aerator to prevent accidents.
Recommended preventative maintenance steps for long-term storage.
Toro's privacy policy regarding the use of personal information for EEA/UK customers.
Detailed explanation of California's Proposition 65 warning requirements and Toro's stance.
Details on what the Toro warranty covers, exclusions, and how to obtain service.
Owner's responsibilities for maintenance and services not covered by warranty.
Covers general warranty terms, limitations, and information for international customers.