18 Air/flue pipe installation manual 8000026412_01
5.5.3 Securing the telescopic pipe
1. Set the telescopic wall duct to the correct length.
– Note that the TOP symbols at both ends must point
upwards.
Danger!
Risk of poisoning due to escaping flue
gas.
Flue gas can escape if a flue pipe is dam-
aged.
▶ Only use the self-tapping screw provided.
2. Secure the air pipes to each other by screwing the
overlapping air pipes together using the supplied self-
cutting screws (1) on the underside.
3. Seal the gap on the telescopic air pipe using the sup-
plied adhesive tape (2).
5.5.4 Installing the wall duct
1. Drill a hole.
– Diameter: 110 mm
2. Push the air/flue pipe from outside and through the wall
and the terminals.
3. Pull the wall duct out to the required depth.
4. Use the locking screws to secure the wall duct.
– Use at least three of the six holes (1) that are avail-
able in the terminals to secure the flue pipe.
5. Install the collar.
6. Before you install the boiler, check that the wall duct is
safely secured in place.
7. Seal the installation gap using a suitable material (e.g.
mortar).
8. Install the boiler (→ Installation instructions for the boil-
er).
5.6 Installing terminal sets for 60/100 mm
diameter air/flue systems
5.6.1 Black terminal set – 0020219537
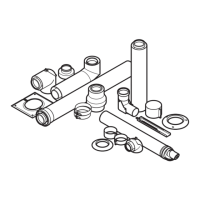
5.6.1.1 Scope of delivery
1 Collar
2 Terminal piece
3 End pipe
5.6.1.2 Installing the black terminal (change of
colour)
Note
You must install the terminal sets before installing
the flue pipework.
Condition: Terminal secured using screws
▶ Undo the lateral screws.
1. Detach the terminal with the flue pipe by pushing the
air pipe to the floor.
Note
You cannot reuse the terminal as detaching
the terminal damages the latching lugs in
the terminal.
2. Pull the terminal from the air pipe together with the flue
pipe.