8000026412_01 Air/flue pipe installation manual 23
5.7.2 Shortening the air/flue pipe
1. Flue system to the rear
2. Flue system to the side
A Clearance to the ex-
ternal wall
B Clearance to the in-
ternal wall: 125 mm
1. Measure the clearance (A) from outside of the wall to
the centre of the connector.
2. Remove the flue pipe from the air pipe.
3. Shorten the flue pipe and the air pipe by the same
amount.
Condition: Additional extensions and elbows required
▶ Install the extensions. (→ Section 5.19.2)
– All of the sleeves for the flue pipe must point towards
the terminal.
▶ Install the elbows (→ Section 5.19.4).
5.7.3 Installing the wall duct
1. Drill a hole.
– Diameter: 125 mm
Note
If the wall duct can be accessed from the
exterior of the building, you can drill the hole
with a diameter of 110 mm and install the
collar from outside.
2. Slide the air/flue pipe (1) with the flexible collar through
the wall.
3. Pull the air/flue pipe back until the collar forms a tight
seal on the external wall.
4. Secure the air/flue pipe with mortar and leave the mor-
tar to harden.
5. Install the collar on the inside of the wall.
6. Connect the wall/roof duct to the product using exten-
sions, elbows and, if required, a sliding sleeve, see
"Connecting the product".
5.7.4 Installing the roof duct
▶ Insert the air/flue pipe (1) into the dormer.
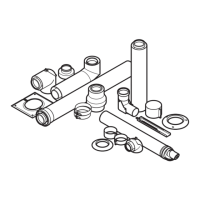
5.7.5 Connecting the product
1. Install the product (7) – see the installation instructions
for the product.
2. Connect the 87° elbow (1) to the connector for the
air/flue pipe (6).
3. Fit the sliding sleeve (3) with the sleeve as far as it will
go onto the wall/roof duct (4) or the extension (5).
4. If required, install the extensions .
5. Connect the sliding sleeve to the 87° elbow.
6. Install the air pipe clamp (2) for the sliding sleeve.