24 Air/flue pipe installation manual 8000026412_01
7.
Alternatives 1:
Condition: Wall/roof duct without extension
▶ Install the sliding sleeve. (→ Section 5.19.1)
7.
Alternatives 2:
Condition: Wall/roof duct with extension
▶ Install the extensions. (→ Section 5.19.2)
▶ Install the elbows (→ Section 5.19.4).
▶ Install the sliding sleeve. (→ Section 5.19.1)
▶ Connect all of the pipe joints with air pipe clamps.
(→ Section 5.19.5)
5.8 Direct, rear wall duct – 303933 – 0010035512
– 60/100 mm diameter
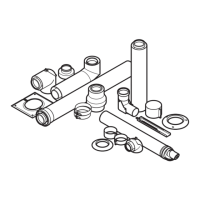
5.8.1 Scope of delivery
1 Collar, 100 diameter (2
pcs)
2 Horizontal wall/roof duct
3 48 mm clamp
4 87° elbow
5 30 mm clamp
Note
Not all components are required for the installa-
tion.
5.8.2 Determining the pipe length and the location
of the wall duct
1. Determine the pipe length (→ Installation instructions
for the boiler) and define the location of the wall duct.
2. Measure the clearance Y from the external wall to the
installation surface for the boiler.
3. Set the required pipe length:
– At least: Y + 24 mm
– Maximum: Y + 28 mm
– If you install the collar outside, add 12 mm to the
total pipe length.
– If the terminal is below a roof overhang or a ho-
rizontal surface, you can pull the wall duct up to
500 mm out of the wall in order to guarantee that
the flue gases are extracted without any obstruc-
tions.
5.9 Horizontal wall duct – 0010024718 –
diameter 60/100 mm
5.9.1 Scope of delivery 0010024718
1 Collar, 100 diameter (2
pcs)
2 Horizontal wall/roof duct
3 87° adapter for connect-
ing the variable terminal
set (VTK)
4 Screws (4 pcs)
5 48 mm clamp
6 87° elbow
7 30 mm clamp
5.9.2 Shortening the air/flue pipe
1. Determine the clearance to the external wall.
(→ Section 5.1.2.2)
2. Shorten the air/flue pipe to the required length.
– If you install the collar outside, add 12 mm to the
total pipe length
– Shorten the air pipe at the opposite end to the ter-
minal.
– Shorten the flue pipe at the opposite end to the
lock.
3. Deburr the sawn-off pipe end in order to prevent dam-
age the seal when installing the flue pipe.
4. Slide the flue pipe into the air pipe.
– Ensure that the flue pipe's recess snaps into place
in the air pipe's latching lug.