20
7. BALANCING THE UNIT
7.1 WHAT YOU NEED TO BALANCE THE UNIT
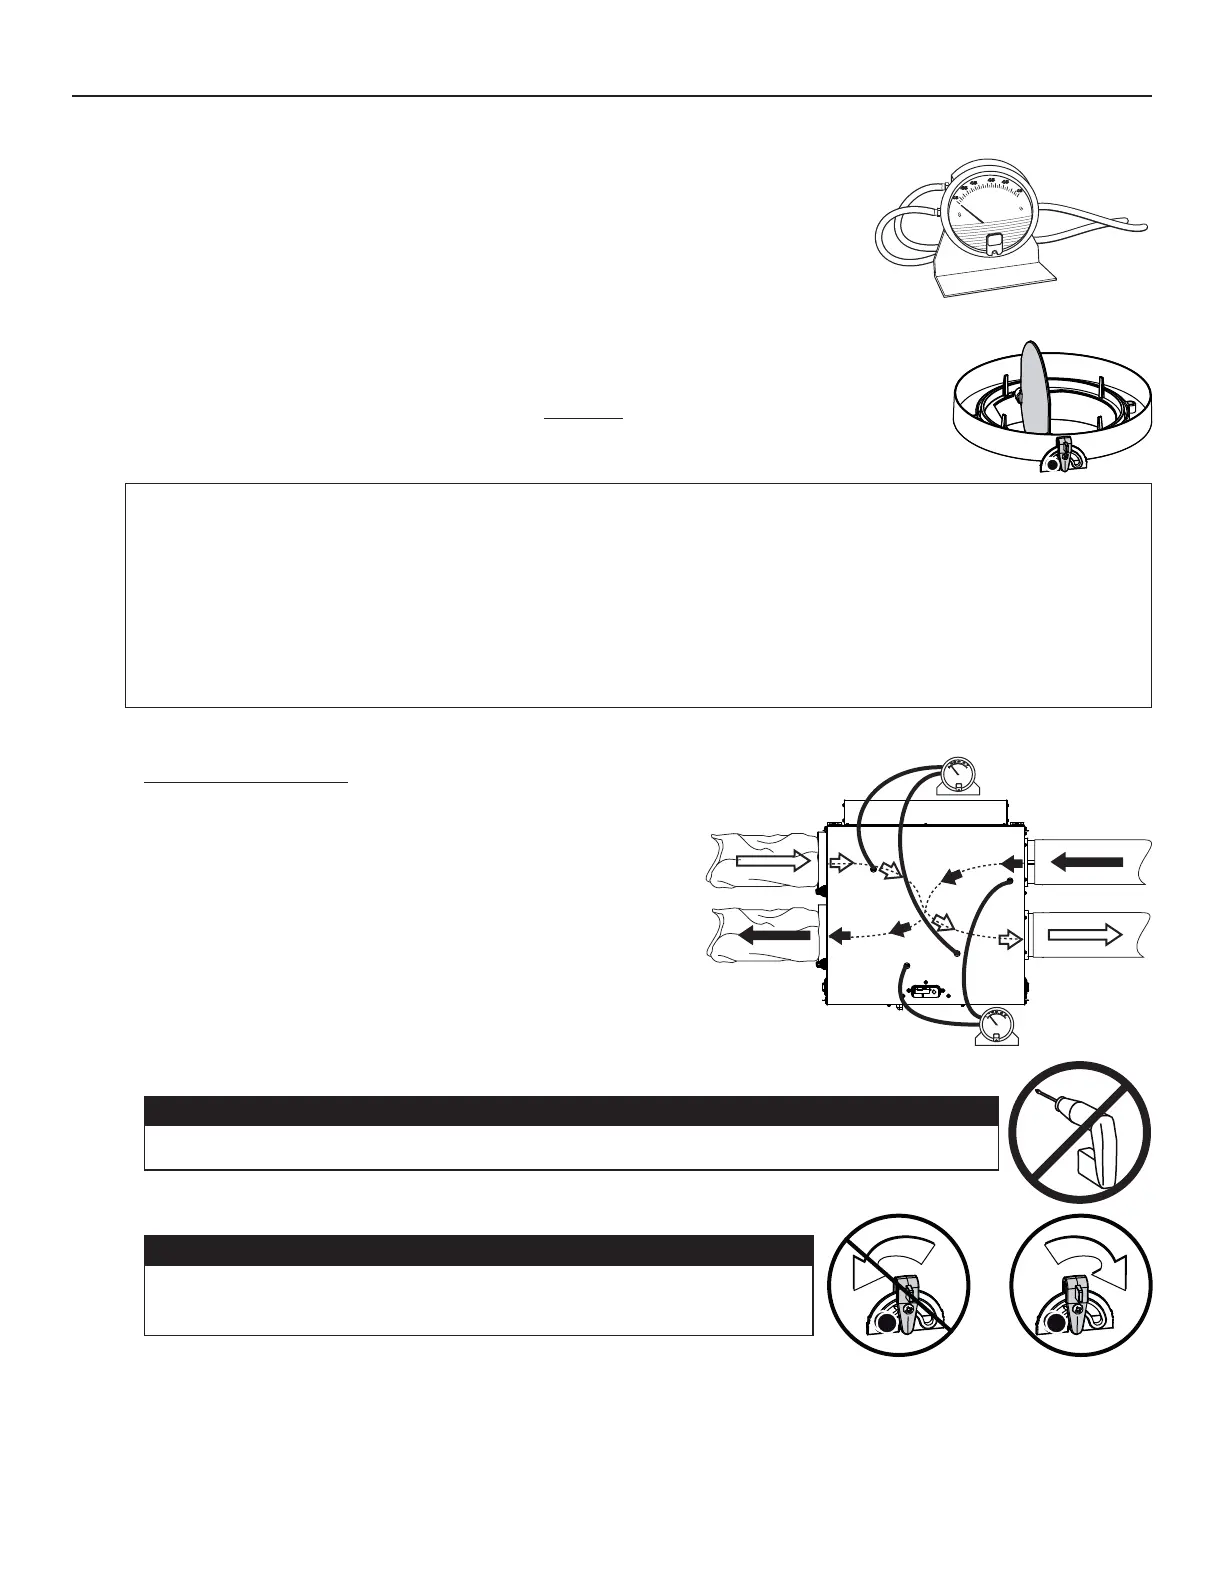
• A magnehelic gauge capable of measuring 0 to 0.5 inch of water (0 to 125 Pa) and 2 plastic
tubes.
• The balancing chart located on the unit door.
7.2 PRELIMINARY STAGES TO BALANCE THE UNIT
• Seal all the unit ductwork with tape. Close all windows and doors.
• Turn off all exhaust devices such as range hood, dryer and bathroom fans.
• Make sure the integrated balancing dampers are fully open. Both are located on the Exhaust air to
outside port and on Fresh air from outside port (see step 2.2).
• Make sure all filters are clean (if it is not the first time you balance the unit).
7.3 BALANCING PROCEDURE
1. Set the unit to high speed.
Make sure that the furnace/air handler blower is ON if the installation is
in any way connected to the ductwork of the cold air return. If not, leave
furnace/air handler blower OFF.
2. Place the magnehelic gauge on a level surface and adjust it to zero.
3. Connect tubing from gauge to exhaust air flow pressure taps and fresh
airflow pressure taps (see diagram at right).
Be sure to connect the tubes to their appropriate high/low fittings. If the
gauge drops below zero, reverse the tubing connections.
4. Measure both flows; adjust higher flow to equal the lower one, using
balancing damper lever.
5. Secure both damper levers in place using their locking screw, then shut all the pressure taps with the small plastic plugs included
in the hardware kit.
6. Write the required air flow information on a label and stick it near the unit for future reference (date, maximum speed air flows,
your name, phone number and business address).
NOTE: The unit is considered balanced even if there is a difference of ±10 cfm (or ± 5 l/s or 17 m³/h) between the two air flows.
VP0009
VJ0116
EXHAUST AIRFLOW
FRESH AIRFLOW
LOW
HIGH
LOW
HIGH
VP0025A
VD0333
CAUTION
Make sure to turn the damper lever to the right direction (opposite to its
stopper, see illustration at right). Securing the lever in wrong position may
cause freezing into the unit.
CAUTION
When loosing or tightening the damper lever locking screw, never use an electric screwdriver or
drill, use a standard screwdriver.
Make sure the unit is not running in defrost mode while balancing.
When the outdoor temperature is below 0°C/32°F, the defrost mode can be activated. During defrost cycle, it is not possible to
balance the unit since there is no flow in one direction.
To cancel the defrost cycle, use the auxiliary control or jump OC-OL on unit terminal block; this will set the unit on high speed
ventilation without defrost for the next 20 minutes. Once the 20 minutes of high speed ventilation is completed, the unit will
perform an extended defrost. If installed, do not forget to remove the jumper between OL and OC on terminal block.
Another way to avoid the defrost cycle is to wait 10 minutes after plugging the unit in; this procedure ensures that the unit is not
in a defrost cycle.
NOTE: Most of vänEE and Venmar units start in defrost mode within the first minute of operation.



 To Next Page