INSTRUCTION FOR USE ENGLISH
7
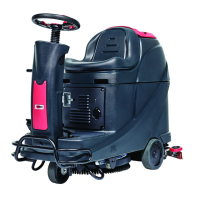
CONTROL PANEL (as shown in Figure 2)
31. Discharged battery warning light (red)
32. Semi-discharged battery warning light (yellow)
33. Charged battery warning light (green)
34. Flow increase switch
35. Solution flow indicator
36. Flow decrease switch
37. Brush/pad-holder release switch
38. Normal vacuum motor model
39. One button starting
40. ECO mode
41. Serial number plate/technical data
42. Charging red LED
43. Charging yellow LED
44. Charging green LED
45. Skirt (*)
46. Brush
47. Pad-holder (*)
(*): Optional
Figure 2
31 32
33
34
36
35
40
39
38 37
41
42
43
44
46
47
45
DISPLAY WINDOW OF CHARGER INDICATON LIGHT (as shown in Figure 2)
1. At the beginning of charging, the red LED (42) of charger is normally on. It is the first stage of charging.
2. After charging some time, the red LED (42) turns off, the yellow LED (43) turns on, this is the second stage
of charging.
3. After the charging is finished, the yellow LED (43) is off, the green LED (44) turns on to indicate that the
battery is fully charged.
NOTE
When charging, if the yellow LED (48) of charger is flashing, it may be caused by: Battery
and charger does not match, battery is not connected well, or output is short-circuited.
The red LED of charger flashing may be caused by charger internal short circuit.
 Loading...