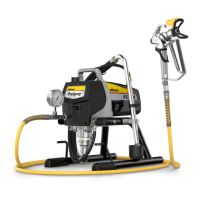
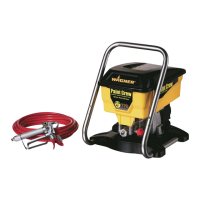
10 ProSpray 3.20
GB
Cleaning the unit (shutting down) Remedy in case of faults
Type of malfunction
A. Unitdoesnotstart
B. Unitdoesnotdrawinmaterial
C. Unitdrawsinmaterial,butthe
pressure does not build up
D. Coating material exits at the top of
the uid section
E. Increased pulsation at the spray
gun
F. Poor spray pattern
G. Unitlosespower
H. Pump over-pressurizes and will not
shut o.
Possible cause
1. No voltage applied.
2. Pressure setting too low.
3. ON/OFF switch defective.
1. ReliefvalveissettoSPRAY(p spray).
2. Filter projects over the uid level and
sucks air.
3. Filter clogged.
4. Suction hose/suction tube is loose, i.e.
the unit is sucking in outside air.
1. Tip heavily worn.
2. Tip too large.
3. Pressure setting too low.
4. Filter clogged.
5. Coating material ows through the
return hose when the relief valve is in
theSPRAY(p spray) position.
6. Packings sticky or worn.
7. Valveballsworn.
8. Valveseatsworn.
1. Upperpackingisworn.
2. Piston is worn.
1. Incorrect high-pressure hose type.
2. Tip worn or too large.
3. Pressure too high.
1. Tip is too large for the coating
material which is to be sprayed.
2. Pressure setting incorrect.
3. Volumetoolow.
4. Coating material viscosity too high.
1. Pressure setting too low.
1. Pressure switch defective.
2. Transducer defective.
Measures for eliminating the malfunction
1. Check voltage supply.
2. Turn up pressure control knob.
3. Replace.
1. Set relief valve to PRIME (k circulation).
2. Rell the coating material.
3. Clean or replace the lter.
4. Clean connecting points. Replace O-rings if necessary.
Secure suction hose with retaining clip.
1. Replace
2. Replace tip.
3. Turn pressure control knob clockwise to increase.
4. Clean or replace the lter.
5. Remove and clean or replace relief valve.
6. Remove and clean or replace packings.
7. Remove and replace valve balls.
8. Remove and replace valve seats.
1. Remove and replace packing.
2. Remove and replace piston.
1. Only use WAGNER original-high-pressure hoses in order
to ensure functionality, safety and durability.
2. Replace tip.
3. Turn pressure control knob to a lower number.
1. Replace tip.
2. Turn pressure control knob until a satisfactory spraying
pattern is achieved.
3. Clean or replace all lters.
4. Thinoutaccordingtothemanufacturer’sinstructions.
1. Turn pressure control knob clockwise to increase.
1. Take unit to a Wagner authorized service center.
2. Take unit to a Wagner authorized service center.
9. Remedy in case of faults
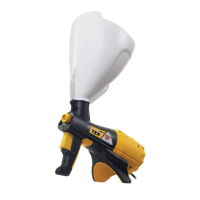
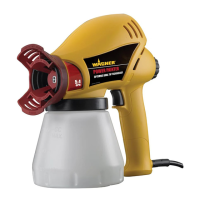
8.3 Cleaning Airless spray gun
1. Rinse Airless spray gun with an appropriate cleaning agent.
2. Clean tip thoroughly with appropriate cleaning agent so that
no coating material residue remains.
3. Thoroughly clean the outside of the Airless spray gun.
Intake lter in Airless spray gun (Fig. 7)
Disassembly
1. Pull protective guard (1) forward vigorously.
2. Screw grip (2) out of the gun housing. Remove intake lter (3).
3. Intake lter congested or defective – replace.
Assembly
1. Place intake lter (3) with the long cone into the gun housing.
2. Screw in grip (2) into the gun housing and tight en.
3. Slot in protective guard (1).
1
2
3